PLEASE READ THIS LICENSE CAREFULLY. By using the software supplied with this licence (the “Software”) you agree to be bound by the terms of this licence.
This is a license, this product is not sold.
THIS IS A NON TRANSFERABLE LICENSE, granted to the end user, by MICROBASE ASIA PACIFIC PTY LTD ACN 612 203 451 (hereinafter called MICROBASE) with its mailing address at PO Box 1484, Fremantle, Western Australia. 6959. The software marketed as AUTOMATION PREMIUM is licensed to you as the user. It is not sold.
I. COPYRIGHT INFORMATION
Australian copyright laws and international copyright treaties protect this software program, and any documentation. By using this software, you acknowledge that you have read, understood, and agree to be bound by the provisions of this license.
II. LICENSE, COPY AND USE RESTRICTIONS
MICROBASE licenses (not sells) the AUTOMATION software to the end user, for use on any computer for which the software was designed. This means that MICROBASE allows you to use the software on a single machine. You may not use the software in a multiple computer, multi-user, or network arrangement without prior consent from MICROBASE.
You may not remove the MICROBASE copyright notices from any manuals or software provided. All copies, together with the original, must be kept in control of the location it is provided to.
You may not make any changes or modifications to the software, you may not delete any of the files contained in the software, and you may not decompile, disassemble, or otherwise reverse engineer the software. The software is not for sale. You are not to sublicense, rent, lend, lease, donate, sell, loan, pledge, transfer, or distribute copies.
III LIMITED WARRANTY
1.0MICROBASE warrants that the media on which the software is recorded and the documentation provided with it are free from defects in materials and workmanship under normal use. MICROBASE warrants that the software itself will perform substantially in accordance with the specifications set forth in the documentation provided with it.
1.1The above express warranties are made for a period of 3 months from the date the software is delivered to you as the user.
Obligations of MICROBASE during the warranty period:
1.2MICROBASE will replace any media, which proves defective in materials or workmanship, without additional charge or on an exchange basis.
1.3MICROBASE will either replace or repair without additional charge, any software that does not perform in substantial accordance with the specification in the documentation. Delivering to you a corrected copy of the software or corrective code will do this.
1.4If MICROBASE is unable to replace defective documentation or defective media or if MICROBASE is unable to provide a corrected copy of the software or documentation within a reasonable time, MICROBASE will refund the license fees paid for use of the software.
Exclusion and Disclaimer of Other Warranties:
1.5MICROBASE does not warrant that the functions contained in the software will meet your requirements or that the operation of the software will be uninterrupted or error free. The warranty does not cover any media or documentation, which has been subject to damage, or abuse by you. The software warranty does not cover any copy of the software, which has been altered or changed in any way by you or others. MICROBASE is not responsible for problems caused by changes in the operating characteristics of the computer hardware or operating system, which are made after the delivery of the software.
1.6EXCEPT AS SPECIFICALLY PROVIDED HEREIN, MICROBASE MAKES NO EXPRESS OR IMPLIED WARRANTIES WHATSOEVER, AND EXPRESSLY DISCLAIMS THE IMPLIED WARRANTIES OF MERCHANT ABILITY AND FITNESS FOR A PARTICULAR PURPOSE.
IN THE CASE OF A USER OF THE SOFTWARE WHO IS A CONSUMER WITHIN THE MEANING OF THE TRADE PRACTICES ACT:
(i) Except for any other conditions or warranties issued in writing by MICROBASE and except for those conditions and warranties implied by the Trade Practices Act or other sale of goods or consumer protection legislation which may not be excluded you agree that there are no additional implied conditions or warranties herein or collateral contracts herewith (except such as may be in writing and signed by a duly authorised representative of MICROBASE);
(ii) to the extent that the goods or services the subject of these provisions are goods or services of a kind not ordinarily acquired for personal, domestic or household use or consumption (within the meaning of the Trade Practices Act) the liability of MICROBASE to you for breach of warranty or condition (other than a warranty or condition implied by section 69 of the Trade Practices Act) or for breach of any duty of care shall in all cases be limited at the option of MICROBASE in the case of goods to any one or more of the replacement of the goods or the supply of equivalent goods, the repair of goods, the payment of the cost of replacing the goods or of acquiring equivalent goods or the payment of having goods repaired and in the case of services to the supplying of services again or the payment of the cost of having the services supplied again and (without limiting the foregoing) shall not include any liability in respect of or arising out of or in connection with any special consequential direct or indirect loss, damage, harm or injury suffered or incurred as a result of such breach.
Your obligations under the Warranties:
1.7You must call MICROBASE’s support line for an authorisation to return any defective item during the warranty period. If MICROBASE's customer service representative is unable to correct your problem by telephone, you will be provided with a return authorisation number and an address for returning the defective item for warranty service or replacement. You must insure any defective item being returned because MICROBASE does not assume the risk of loss or damage while in transit.
Other Conditions:
1.8The warranties set forth above are in lieu of all other express and implied warranties, whether oral, written, or implied, and the remedies set forth above are your sole and exclusive remedies. Only an officer of MICROBASE may make modifications to this warranty, or additional warranties binding to MICROBASE. Accordingly, additional statements such as advertising or presentations, whether oral or written, do not constitute warranties by MICROBASE and should not be relied upon as such. This warranty gives you specific legal rights, and you may also have additional rights, which may vary from country to country.
IV. LIMITATION OF LIABILITY
TO THE MAXIMUM EXTENT PERMITTED BY APPLICABLE LAW MICROBASE AND ITS SUPPLIERS SHALL NOT, IN ANY EVENT, BE LIABLE FOR SPECIAL, INCIDENTAL, CONSEQUENTIAL, INDIRECT, OR OTHER SIMILAR DAMAGES, EVEN IF MICROBASE OR ITS SUPPLIERS HAS BEEN ADVISED OF THE POSSIBILITY OF SUCH DAMAGES. In no event shall MICROBASE’s liability exceed the license fees paid for the right to use the licensed software.
V. INTEGRATION
This license including the full text of the Limited Warranty and the Limitation of Liability, constitutes the entire agreement and understanding between the parties and supersedes any prior license or understanding whether oral or written, relating to the subject of this license. This license may only be modified by a written agreement signed by Microbase Pty Ltd.
You may use the software as long as you like provided you do not violate the copyright and you follow the above rules.
Title to the software, related documentation, and any copies are retained by MICROBASE ASIA PACIFIC PTY LTD.
Copyright © 2016 Microbase Asia Pacific Pty Ltd. All rights reserved
Microbase Asia Pacific Pty Ltd
PO Box 1484
Fremantle
Western Australia 6959
Automation Premium has taken many years to develop. The application offers a level of control that will put you firmly in the driver’s seat of your business by providing a fully comprehensive solution literally at your fingertips.
To ensure we meet industry needs this software has been designed in consultation with mechanics, service advisers and accountants. Functionality allows you to communicate with your customers more effectively, maintain full service histories, track technician’s productivity, and produce valuable marketing reports as well as keep the accounts in order.
Automation Premium is built for the busy repair shop that does not want to waste valuable time navigating cumbersome hard to learn packages. The software is extremely powerful yet easy to understand. There are separate client and vehicle records, automatic service reminder generation, and even retrieval of parts information for vehicles previously worked on.
You will find Automation will generate more work by recording vehicle faults reported and pasting them to any subsequent invoice. The client form lists all transactions and communications for each individual client in an easy to understand format. Job card design allows for speedy data entry, labour can be allocated to individual technicians to track productivity – You can even set up individual technicians’ incentives.
The report module gives you both demographic and financial information in statistical and graphical formats. The package provides you with a fully integrated task manager allowing you to set up appointments and client contacts. Automation Premium has full stock control capabilities, including sales reports by categories or individual items. You can even run reorder reports for specific suppliers based on minimum / maximum stock requirements. Attaching a USB hand scanner gives the operator the ability to scan barcodes for entry of items directly onto the job card.
Automation allows you to track inventory, job and expense purchases by supplier giving you the ability to run a GST report and tax report which provides the essential information for you to complete your business activity statement.
Our comprehensive double entry accounting package includes accounts receivable, accounts payable, general ledger and bank reconciliation. You can export any report including a transaction log by account for your accountant to packages such as Microsoft Excel or Word.
Automation also has the added advantage of the user being able to work on-line or locally via the same user interface. On-line users are able to access an on-line job card using any peripheral device via a web browser.
When you keep books for a business or organisation, you want to track where your income comes from, where you put it, what your expenses are for, and what you use to pay them. You track this flow of money through a list of accounts called the chart of accounts. Accounts include the following:
Balance sheet accounts
Income accounts
Expense accounts
Cost of goods sold accounts
Non-posting accounts (includes purchase orders and estimates)
Some of these accounts are created for you automatically for example, the first time you create an invoice or statement charge, Automation automatically creates an accounts receivable (A/R) account. You can customise the default chart of accounts to suit your business needs, however some accounts are flagged as system entries which means they can't be changed. These accounts are easily identified from the account form as the account name is greyed out and can’t be changed.
Types of accounts
Your chart of accounts includes balance sheet accounts. These accounts track the following:
What you have (assets)
What people owe you (accounts receivable)
What your company owes to other people (accounts payable and other liabilities)
The net worth of your company (equity)
Retained Earnings (profit carried forward from previous tax years)
The following table describes the various types of Automation balance sheet accounts.
Balance sheet account type |
Automation account type |
Use to track |
Asset |
|
What you have and what is owed to you |
|
Bank |
Transactions in cheque or savings accounts. Add one bank account for each account your business operates. You can also use this type of account for cash purchases. |
|
Accounts Receivable (AR) |
Transactions between you and your customers, including invoices, payments from customers, deposits of customer payments, refunds, and credits. Accounts receivable is automatically created. |
|
Other Current Asset |
Assets that are likely to be converted to cash or used within a year, such as the value of your stock on hand. |
|
Fixed Asset |
Represents the depreciable assets your business owns that aren’t liquid such as equipment, furniture or a building. |
|
Other Asset |
Any asset that is neither a current or fixed asset |
|
|
|
Liability |
|
What your company owes |
|
Accounts Payable (AP) |
Comprises of outstanding bills. When you first enter a bill, Automation creates an AP account |
|
Credit Card |
Credit card transactions for your business purchases or expenses |
|
Other Current Liability |
Liabilities that are scheduled to be paid within the next 12 months, such as GST, payroll liabilities and short-term loans. |
|
Long Term Liabilities |
Liabilities such as loans or mortgages scheduled to be paid over periods longer than 12 months. |
|
|
|
Equity |
Equity |
Net worth of your business |
|
|
Comprises of the following: Investment of capital in the business by the owners Net profit from operating the business during the current financial year that have not been distributed to the owners Retained earnings, or net profits from earlier periods that have been carried forward into the current financial year. |
Balances for balance sheet accounts
The Chart of Accounts window shows a balance for each balance sheet account (except for the special equity account, Retained Earnings). In Automation, each balance sheet account has its own register, just like your bank account register. The register shows every transaction for that account, as well as the account balance.
Income& expense accounts
Income and expense accounts track the sources of your income and the purpose of each expense. When you record transactions in one of your balance sheet accounts, you usually assign the amount of the transaction to one or more income or expense accounts. For example, not only do you record that you took money out of your current account, but also you keep track of what you spent the money on.
Cost of goods sold (COGS) account
The account type "cost of goods sold" (or COGS or cost of sales) is grouped with income and expense accounts even though it is a separate account type. Many businesses have one cost of goods sold account, which is similar to an expense account. COGS contain all expenses that are direct costs of your sales, such as items for a job or inventory. When you use inventory items to track purchases and sales of inventory, Automation automatically calculates the cost of goods sold every time you sell an item.
The value and performance of your company can be summarised by two reports: The balance sheet and profit and loss statement. How you set up your chart of accounts will greatly influence the level of detail you record on these reports
The Balance Sheet
A balance sheet is a financial snapshot of your company on a selected date basis. This report is useful when applying for a business loan or at year-end to get an accounting of your business’s equity, assets and liabilities.
The income statement shows the performance of a business over a period of time. Income is reported for a month, quarter, year or some other period of time. The income statement lists your income, cost of sales, and expense accounts. (Cost of sales and expense accounts are very similar. Businesses use the two different account types to discriminate between costs directly related to sales and the costs of running a business) Cost of sales and expenses are subtracted from income to calculate the profit (or loss) for the period. this is why the income statement is also called a profit & Loss Statement. Where the Profit & Loss Statement meets the Income Statement There is one link between the two financial statements It is an important link and a key concept The net profit or loss of the Income statement is automatically posted to the equity section of the balance sheet.
Double-entry accounting is the accepted method of accounting worldwide. Double-entry accounting, as the name suggests, requires two entries for every financial event, but what is an entry? An entry is made when you assign an amount to an account.
If you were to put $100 in the company cheque account, the entry would look like this:
Account Amount
Company Cheque $100.00
However, this entry reflects only one side of the transaction. It doesn't tell you where the money came from. If this $100 originated from the sale of a tyre, the entry would look like this:
Account Amount
Tyre Sale $100.00
These two entries when put together, make up one double-entry that looks like this:
Account Amount
Company cheque $100.00
Tyre Sale $100.00
As you can see, you now have a double entry, reflecting where the money came from and where it went. This is the basic function of double-entry accounting.
Once you’ve mastered the different account types and the two financial statements. The next concept to learn is debits and credits. In double-entry accounting, every dollar amount is categorised as either a debit amount or a credit amount. And each of the six account types - asset, liability, equity, income, cost of sales, and expense -is classified as either a debit account or a credit account. Asset and expense accounts are called debit accounts because their balances are usually debit amounts. The other four account types are credit accounts because their balances are usually credit amounts.
A good working knowledge of credits and debits is helpful, but not required to use Automation Premium. In almost every transaction, Automation calculates the correct debit and credit amounts for you.
Because debits and credits do not follow any obvious rule, it is difficult to remember which accounts normally have a credit balance and which normally have a debit balance. If you remember that assets are debits it will follow that liabilities and equity are credits. If you remember that sales are credits it will follow that cost of sales and expenses are debits
On the balance sheet, assets - things you own-are good and are debits. Liabilities - things you owe are bad and are credits. On the income statement, income accounts – money in - are good and are credits Expense accounts - money out - are bad and are debits, the following chart shows the accounts and the sign they carry
Account |
Normal Sign |
Description |
Assets |
Debit |
All the things a business owns |
Liabilities |
Credit |
All the things a business owes |
Equity |
Credit |
The difference between what is owned and what is owed |
Income |
Credit |
The money charged for products and / or services |
Cost Of Sales |
Debit |
The direct cost of products and / or services sold |
Expenses |
Debit |
The money charged to operate the business |
Conclusion
As you might have guessed double entry accounting can and has caused a great deal of confusion. A single entry appears simple but as different types of entries are added to the business’s books, the system gets more difficult and complex to understand. Automation Premium has been designed to minimise the complexities of double entry accounting, however it is still helpful to have a basic understanding of the principles applied.
Cash & Accrual Accounting Methods
An accounting method is a set of rules that determines when and how you report your income and expenses for tax purposes.
Cash basis
Many small businesses track income at the time they receive the money, and expenses when they pay the bills, this method is known as bookkeeping on a cash basis If you've been recording deposits of your customers' payments but have not been including the money customers owe you as part of your income, you've been using cash basis. Similarly, if you've been tracking expenses at the time you pay them, rather than at the time you first receive the bills, you've been using cash basis.
Accrual basis
In bookkeeping on an accrual basis, you record income at the time of the sale, not at the time you receive the payment. Similarly, you enter expenses when you receive the bill, not when you pay it. Accountants usually recommend accrual basis because it gives you a better picture of how your business is doing.
The choice is yours
Automation makes book keeping really simple by enabling you to enter transactions the same way no matter which method you use for tax reporting. At any time you can create tax reports that follow either method, so you are not locked into one method.
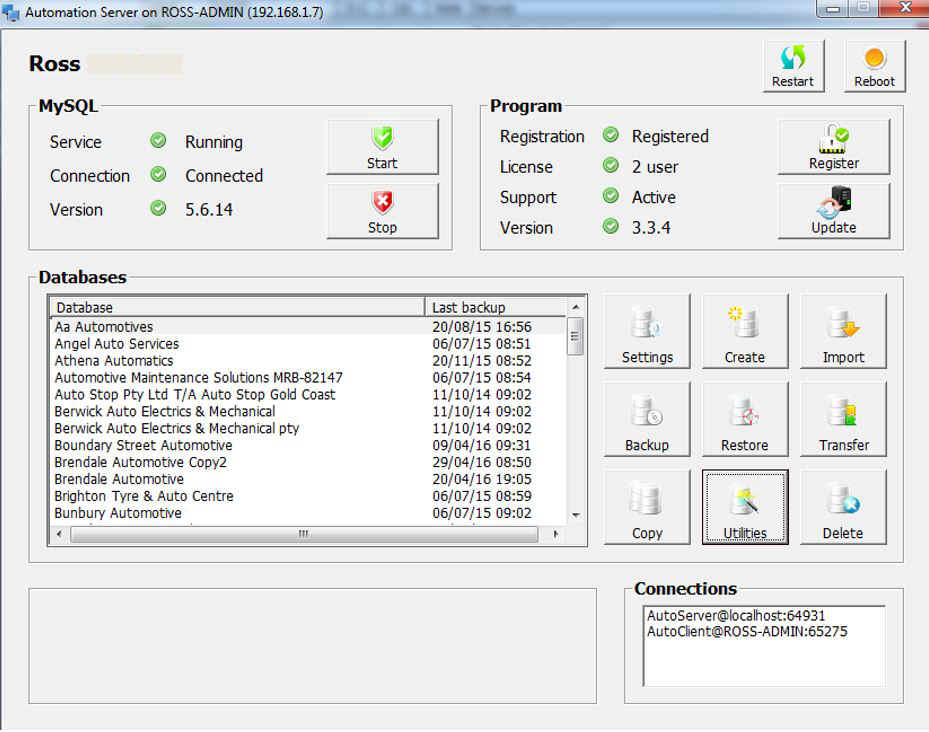
The Automation server application manages connections between the SQL database and client software, the application will auto start on the server machine when you re-boot. It is possible to close the application by selecting the Red Cross on the top right hand side of the display and accepting the message option. If the server software is closed the client software will not be able to access the database.
Restart / Reboot: Select restart to close and restart the server application, to reboot the PC, select reboot.
MySQL: Status indicators are displayed on the top right hand side informing the user that the application is running, connected to the selected database and the version number. It is possible to stop and re-start the program by selecting the start and stop options next to the indicators.
Program: This section displays whether the program is registered, how many sessions a user can have open at one time (PC's using Automation) and the software version number.
Registering:To register Automation click on the register option, you will be requested to enter your company or trading name, type the details then submit.
Update: If your site is on support you will prompted to update when new code is available, you can also check manually by selecting the update option.
Update: To manually update your version, select update, Automation will under normal circumstances update itself to the current version number to all sites that have product support contracts.
Databases: Automation server can store multiple databases, details are displayed in the database listing. You can switch between databases from the client application.
Settings:This option has been written only for locations that are involved with the Global Red rewards program, the user can select the data export location and enter their partner id.
Create: To create a new database select the create option, enter the name of the new database i.e.: ABC
Automotives, select OK, a blue indictor will build along the bottom of the display, after a minute or so you will
see your new database name in the listing.
Import: Automation version 3 allows you to import all data from the previous version 2.6.6, the import time depends on the size of the database and the speed of your machine, when importing be aware the process may take up to 10 minutes. On completion you will see the database listing in the window.
Backup: On selection you will see Automation backs up to a primary and secondary folder, the primary is preset, the secondary can be selected, we strongly suggest the secondary backup is made to a removable device like a USB flash disk or external hard drive. Backups can be automated by accessing the automatic backup option.
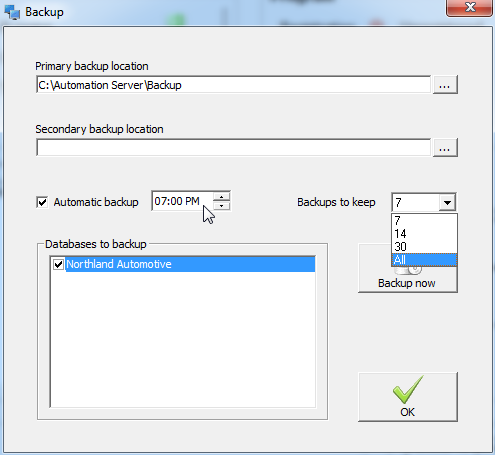
Back-Up Parameters: The backup function allows you to select the number of backups you wish to retain. Click on the arrow to the right of the backups to keep option, from the drop down menu select the quantity of backups required. These will be written to both primary and secondary drives.
To select the databases you wish to backup point and click in the checkbox to the left of the company file name, the databases to be backed up will require a tick in the box.
Select a time when the server will be operational, the backup process can be performed while using the application with no slowdown in data processing
Select the time you wish the backup to occur, you must have your secondary drive connected to the computer when this backup process initialises. There is a manual backup option available from this display, to start the process select backup now.
NOTE: IT IS ESSETIAL YOU RUN A BACKUP AT LEAST ONCE A DAY
Restore: In the unlikely event that you need to restore your database, select the restore option, this will point you to the SQL / backup folder, from this screen you can select the backup you wish to restore.
Transfer: You can transfer your database to the Microbase server using this option, on selection you will be prompted to transfer the running database, when sending select upload, download when receiving.
Copy:This option allows you to copy a database to an alternate name, to perform this function highlight the database you wish to copy from the database list. Select the copy option, you are prompted to enter a new name for the data, type this into the field, and select OK
Utilities:Select if you wish to run an organization specific data utility
Delete:Allows you to delete a database, highlight the entry in the database window and follow the prompts – A DELETED DATABASE CAN ONLY BE RESTORED FROM A BACKUP.
Connections:The connections window displays all open connections including server, if you exceed the amount of connections you are licensed for a warning is displayed and the extra connection will not open.
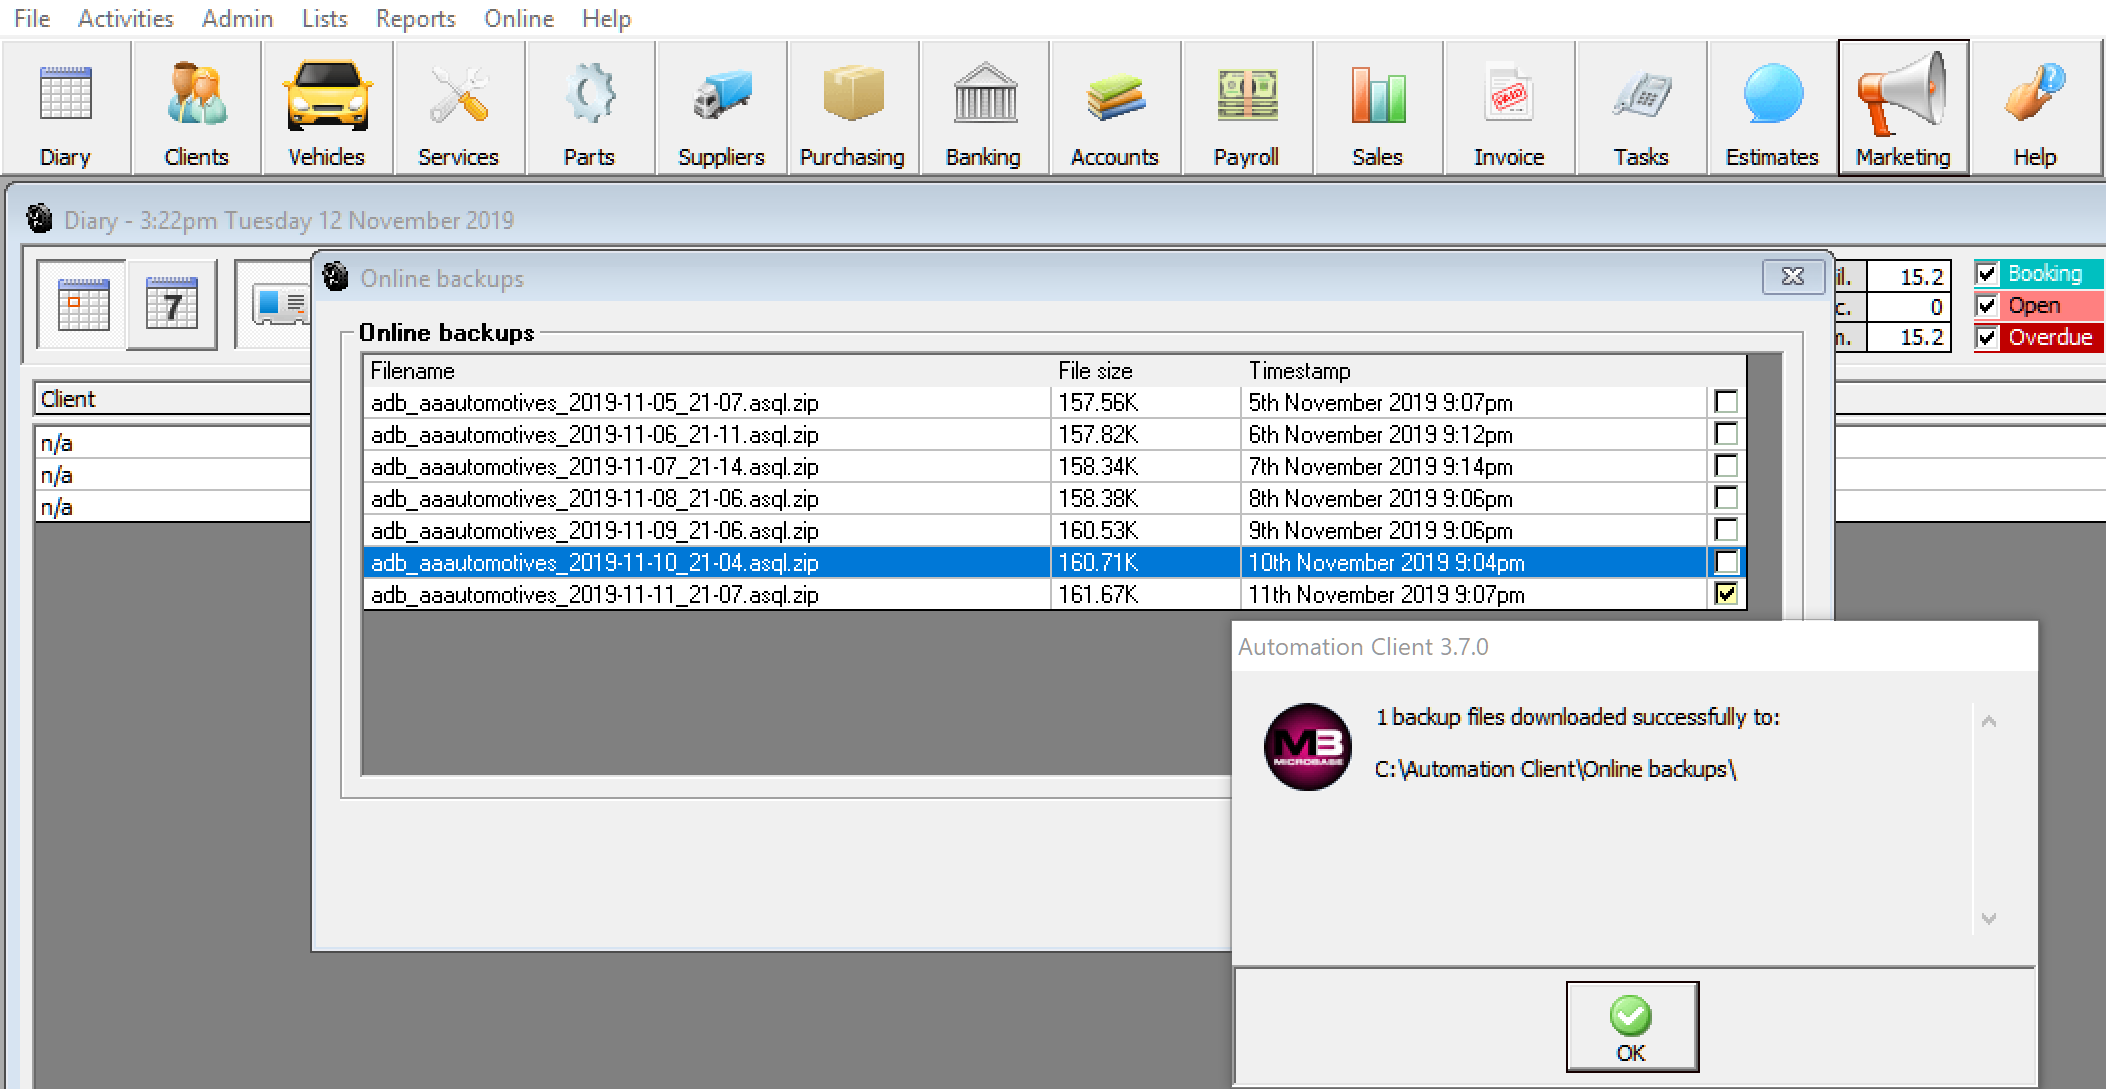
Storing Online Backups Locally: Sites that are storing their data on the Microbase cloud server there is a new Online Backups option. This feature allows users that need a copy of their data or who decide that the 7 day backups across 3 x servers that Microbase store are insuffecient for their needs, functionality allows for the site to download any of the backups Microbase are currently storing on their behalf and place them into a local folder.
Downloading An Online Backup: From the top of screen select Online / Online Backups, this action will connect you to the backup folder located on the Microbase server, you will see backups for the last 7 days in date order. Select the backups you wish to store locally, to finalise select the download option at the bottom of the display.
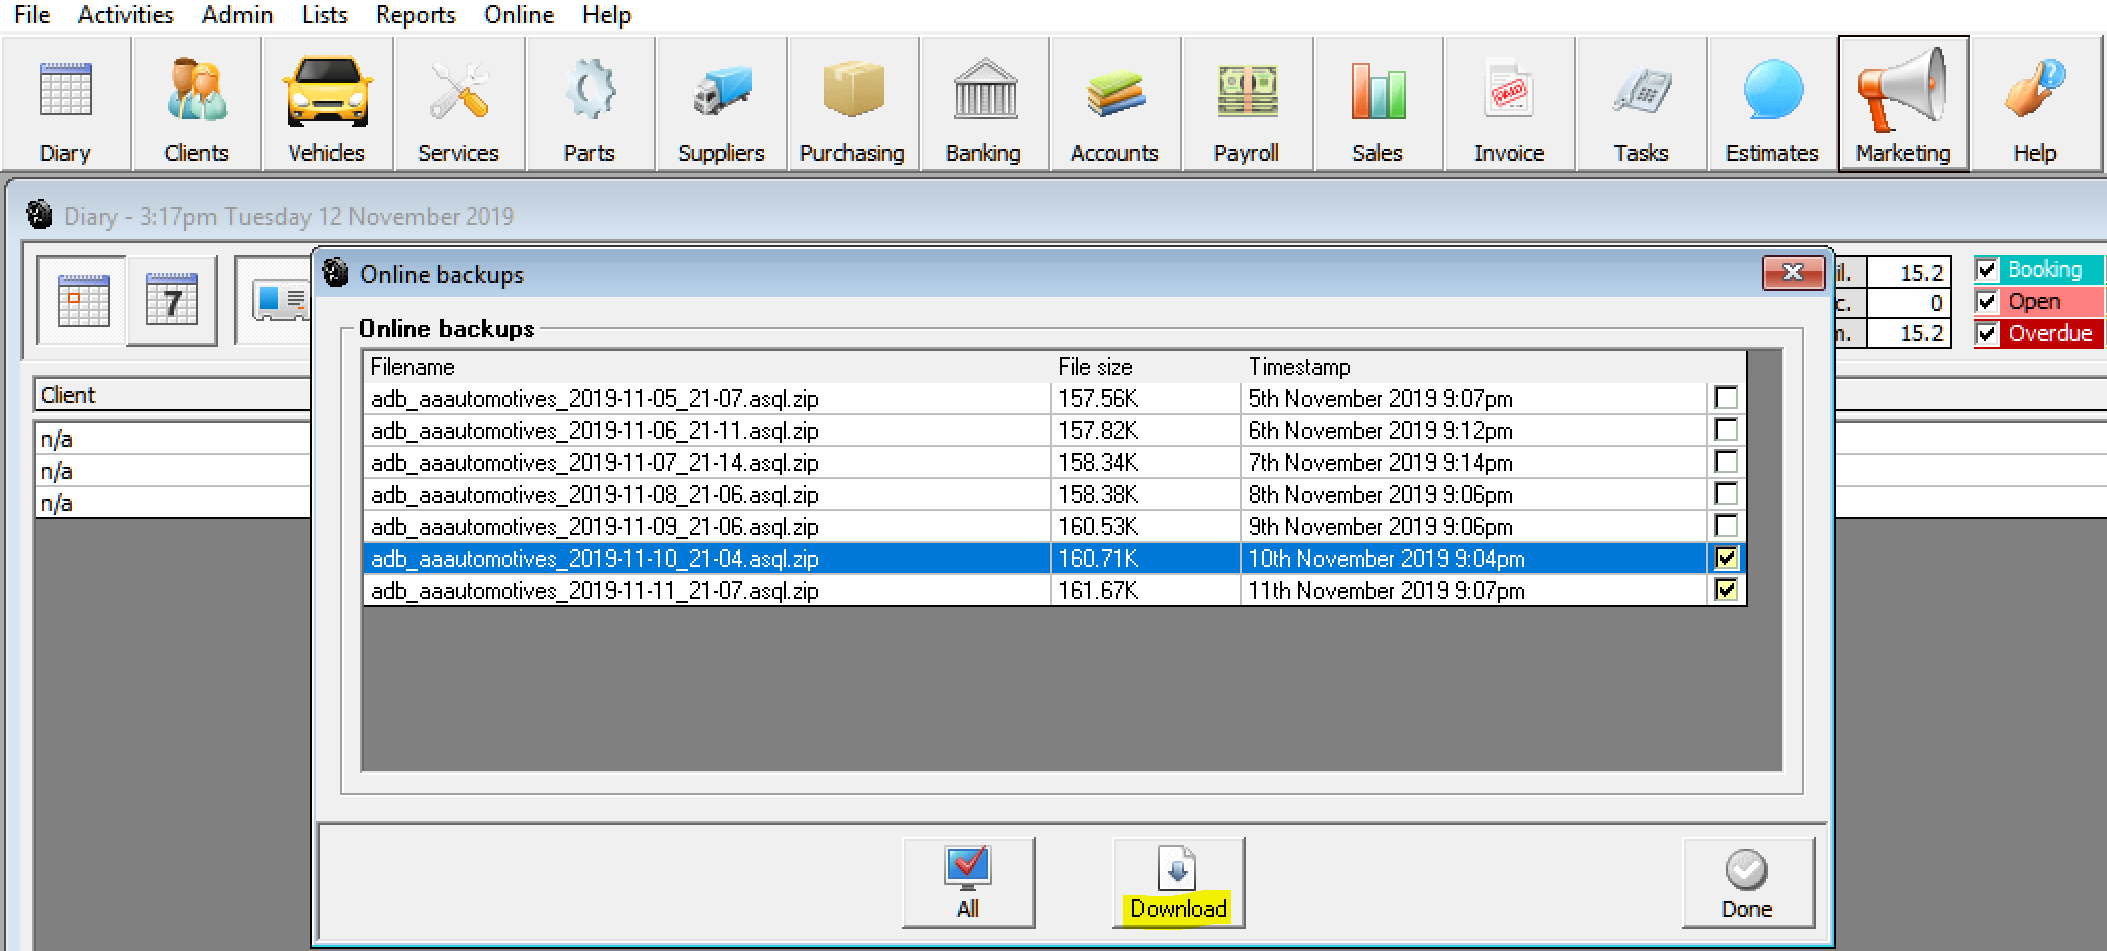
By default the backups will be downloaded to C:\Automation Client\Online Backups they can then of course be moved to an alternate location.
Select Site / Printer Settings from the drop down menu, you have the option to print to two machines. The report printer will print job cards and all other reports, the invoice printer will only print invoices (suggested if you use letterhead stationery). The report and invoice printers can be the same if multiple units are not in use.
Printer selection: Automation allows you to connect three standard and one receipt printer. Select the required printer by clicking on the arrow to the right of the report printer field. Highlight the device and double click the details are displayed. Perform the same process for the invoice and job card printer.
Job card & invoice format: There are 3 types of job card and 7 types of invoice formats it is suggested that you select each type and test print to determine which layout you wish to use.
Using letterhead stationery: Selecting will not print the site / location address and phone details on the invoice. The header spacing can also be adjusted by entering values into the allow field.
Print logos on Invoice: If you wish to customise the display convert your logo into a JPEG or BMP file and copy into the Working directory\logos folder. To select the logo flag the print logos on invoice selection, the drop down list will be displayed. Point to the required file and double mouse click, the file name is displayed in the logos field.
Merge Services on Invoice: When selected does not define fixed price & mechanical services.
Duplicate invoices: Allows the operator to automatically print two copies of the invoice with sign-off text being printed on the client’s copy. To enter the text required access Messages / Invoice Sign-Off Text.
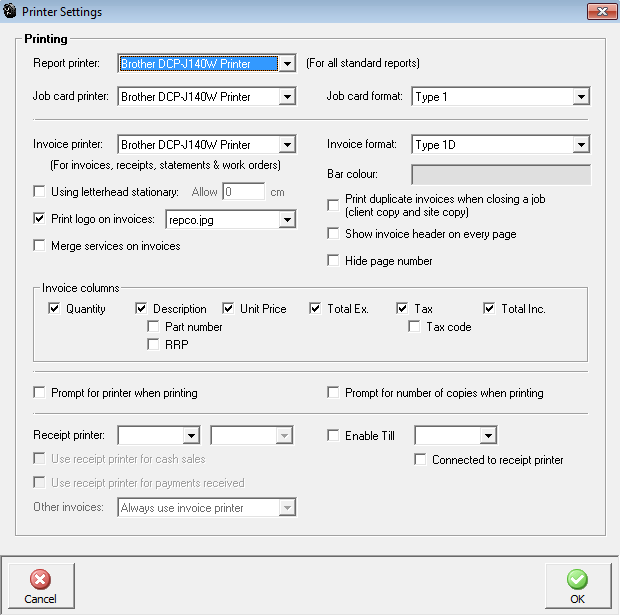
Show invoice header on each page: Allows you to print a header on each page of the invoice
Hide page number: Select if you do not wish to print the default invoice footer
Print part numbers: Select if you wish to print these on your invoice
Print full retail price: Select if you wish to print these on your invoice
Prompt for number of copies: If you wish to be prompted to print more than one copy of a form select the prompt
Bar colour: Automation allows you to customise the invoice header bar colour, to select point and click on the colour field and select from the displayed grid.
Invoice columns: Automation allows the operator to select which columns they wish to display in the parts and labour section of the invoice
Prompt for printer when printing: Selecting this option will allow the operator to select another printer other than the default.
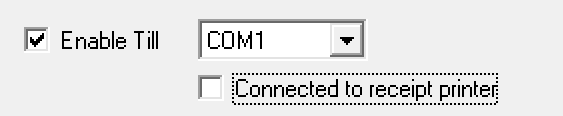
Receipt printer: Automation allows you to attach a slip printer to a designated com port, select the down arrow to the right of the receipt printer field, point and click on your selection. A print job will be sent to the slip printer when a cash sale is performed or a payment is received. To initialise these functions point and click in the appropriate check box at the bottom of the printer settings form.

Other invoices: It is possible to print invoice to the receipt printer – no work description or vehicle faults are printed when selecting this option. Select from the option your preference.
Once your site is created and your printer settings have been customised you need to configure the site settings, the following notes guide you through the process
Automation Premium allows you to attach a serial till draw that needs to be connected to a coms port on the local machine (if you are running a LAN). To set-up a till draw perform the following:
Connect a serial till draw to a coms port on your computer
1) Open settings from the file menu, select printer settings 2) Point and click in the enable till check box 3) Select the port your till draw is connected to from the menu 4) Save the settings with OK (F12) 5) Test the till draw operation by pressing the F9 key |
|
Till draw, opening: When the till function is enabled a second OK function is added to the payment receipt form, if you wish to open the till draw as you finalise a sale select the till draw icon or press the F9 key.
Settings, accessing: You will need to set your site preferences before using the program, from the opening screen select file / settings. The display is tabulated with five choices:
Site Details
Database Settings
Accounts
Local Settings
Online Settings
|
|
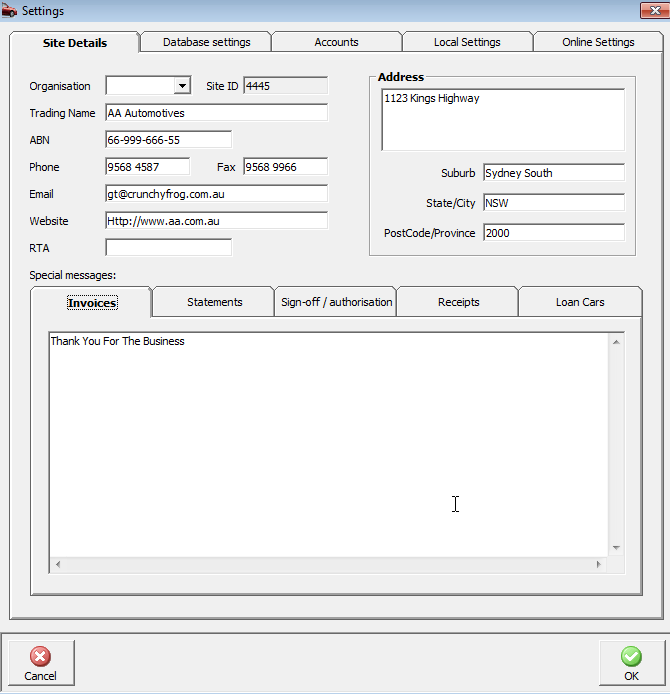
Trading details: Enter your trading details including email address into the fields provided. Enter your suburb and press the enter key, your postcode and state will automatically be inserted into the appropriate fields.
RTA #: If you have a registration number that needs to be printed on the invoice enter details into the RTA field.
Text messages: Automation allows you to enter four text messages that are printed at the bottom of the invoice, client statement, sign off / authorisation and receipts. A fifth option tab is available to enter terms and conditions for the loan car contract. To enter messages click on the tab type your text into the appropriate field. On printing the text lines are automatically centered on the form. Save your changes by selecting OK (F12).
Messages invoice & statements, formatting: You can add enhanced text to the message space on the invoice and Statements. Open site settings from the file menu, type your text, highlight, right hand mouse click and choose from italic, bold or red.
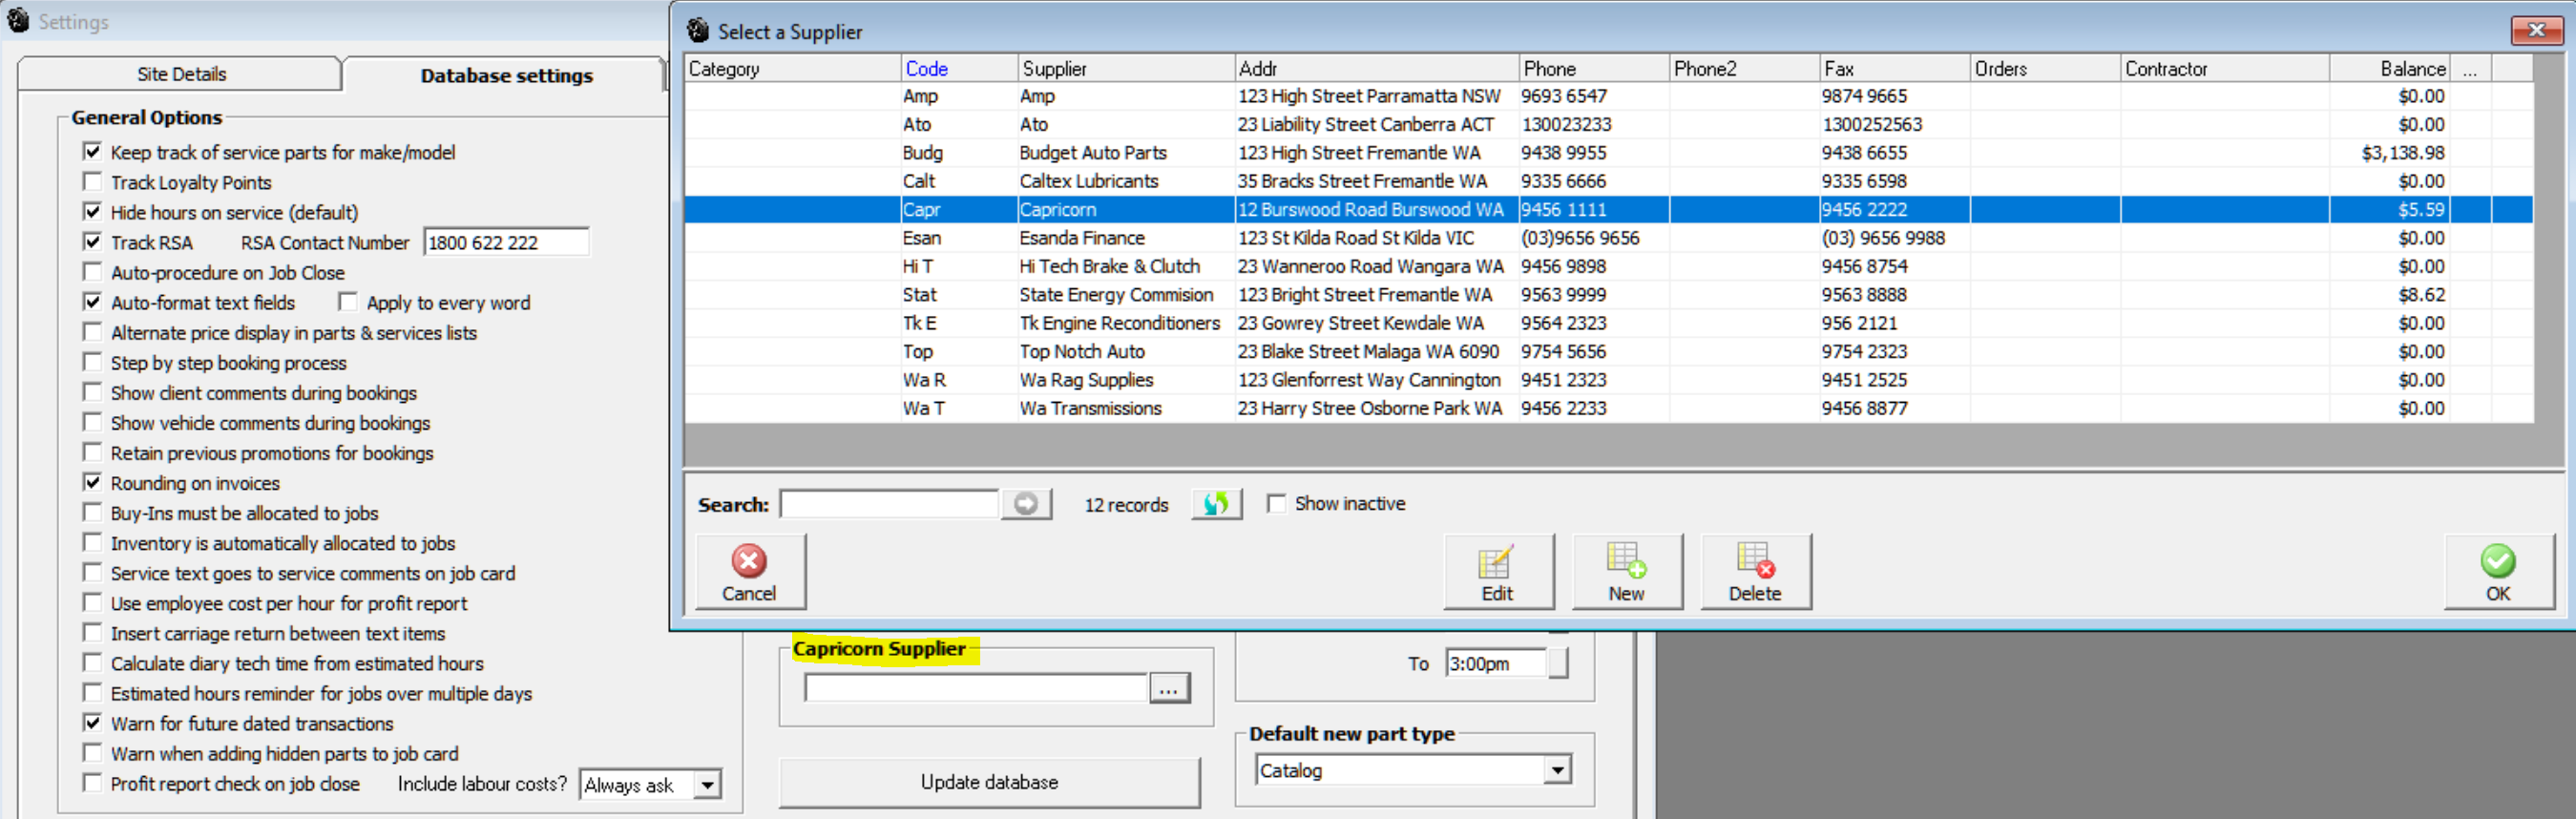
Customising: Selecting Database Settings allow you to customise various features of Automation by pointing and clicking in the checkbox next to listed feature. Categories are as follows: General Options, Security, Date Lock, Cost Centre, Default Account Keeping Fee, Yearly Trading Days, Purchase Units, and Default Vehicle Availability
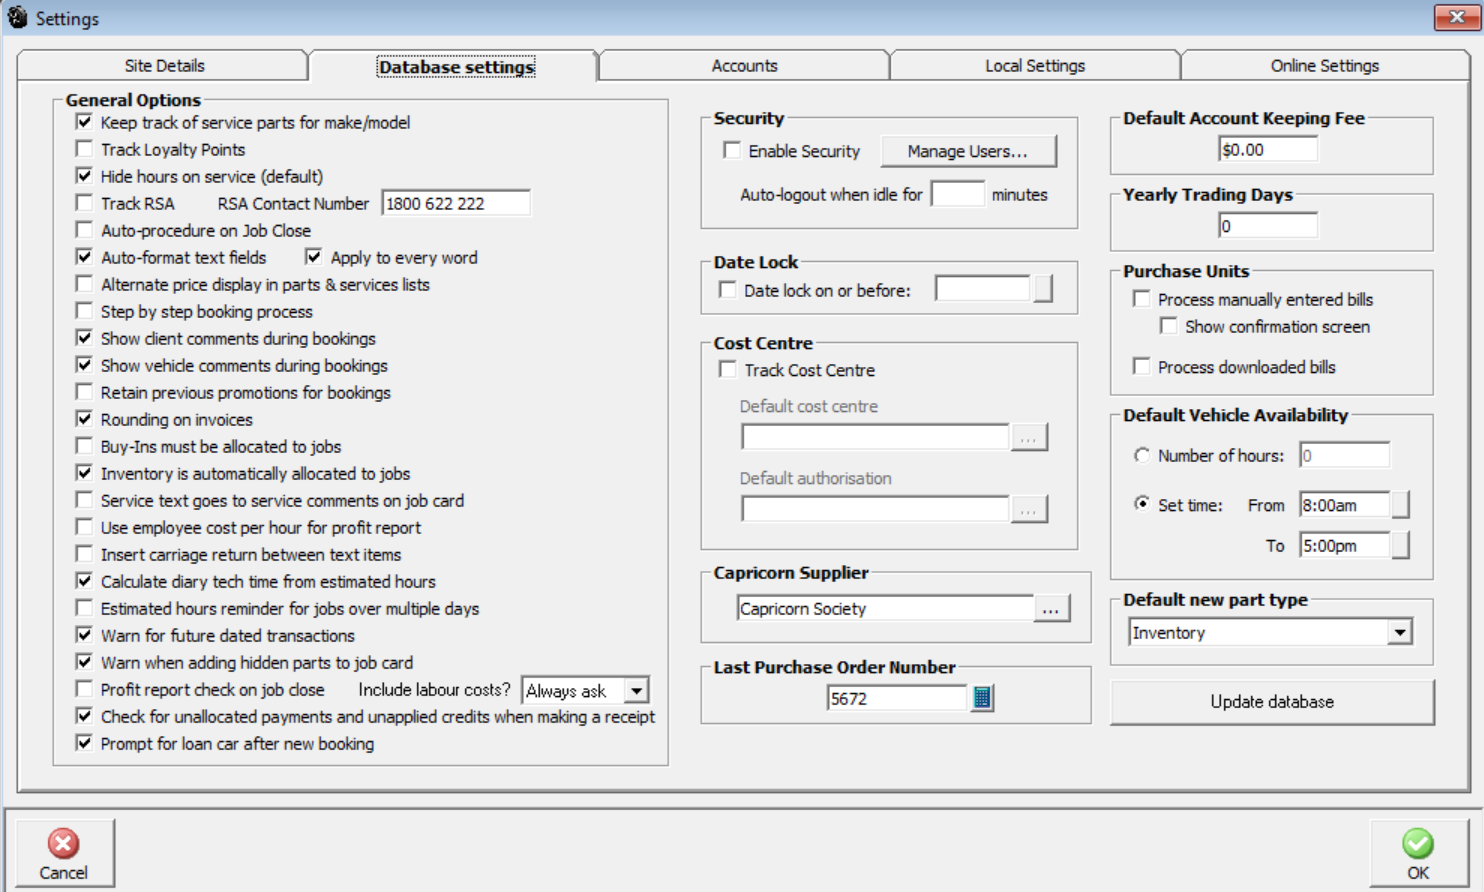
Keep track of service parts for make/model: Will display parts on the invoice based on make / model and service for previously performed services
Track loyalty points:If you are operating a loyalty program mouse click in the appropriate field. When using the loyalty program member’s invoices display a statement of points to date.
Hide hours on service (Default) – When this option is selected the hours for each service are not printed on the clients invoice.
Track RSA: This feature allows you to issue roadside assistance to your clients if you intend using support services.
RSA contact number: If you are issuing roadside assistance to your client base type in the contact number, which will be printed on the invoice. If you are using support services the number will be supplied to you. RSA issue details are printed on the invoice if this feature is selected.
Auto procedure on job close: If selected will automatically lead the operator through Hours allocation & Service Reminders. Service reminders and labour allocation can be selected manually if required.
Auto-format text: Capitalises the first letter of each word regardless of the cap locks setting.
Alternative price display in parts & services lists: Displays MRRP, retail, wholesale, trade and recommended retail prices including GST.
Step by step booking process: Initialises the automated booking process from the diary screen.
Show client comments during booking process: Selection will display any client comments recorded on the client form during the booking process.
Retain previous promotions for bookings: Helpful option if wish to track the overall performance of a specific promotion over an extended time period. Selecting this option will retain the previous selected promotion in the promotion field. Using this feature you can track the actual sales achieved from an initial introductory service or once the client is allocated to repeat customer it saves you having to select the option from your promotions list every time you make a booking for the client.
Rounding on invoices: Selecting rounding on invoice, rounds the invoice value to the nearest zero or five cents. The adjustment is posted to another income account; it is displayed in the financial summary of the job card and printed on the final invoice
Buy-Ins must be allocated to jobs: Selection ensures that all buy-ins (items specifically for jobs) are allocated to an open job card. When this option is selected it will no longer be possible to enter buy-ins onto a supplier invoice without a job allocation.
Inventory is automatically allocated to jobs:Allows you to allocate inventory items to a job directly from the supplier invoice.
Service text goes to service comments on job card: This feature allows you to further customise your invoice layout by placing text attached to services into the service comments field so it is printed below the service rather than in the work done field.
Use employee cost per hour for profit report: Automation automatically calculates the cost per hour for technicians by dividing the total value of hours sold for the past 90 days into the total payroll for technicians over the same period. If you wish to overwrite this feature select this option it is now possible to enter a manually calculated labour cost per hour against each employee from the employee form, this value is applied when running a profit report from the job card.
Insert carriage return between text lines:Selecting this option will place a carriage return between the lines of text when selections are made from the work done or vehicle faults data.
Calculate diary tech time from estimated hours:Select this option if you wish the diary hours available table to calculate from estimated time rather than technicians allocated times.
Estimated hours reminder for jobs over multiple days: Selection will remind the operator to edit estimated job times for the day based on jobs carried forward from previous periods
Warn for future dated transactions: If this option is set to true when a future dated transaction is entered you will be prompted whether you wish to continue or not.
Warn when adding hidden parts to a job card: Used as a part check when an item is flagged as inactive.
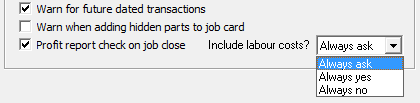
Profit Report Reminder: This feature allows the operator to pre-select viewing of the profit report from the job card by user and whether the labour costs are to be included. When the option has been selected it means that closing a job will first require that a profit report is brought up to screen automatically, however if the report has already been run and there have been no changes to the financials when closing the job it will not display for a second time. For audit purposes there is an additional report under the sales group titled “Profit Report Viewings” which is simply a log of the users that have viewed profit reports, for which job and when.
Profit Report Reminder, Settings: To initialise the function go to File / Site Settings / Database Settings at the bottom of general settings is the profit report check on job close option. Point and mouse click in the check box, note you also have an option to always ask (default) to include wages cost or you can select always yes / always no from the drop down menu at the end of the line option.
Initialising the profit report reminder:When you have made your selections save with OK (F12). The second setting you need to be aware of is in manage users / user profiles, if you are using this feature and you wish a user to be able to view the report and close a job card the “Job Card Financials” option must be selected. If you are not using security then all users will be allowed to view the report and close job cards, in this instance there will be no reference to the user on the “Profit Report Viewings” the reference will simply state “User”.

If you are using security ensure the job card financials is selected, if you need to change the permissions save with OK (F12).
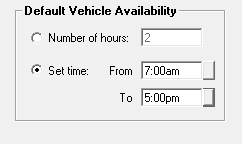
Adjusting Default Booking Hours – To adjust the default booking hours (set at 2) open File settings select the database settings tab. From the bottom of the form select the method you wish to use as a default booking time. There are two options hours or time, save your changes by selecting OK (F12) from settings.
Security
Security Overview: Automation Premium allows you to set different access permissions for each user; on first installation the security feature is inactive. This feature is used in two ways.
Firstly, as a way of securing sensitive information i.e.: you may not wish your technicians to be able to view your chart of accounts, banking functions or financial reports. You would however give permission to your office staff to perform bill payments, make deposits and create client credits. Automation allows you to set the permissions for each employee, who is then assigned a unique log in and password. When operating on a network it is possible to have different users logged onto the terminals with only the permissions for the terminal operator being applied.
Secondly, as a management tool for the in built task manager, using security allows you to set-up appointments and tasks by user or user group. When logged in a user will only be able to view that individual’s appointments and tasks. Security permissions also allow you to establish whether the user is able to enter tasks or appointments for other users.
If you wish to use the security function it will have to be enabled from the configuration screen.
Security, Enabling:Point and click on the enable option positioned above the manage users button. Next you need to enter the user’s name (this will be their unique log in), set the user type, establish the permissions and enter a password. The password can be in text, numbers or a combination; the password field is case sensitive so if you enter a letter in capitals it must be typed in the same way for the user to be logged on. Note that when entering your password you are asked to confirm by re-typing, if the combination does not match the original entry a message is displayed. Simply re-key correctly.
To select the user type point and click on the down arrow situated on the right hand side of the type field. There are three user types Manager – Usually would have full access, Office – Access to limited administration functions, Technician – Access to jobs and the accompanying functions only with no access to administrative tasks

The allow all and block all function is a quick way to set or secure access to all functions, you can use this as a short cut, then simply edit the selections you wish to change.
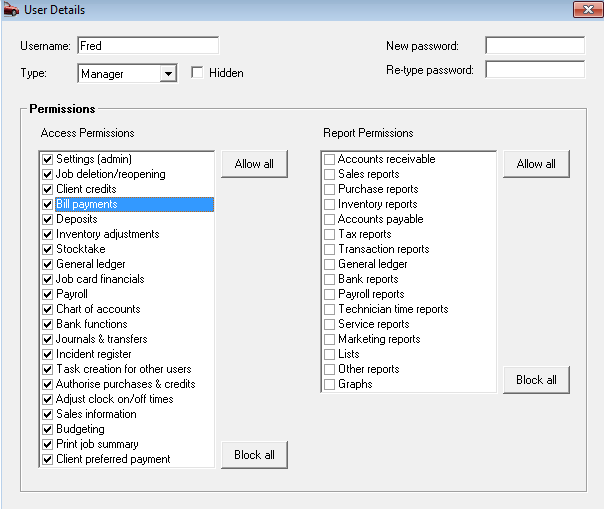
Security, User Default: To setup a new user select manage users from the configuration screen, select new, the user details form is displayed. Enter the user name, select the user type, enter the password (remember this is case sensitive), confirm by retyping in the re-type password field.
Next point and click on each function you wish to give the user access to. Report permissions allow the user to print or not print all reports in the group selected.
Note: It is important that you retain your password in a SAFE place as loss can cause operational problems. It is also suggested that you limit your password to a maximum of 6 characters so it is easy to remember.
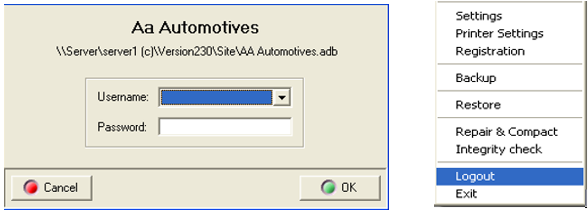
Security, Log On: Once security is set you will need to log on to use the program, on start up a log in message is displayed, type the user name or select from the drop down list, enter the password and press enter or select OK.
If a user attempts to access functions that have not been selected in the security profile an access denied message is displayed. It is however possible to change a users access at anytime by selecting File / Settings / Configuration / Manage Users. It is of course suggested that only the manager has access to the setting option to prevent unauthorized use of the program.
Security, Log Out: To log out of Automation select file / logout, this procedure will log you out of the program displaying the log in message for the next user to sign back in. If security is a concern it is suggested that you log out whenever you leave the terminal and log back in when you return.
Auto Log Out When Idle: This options allows the operator to set an auto log out period when the terminal is inactive. Enter the minute value into the field provided, once this period is exceeded you will be required to log back into the system.
Provides the operator with the ability to lock records prior to a nominated date, to enable point and click in the check box then select the button to the right of the date field, from the calendar select the lock date by double clicking in the grid, save your settings, you will not be able to edit any records prior to the selected date. It is however possible to change your settings or disable the feature at anytime
Track Cost Centre: Allows you to select a cost center and default authorisation for purchases and track via the purchase transaction report. To set-up cost centres you will need to add an entry to the list and also have at least one user setup.
Default Account Keeping Fee
Enter the monthly service charge for your charge accounts
Yearly Trading Days
Set to give accurate daily calculation from the KPI and Financial Summary Reports
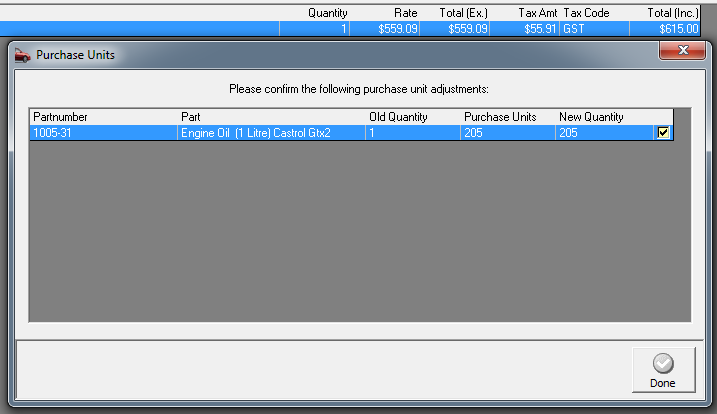
Some items you purchase will be bought as one unit and sold as multiple units, in the past you have had to manually enter the purchase units, then calculate the cost based on the amount of units you sell from the one unit purchased i.e.: Oil you buy a 205 litre drum which your suppliers bills at one unit, then you sell in 1 litre units effectively converting the one unit purchase into 205 units retail. Problems can arise with costings and stock quantities if the operator does not price the goods inwards on a units to be sold basis i.e.: 205 litres @ $5 = $1025.00, however the unit cost is $1,025 / $5.00 = 205, if the unit cost for the 205 units flows through to the cost of the item it will grossly over inflate the COGS of that item and only place one item in stock. To prevent this from occurring version 3.3.8 introduces a new purchase unit’s option which allows you to record on the part form the units you normally resell. You can choose to be prompted to allow the change from settings or for it to happen automatically, further options allow you to apply the formula too manually or downloaded (Repco) bills.
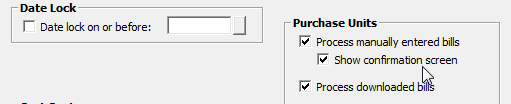
Unit Purchases, Site Settings: To enable this feature you need to access the switches in site settings. Over on the right hand side of the database settings display you will see a purchase unit option, select process manually entered bills, if you are using Repco invoice retrieval tick process downloaded bills, if you wish to be prompted select the show confirmation screen. Save your site settings with OK (F12).
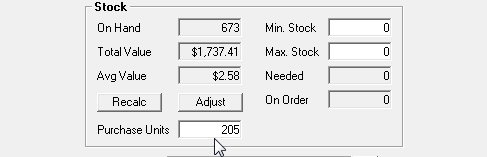
Unit Purchases, Part Form: once your parameters are set in site setting you will need to open the part form for the item you wish the calculation to apply to.
Move down to the field below stock and enter you purchase units into the purchase units field, save your changes with OK (F12).
Unit Purchases, Applying The Formula: On your supplier bill leave the quantity as 1 and change the total price to the cost of the 1 unit (i.e. 205 litres oil) on completing the 1 x unit purchase price a confirmation screen will display your reseller unit value, selecting OK will now divide the unit price by the resell units entering 205 units @ 2.73 plus tax (in this example), the profit checker will still compare previous cost to new cost and display a percentage change which you can accept or decline.
Default Vehicle Availability
Option allows the user to change default vehicle availability setting for diary bookings.
Default New Part Type
Option allows for a default setup for new part types, inventory or catalogue.

Customising: The accounts tab allows you to setup various accounting functions within Automation; these are categorised in the following way. Default Parts & Service Accounts, Default Payment Accounts, Banking Details, Tax, Credit Card Surcharges, PAYG Summaries, Default Payroll Payment, Super Payment Schedule.
Default Parts & Service Accounts
Default Accounts: Parts – Income, Parts – COGS, Services – Income, select the accounts you wish to apply as the default. Clicking on the button to the right of the field will display the chart of accounts, highlight the record you wish display by selecting OK (F12) from the bottom of the account list.
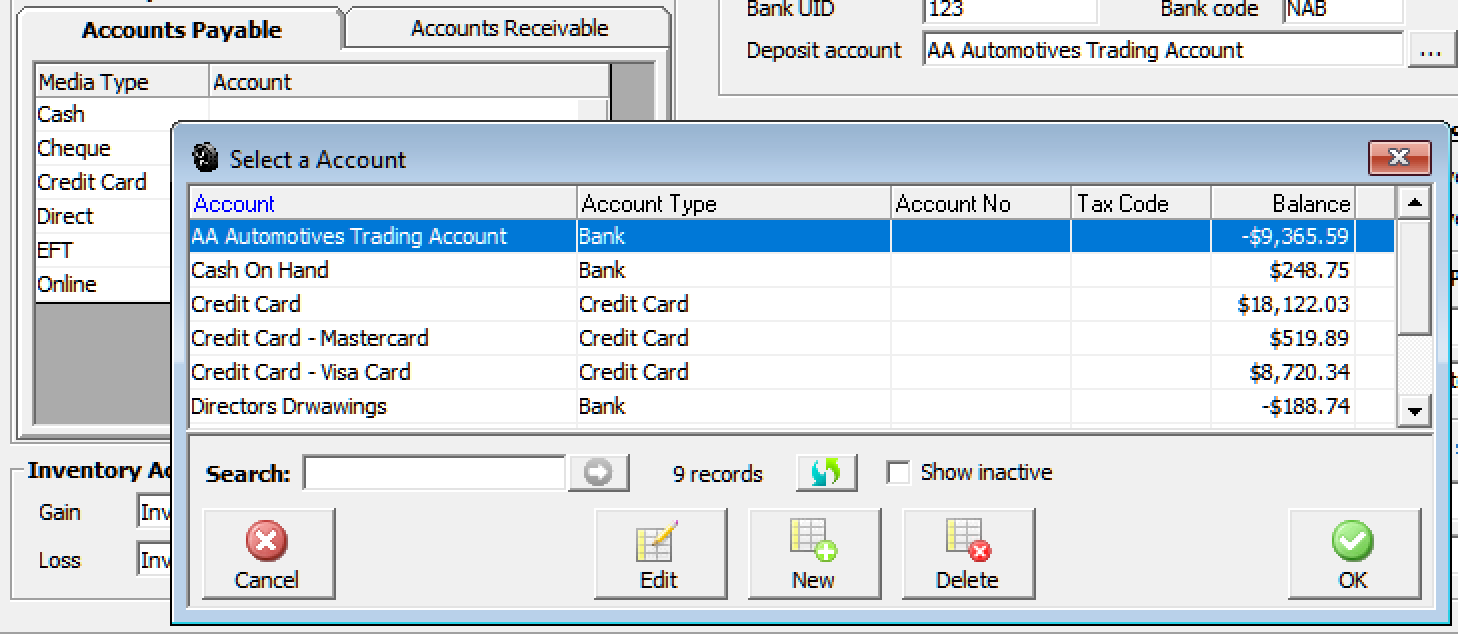
Default Payment Accounts
Automation allows you to attach default accounts to receipt and payment media selections. You may wish for all your cash and cheque receipts to be posted to undeposited funds, EFT and credit cards to a clearing account. Accounts can also be selected for payment types i.e.: Cheques can be attached to your main trading account, cash to cash on hand or undeposited funds.
To setup select Accounts Payable or Accounts Receivable tab, point and click on the button to the right of the account field a list of your payment / receipt accounts is displayed. Select the account you wish the transaction to be posted to finalise with OK (F12), the name of the account is displayed in the account column.
Default Payroll Payment: To record a default wage account open settings from the file menu click on the accounts tab. Select the payment media and account from the drop down menu. Save your settings by exiting via OK or F12

Banking Details
Options allow you to set up your bank details to print on deposit slips. Nominate a default bank account (this is the usual bank account you deposit to)
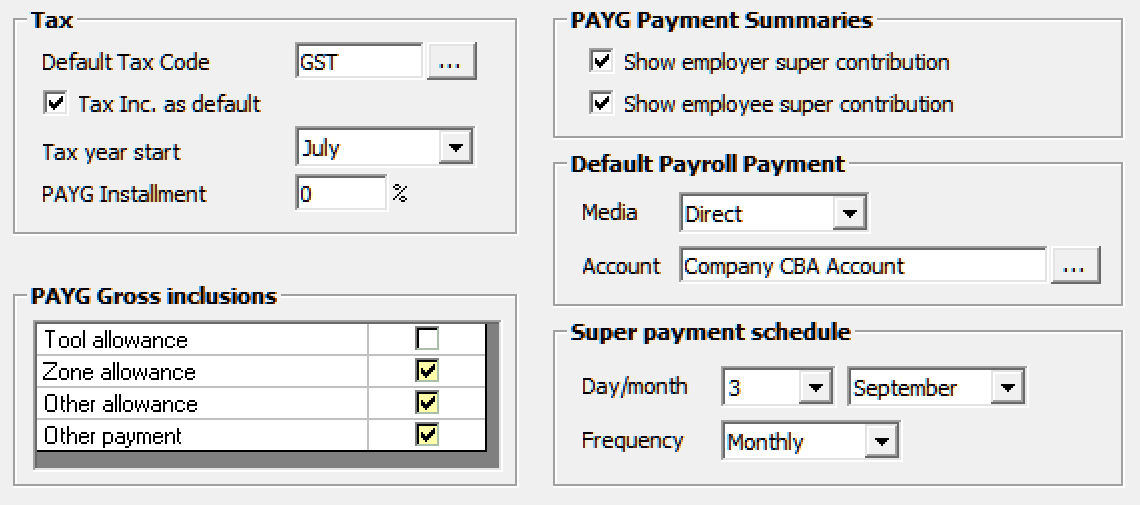
Tax
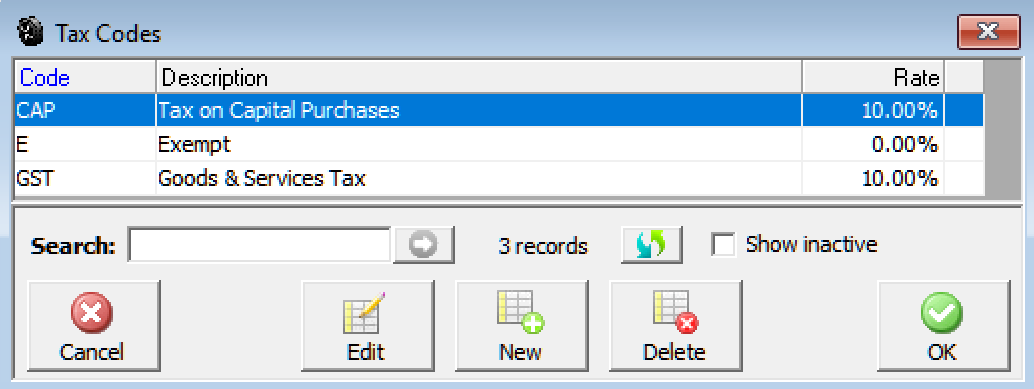
Automation Premium allows you to store multiple tax codes, which can include varying rates of tax or exemptions. You can also select a code to be your default in most cases this will be GST.
Tax Codes, Selecting: To view tax codes or select a new default code mouse click on the button to the right of the default tax code field.
Automation allows you to set up multiple tax codes that apply varying rates of tax to specified items. Highlight the tax code you wish to make the default and select OK the code will display in the default tax code field. The default CAP Tax code when selected will post purchases to G10 – Capital purchases on your BAS.
Tax Codes, Creating: Select new from the bottom of the display the tax details display consists of the following fields:
Tax Code: Insert a unique code for the tax
Rate:Record the rate of tax to two decimal places (do not enter a % sign, this inserts automatically)
Description:Include a description for the tax i.e.: Wholesale, GST, and Exempt
Account: Allows you to allocate the tax to a sub account of tax payable, you may wish to separate the various taxes that apply to your business. If you wish to apply a tax in this way you will need to set up the sub account in the chart of accounts.
You can apply different tax codes to parts, services and expenses. The taxes can be allocated to one account ie: Tax Payable / GST or you can create individual tax accounts. Automation gives you the option to view values over a date range by tax code.
This option is helpful if you handle the liability differently to your default tax code. An example is private vehicle use that may not be tax deductible any expenses that you apply to a unique tax code can easily be tracked.
Tax Included As Default: Select this option if you wish the cost and retail prices to default to tax included, leave blank if you wish the default to be ex. Tax.
Tax Year Start: Enter the start month of your tax year, if you are starting to use Automation Premium during the tax year you still need to enter the tax start month in this field. If this is not entered correctly it will impact on your financial reports.
PAYG Installments: If you are liable for PAYGI enter the % rate into this field, PAYGI is calculated on sales excluding GST and is visible as a total in Tax Payable / PAYG Installments posting in the chart of accounts.
Gross Inclusions, Payroll: You can set which payments you wish to include in your gross payment reporting. To set the parameters which will remain as the default when running reports for the PAYG Payment Summary, PAYG Payment Summary Statement and the EMPDUPE file export reporting go to file / site settings / accounts.
A section of the display titled PAYG Gross Inclusions allows for the selection of other payments and allowances (as per the payroll transaction form) for inclusion in gross salary reporting. Simply point and click in the checkbox located against the selection to set to true, save your settings with OK (F12).
STP (Single Touch Payroll): If you wish to access the Automation single touch payroll service select the STP option. For more details on this feature please see STP in the payroll and superannuation topic in the help menu.
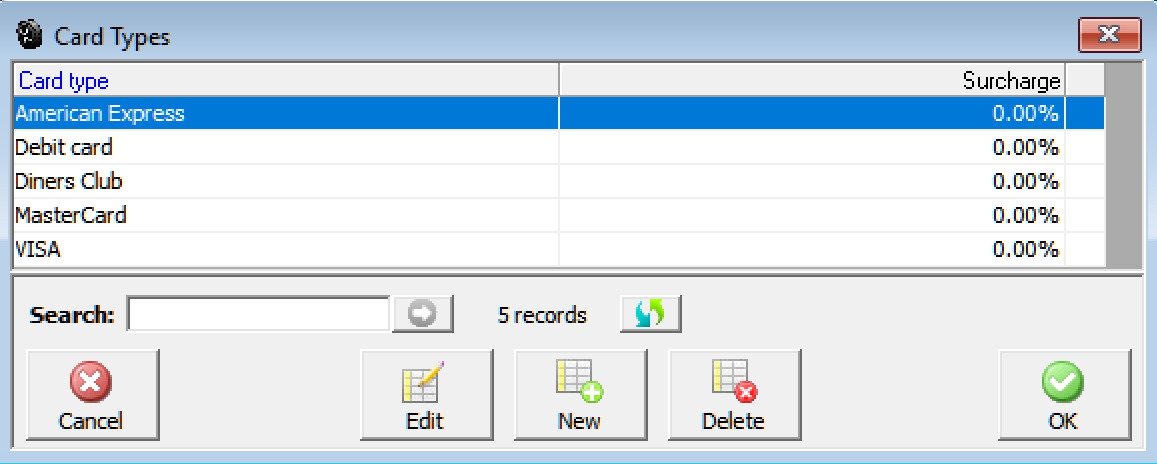
Automation allows you to setup different percentage surcharges for four credit card types. When a value is entered and you choose to process a client payment via credit card a selection field is displayed, simply select credit card from the payment receipt form, you can then select the credit card type from the drop down list and the percentage is added to the total payment due. – Note: the receipt is titled tax invoice for taxation purposes. The surcharge is also recorded in the payments section of the client card.
At the bottom of form you will see a manage selection under the Credit Card Surcharge heading, click on this to open the credit card input table.

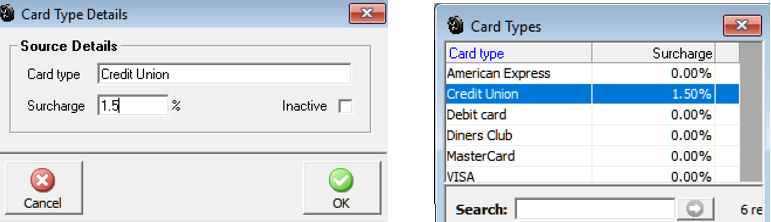
Credit Card Surcharges, Creating New: Select new from the bottom of the display, enter the name of the credit card into the card type field, the percentage is recorded as a surcharge, finally select OK (F12) to save the new entry in the list. Exit out of site settings with OK (F12).
PAYG Summaries
Select whether you wish to display employer / employee superannuation or both on your PAYG summaries.
Default Payroll Payment Super Payment Schedule
Select the media from the drop down menu by selecting the arrow t the right of the field. Next select the account you pay payroll payments from by selecting the button to the right of the field and highlighting the entry
Automation allows you to record on the pay slip when the next superannuation payment will be made and the amount. Enter the day of the month you process these payments and the month the next payment is to be made, finally enter the payment cycle. The super liability for the employee for the previous month with the next payment date is printed on the pay slip.

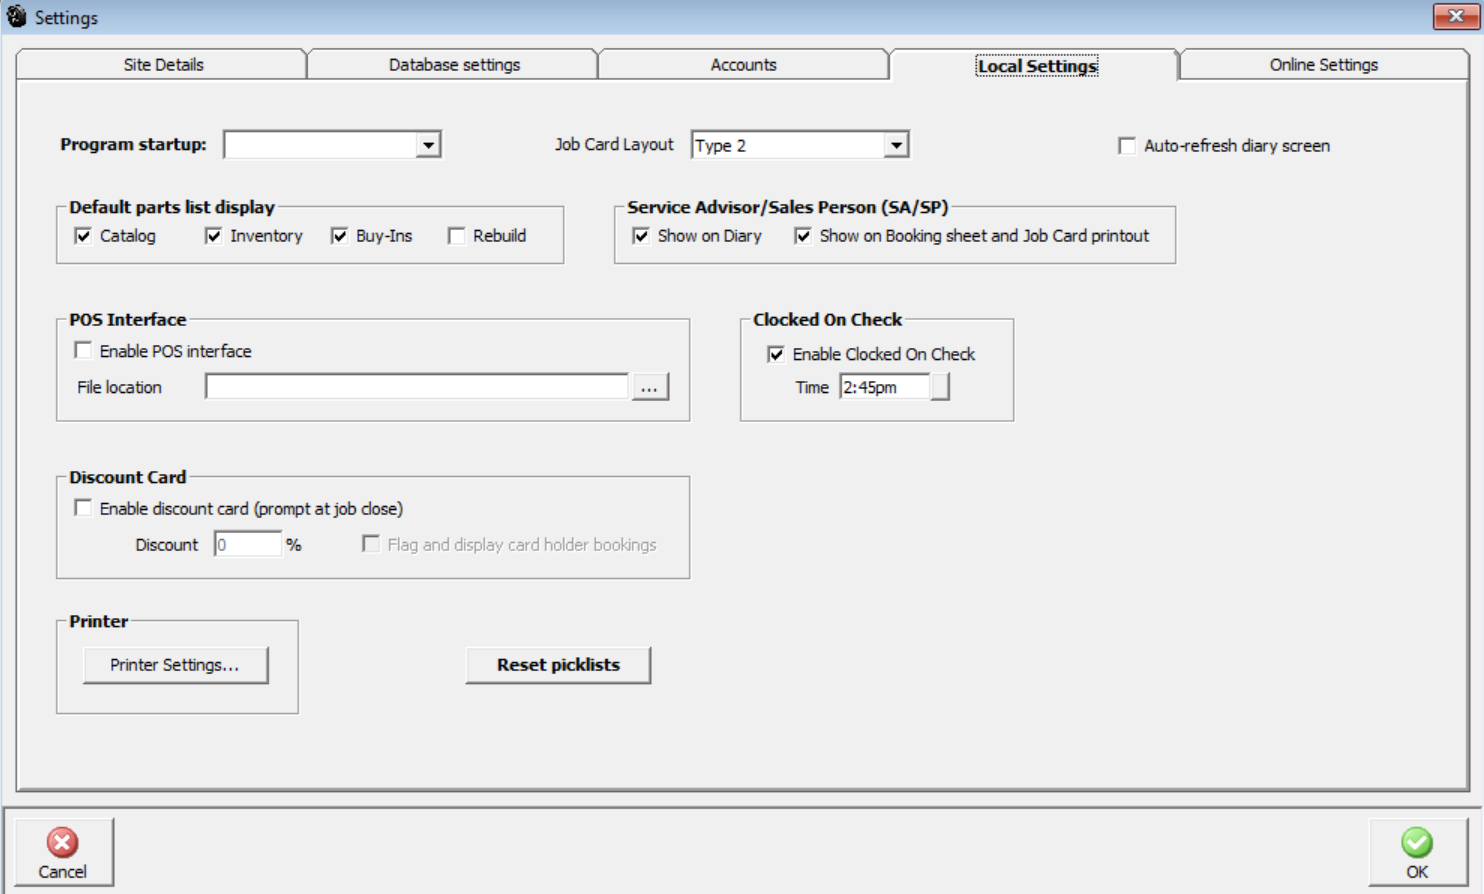
Customising: Local settings allows for further customisation: Program Startup, Job Card Layout, Default Parts List Display, Sales Person / Sales Assistant, POS Interface, Discount Card, Printer Settings and Reset Pick lists.
Program Startup
Allows to select from four start up modes, select the down arrow to the right of the field, point and click on your start up preference.
Job Card Layout
Allows selection of the 2 x job card layouts – Type 1 is for high resolution displays, we suggest type 2 is selected for lower resolution devices.
Default Parts List Display
Allows you to select which part type you wish to set as a default
Sales Person / Sales Assistant
Select the show on diary under the Sales Person / Sales Assistance heading to include the column on the diary. If you wish to display the service advisor on the job card and booking sheet printout select the option.
POS Interface
Microbase in conjunction with Computer Vision have developed a basic link to the Quick Fuel POS system, if you have this application installed and wish to link with Automation select the checkbox and search for the Quick Fuel company file by clicking on the button to the right of the file location field, this action will allow you to navigate your PC.
Printer
Selecting this option will open the printer settings – see printer settings for details.
Reset Pick Lists
Option allows you to set you list configuration to the optimum for your chosen resolution – please not you will have to exit the program and re-enter for the settings to be visible
Discount Card
This option is Global Red user specific, allowing for a discount card feature to be switched on and a percentage entered.
Version 3.6.6 introduces an automated diary screen refresh option, this will be extremely helpful to sites that are using the online job card as changes to the job card status on the tablet will automatically flow over (with up to a 30 second delay) to the terminal screen. The setting is local so the option needs to be set on each machine where you wish the refresh to take place.
To initialise the option on a terminal, select file / site settings / local settings > Auto-refresh diary screen
Select the option highlighted above and save your settings with OK.
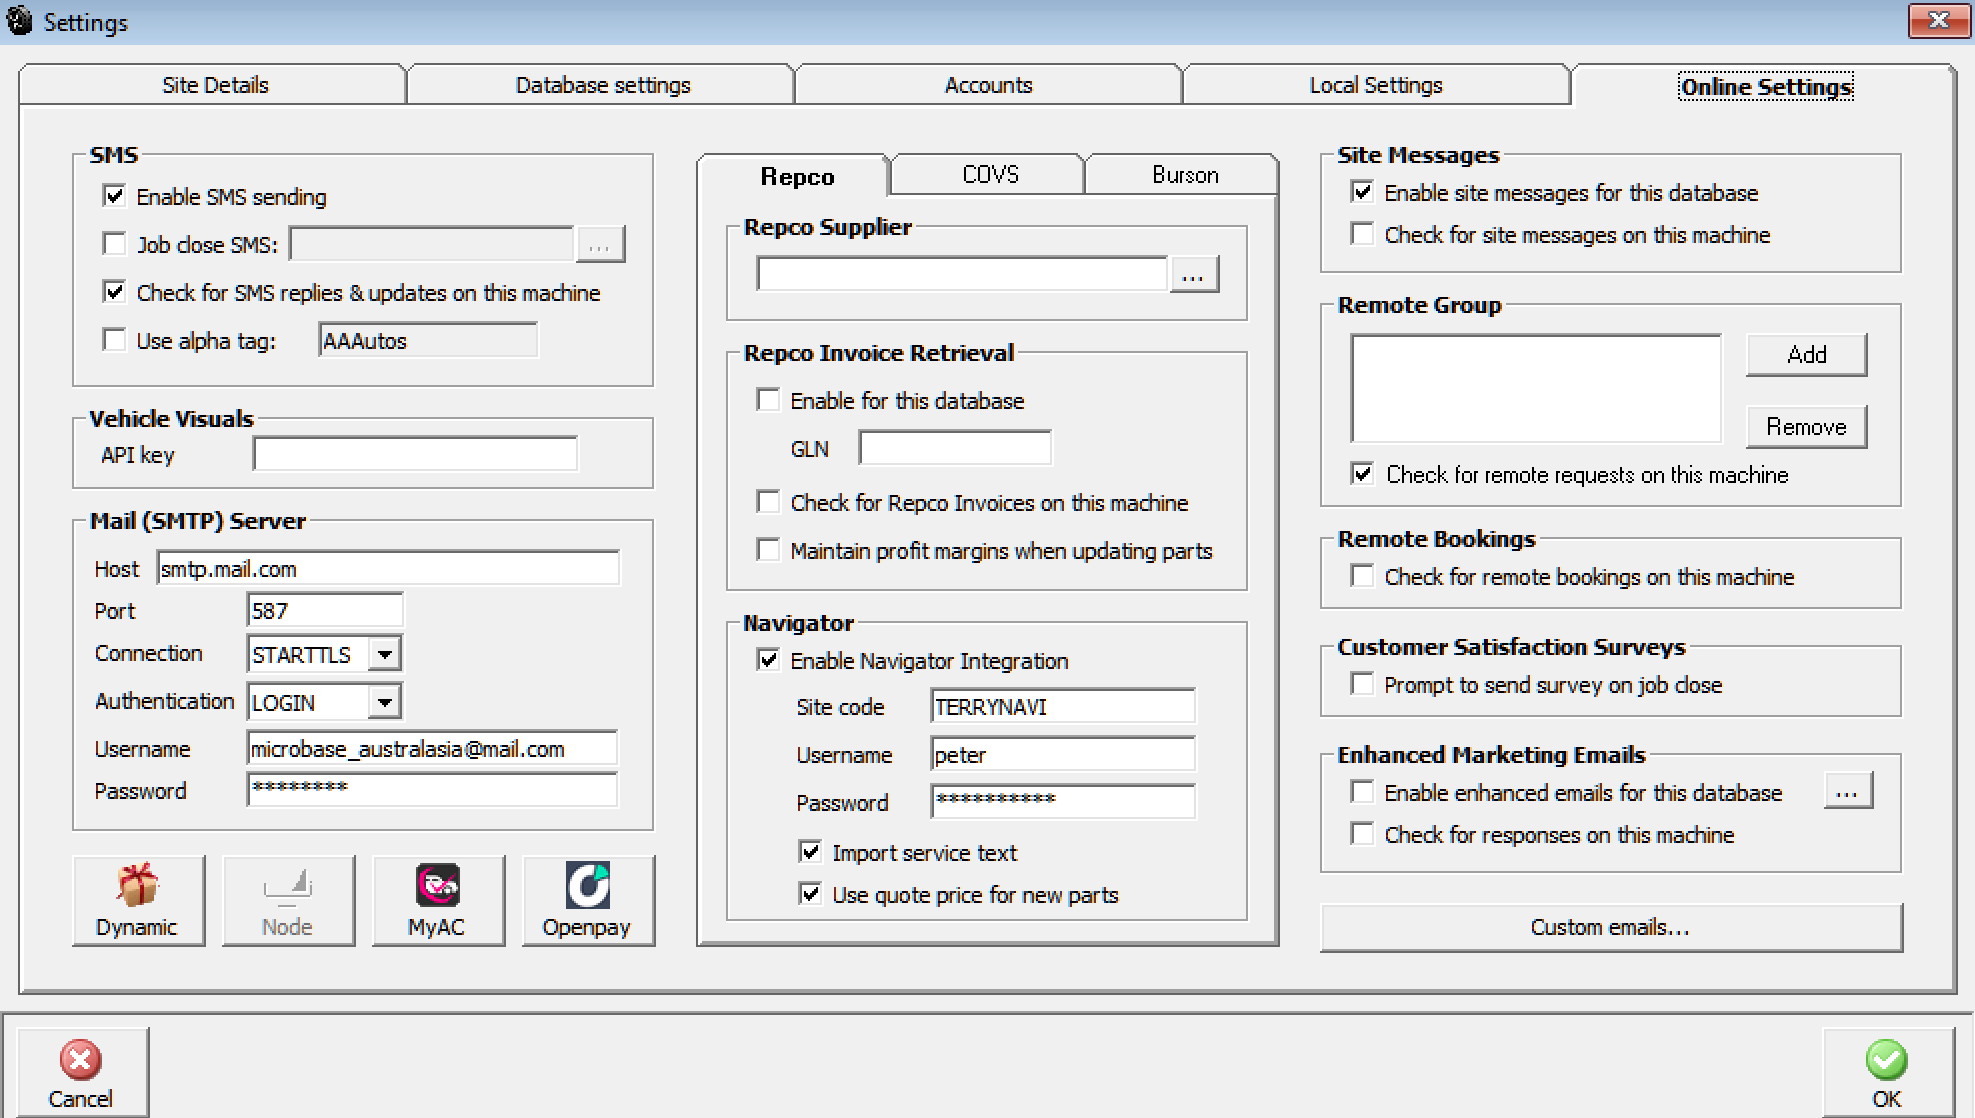
Online Settings

SMS Messaging
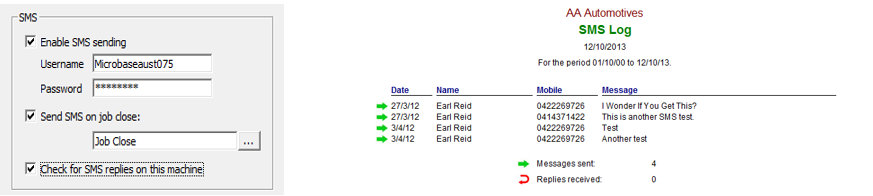
Automation allows the user to send SMS messages to single or multiple clients, for this feature to work you must have an internet connection plus an account and password from Microbase Australasia. Enter the account details into the fields provided.
It is also possible to run an SMS report for any date range from Reports / Other reports.
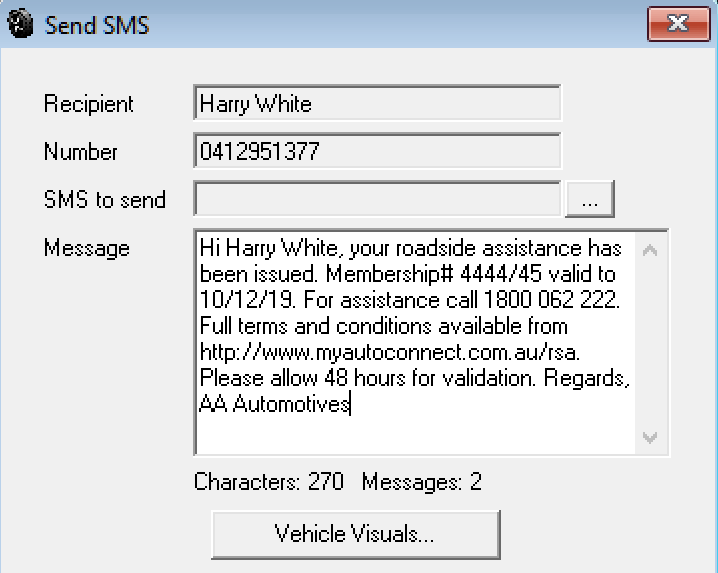
SMS, Merge: You have the ability to send messages that contain more than 160 characters (2 messages or more) merged into one. Highlighting a client from the client list and selecting SMS from the bottom of the display allows you to enter text and send the communication as an SMS.
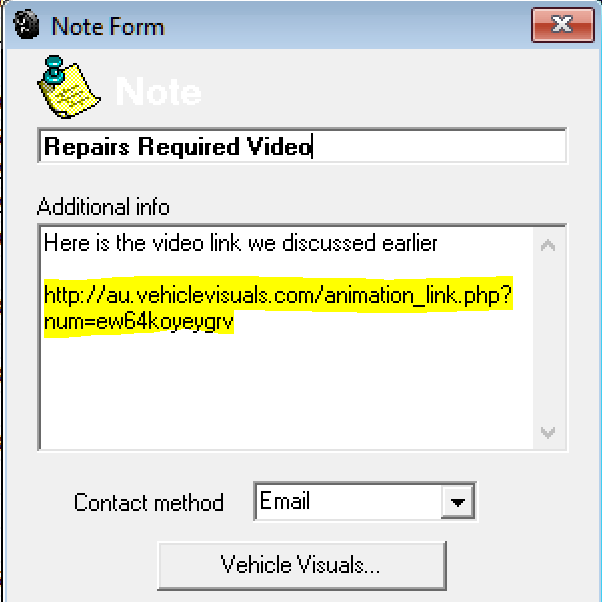
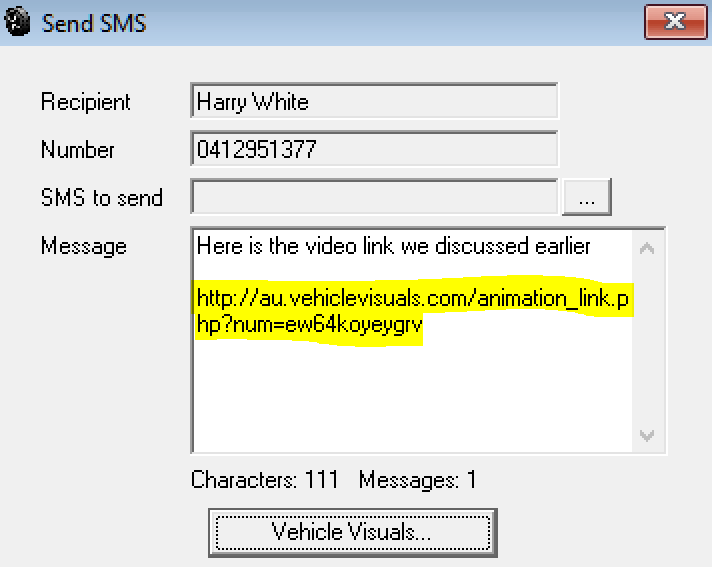
There is a character count on the bottom of the display that indicates how many messages your text when compiled creates in the example above we have used 270 characters and as you can see this equates to 2 x SMS messages. Note that if you have subscribed to vehicle Visuals you can add a video link to the SMS by selecting the Vehicle Visuals option positioned under the message text.
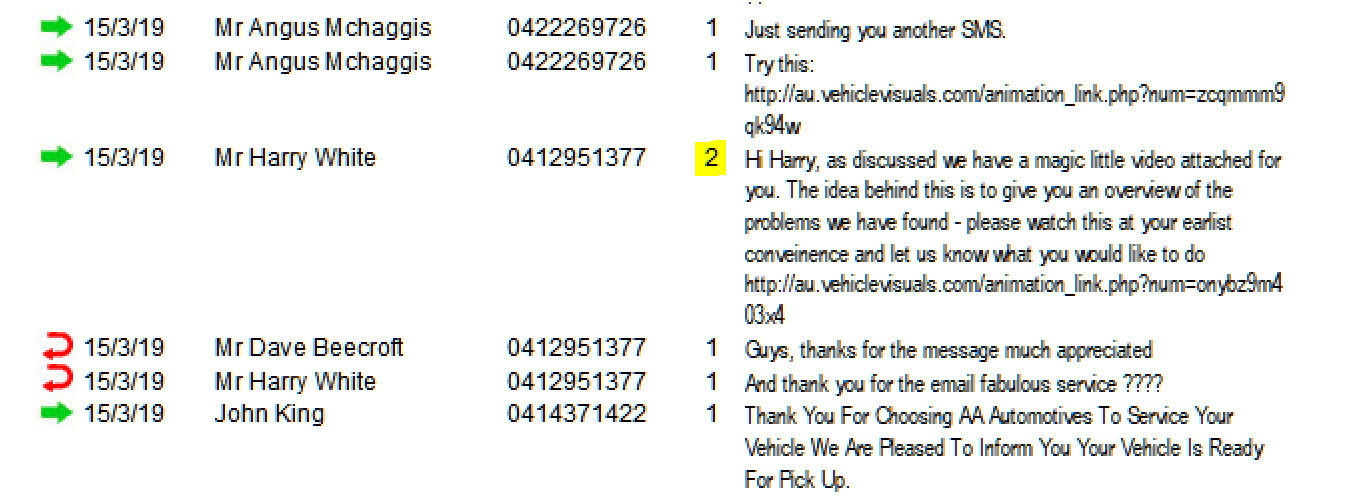
SMS Log : You can view your SMS activity via Reports / Other Reports / SMS Log, the format displays the message type outgoing / incoming, date, client name, mobile #, how many messages will be charged (see yellow highlight) and finally the message.
Note:If you message exceeds 160 characters you will be charged for each 160-character block thereafter. Ie: if your message is made up of 200 characters including spaces then you will be charges for 2 messages as your text exceeded 160 and was below 320.
Vehicle Visuals Overview: Microbase has formed an alliance with Vehicle Visuals, this association allows you to deliver high quality 3D video presentations to your client base via email, SMS and MyAutoConnect.
Vehicle Visuals is a cloud-based library containing hundreds of animations showing how each part of the car works and what can happen when the part fails. The original line-drawn animations are now replaced with realistic 3D animated models, but the core value of making technical concepts simple to understand remains at the heart of what they do.
Vehicle Visuals help you bridge the understanding gap by providing your service team with a tool that gets the message across in a simple, customer-friendly way. Service advisors using Vehicle Visuals are able to sell more service and repair labour, and receive higher customer satisfaction scores.
As workshops use this system to explain services to their customers, they experience:
An increase in repeat business as customers feel more confident that the services the repairer performed were truly necessary in maintaining their vehicle
More referrals as they tell their friends and family what a great experience they had at the repairer’s workshop
Higher sales as customers agree to more work being done, because for the first time ever they really understand what’s involved and why it is needed.
Subscribers access
Vehicle Visuals using either desktop computers or mobile devices such
as iPads or tablets. Your service team can even e-mail or SMS an animated
video (including audio) to a customer if they are not in the workshop,
and follow it up with a phone call to answer any questions and close the
sale.
Vehicle Visuals is used by national repair chains throughout Australia,
as well as a number of vehicle manufacturers through their authorised
dealer network service departments.
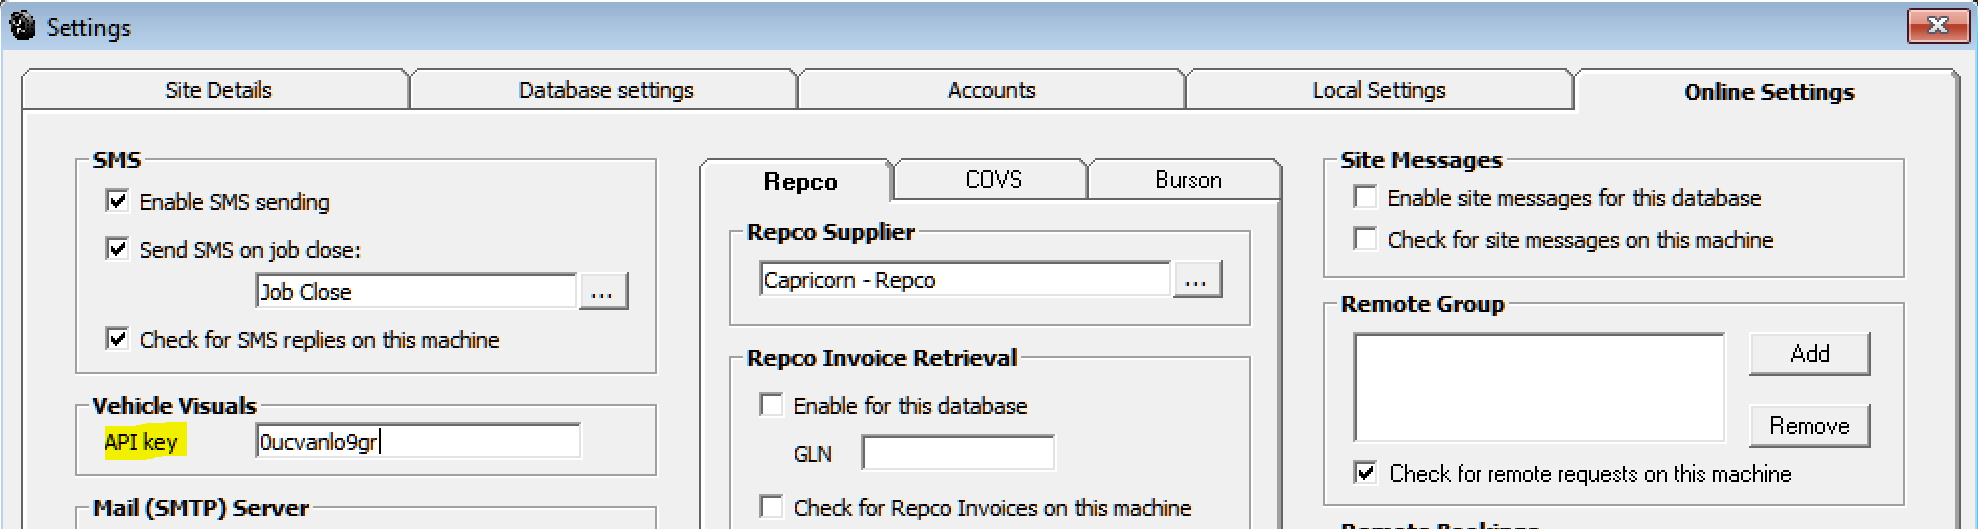
Vehicle Visuals, Activating: Vehicle Visuals needs to be activated prior to being available from Automation, to do this you need to visit their web site, a link is available from our online menu. Once you have committed to subscribe to the service you are issued with an API key this needs to be entered into File / Site Settings / Online > Vehicle Visuals. Please ensure the API key is typed correctly this code is case sensitive. Save your entry with OK (F12) once this action is completed you will have access to vehicle visuals from the SMS form, Email and MyAutoConnect.
Vehicle Visuals library is web based so when sending a video to a client you are simply sending the link to that library item, this will play on their computer or smart device including the voice over.
Vehicle Visuals, Sending A Link:Links can be inserted into communications sent via these three media:
SMS, Email and MyAutoConnect.
SMS:Open the SMS form, type your message and leave your cursor where you want the link to display, select the Vehicle Visuals option situated under the message box, choose your video from the selection, you can preview the video if you wish before committing the link to the message.

Email:Open an email form, type your message and leave your cursor where you want the link to display, select the Vehicle Visuals option situated under the message box, choose your video from the selection, you can preview the video if you wish before committing the link to the message.

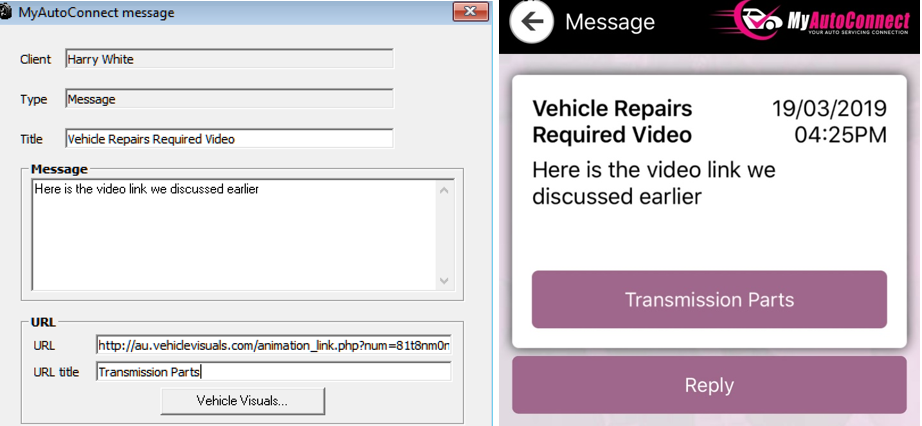
MyAutoConnect: Open the MyAutoConnect Message form, type your message, select the Vehicle Visuals option choose your video from the selection, you can preview the video if you wish before committing the link to the message, Automation will insert a relevant title into the URL Title field, you can remove this and type your own if you wish. The MyAutoConnect client simply clicks on the URL titled Transmission Parts to play the video.

Vehicle Visuals, Viewing Locally: To view a video locally, select the online menu, open the Display Vehicle Visuals Animation link, make your selection from the video list, highlight and select preview from the display window. The video will run on your machine via the web browser.
Remote Sites Parts Inquiry
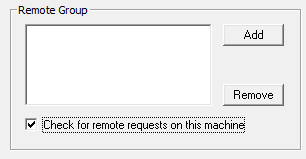
The right hand side of the online screen allows the operator to setup single or multiple sites to contact to check stock on hand.
Before adding sites ensure that the remote and local site/s have replicated with the Microbase server. This only needs to be performed once to record the site id., if you do not intend to send any further data to the server turn the replication feature off after the initial replication select add to enter a new site, type the site id. Into the field provided, save with OK (F12). Repeat the process for any other sites in the group. o finalise the setting select listen for requests on this machine, only one machine that has access to the internet on the network needs to have this option selected. Save your settings with OK (F12)
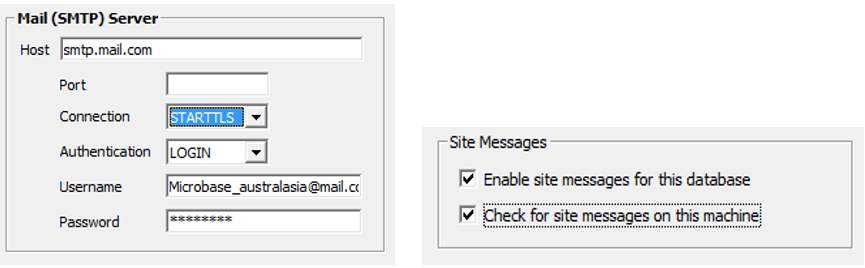
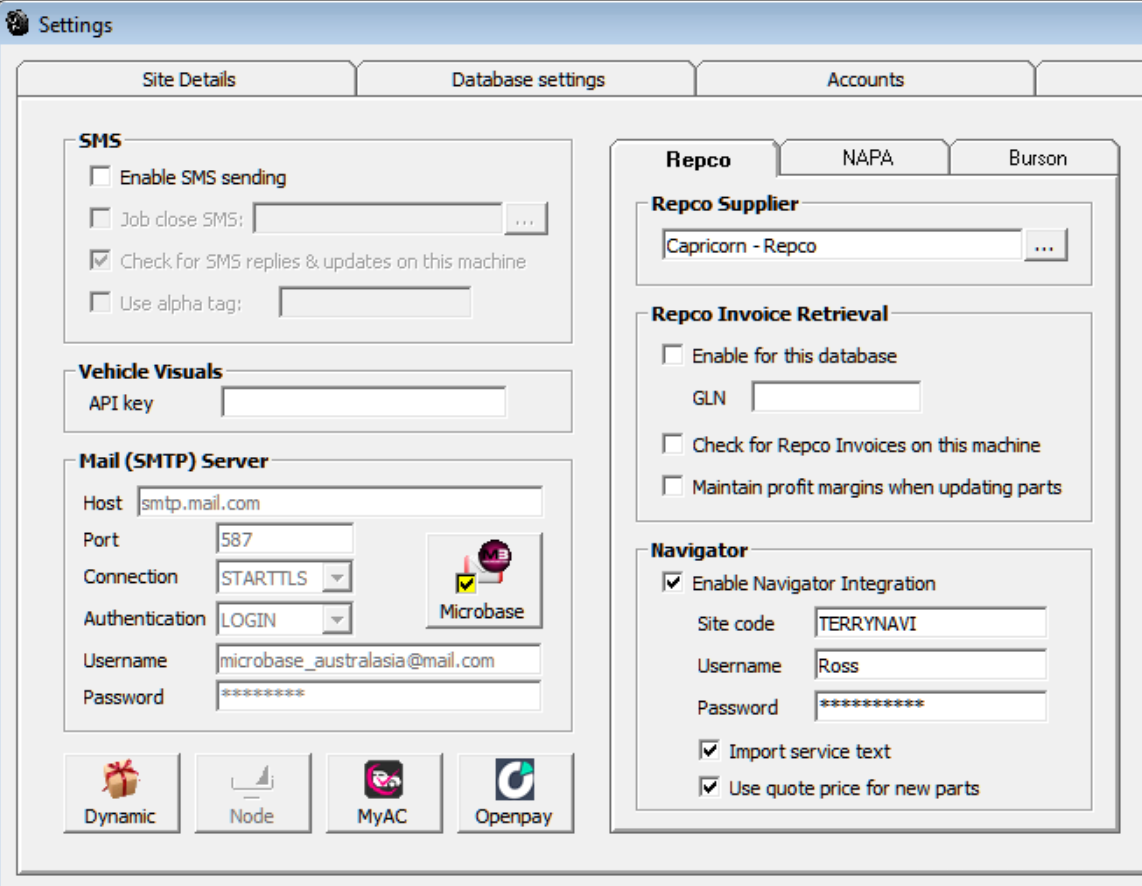
Mail Server
To send emails from Automation Premium you need to enter the details of your outgoing server (SMTP) it is not necessary to enter the SMTP prefix in the field. Selecting authentication provides you with further log on options. By selecting pop you can use your email address and password to connect to your service providers outgoing server. Note: Some services require additional information to logon, you will need to contact your internet service provider to obtain these details. If you are using web based mail services select the STARTTLS option, LOGIN, enter your username (email) and password to connect.
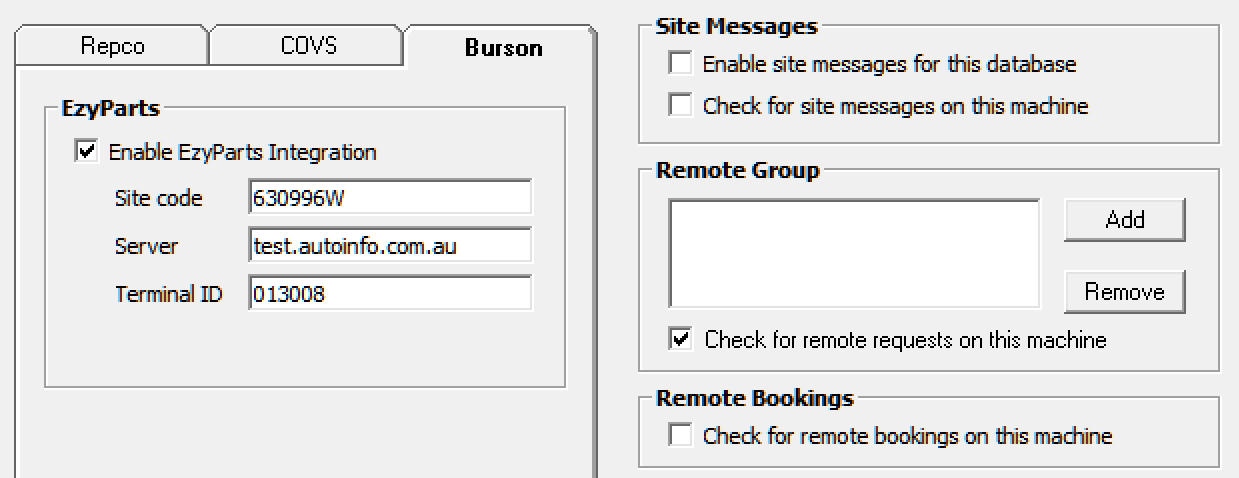
Site Messages
Microbase generates site messages from the central server. Most of these communications relate to support issues. If you wish to receive these messages select enable site messages and nominate which machine you wish to view these from.
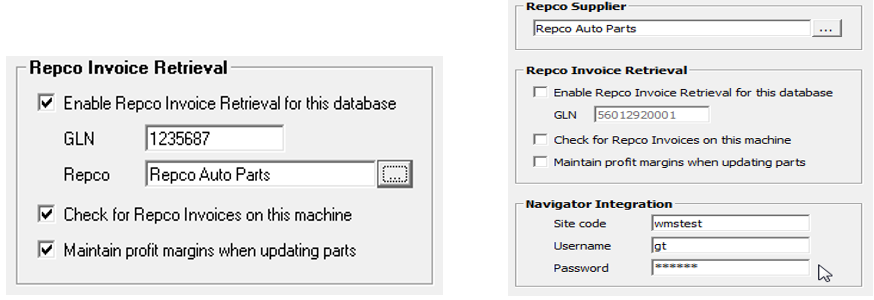
Repco / Coventrys Invoice Retrieval
Enter your GLN (account number) into the GLN field, select the button to the right of the Repco / Coventrys option, your supplier list is displayed point and double click on the Repco / Coventrys account you wish to use for import, the supplier name is displayed. There are two further options – Check for Repco / Coventrys invoices on this machine, selecting this option will initialise the import on the one machine, usually this would be your administration or office computer. The second option allows for the automatic maintenance of profit margins for any item that has increased in price the retail will be increased by the same percentage.
Navigator & Pro-link Integration
In the center of the form you will see your Repco parameters, select the button to the right of the Repco / Coventrys supplier field, from your supplier listing identify your Repco / Coventrys account from the list, highlight and save with OK. The record will display. Next move down the form and enter the site code, username and password. Save your choices with OK (F12). If you are using the Repco / Coventrys invoice retrieval system there is no need to search your supplier listing for the Repco / Coventrys account as this will already be entered in the supplier field. To apply quoted price from Navigator when bringing in new parts to the job card or into inventory select the option under the Navigator / Pro-link settings
To setup your Ezyparts link you will firstly need to download a copy of the application from Bursons Auto Parts from http://www.burson.com.au/ezypartsezypartsinstall, this needs to be authorised to be able to function. Once you have done this you next need to establish the link between Automation and Ezyparts. From the top of screen go to File / Site Settings / Online Settings in the centre of screen you will need to enter your Ezyparts credentials.
Once these have been entered you will see an Ezyparts icon on the task bar below the parts and labour section of the job card. Note: You can only establish your connection from the job as we have to send Ezyparts the vehicle information.
Remote Bookings Dynamic Rewards
Select this option if you wish to receive on line bookings from a web site that has been provisioned to send this data via the Microbase server. Dynamic rewards is a Repco option, if you are using this feature select the Dynamic rewards option and enter your operational data into the form provided. Select this option if you wish to change the default attachment when emailing invoices.
Enhanced emails allow you send html templated emails to your clients reminding them service is due. The format includes a response option that generates a booking directly back to the site. If you are using this feature select the option and nominate the machine to receive bookings. It is also possible to edit the html code by selecting the button to the right of the enable option.
Customisation of the templates for the email covering page include statements, estimates and summaries. To create a new template your text needs to be in HTML, this is not as daunting as it sounds as it is easy to enter the text using Microsoft Word and save the document as a web page, filtered, to add your template to Automation simply open the HTML document in Notepad (a Windows utility) via Windows Explorer (point & RH mouse click on the file name and select open with > Notepad) highlight the HTML code and copy (ctrl+c) then paste into the text window in Automation (ctrl+v).
To access the templates, select file / site settings / online > custom emails on selection you will be presented with the 4 x choices, click on the button to the right of the option to open the required template. Below is an example of an invoice template displaying the HTML code created in Word and copied via Notepad.
Sites that have their data hosted remotely can insert graphics directly into the HTML text, the lower task bar for these locations displays an addition images option. The option allows remote users to store their images in a personal folder on the Microbasecloud server. To insert an image simply click on the images icon, the image processing utility is now available.
To upload an image, click on the upload option, you can now navigate your PC and select the image you wish to include in your custom email.
Point and double click on the image this will initialise the upload process, once complete the image will be inserted into the list either as a thumbnail (small image) or file type depending on your PC settings.
When the image is in the list you can move your cursor to place you want to insert the graphic in your HTML template, then select insert from the lower task bar, you will now see a line of code entered into your document, this represents the image command line.
src='https://www.microbasecloud.com.au/databases/files/37/AutoResponse.JPG'>
Bear in mind that if you have centred your message you must include a command prior to the image reference to centralise your graphic the command is:
<p class=MsoNormal align=center style='text-align:center'><img
There is a separate document covering this process in detail available from:
http://www.microbase.com.au/resources/Custom Message For Emails.pdf
This document also makes reference to how sites that are continuing to run their database locally can insert graphics into an email template, please contact Microbase support to assist you.
For further personalisation Automation allows you to merge certain database fields into the template, to insert a merge field place your cursor into the HTML text where you want the data to be placed then select the merge option from the bottom of screen, point and double click on the entry in the field list and save your changes with OK (F12). You insert multiple entries into the template one at a time and then save all the changes with OK (F12).

To preview the email template, select the preview option at the bottom of display, your template will open in the default web browser, this allows you to view the exact format of your template. Below is how this template is displayed in your browser which is the same format that your client will receive via email.
One of the main advantages to using Automation is that as you create invoices, write cheques, and produce purchases orders; Automation is literally doing your bookkeeping. To make it easy to perform regular tasks, Automation saves information on various lists so you don’t have to retype it each time you need it. For example, in the client list, you can save addresses, phone numbers, and payment terms that apply.
It is not essential for the operator to have a full understanding of the accounting processes as Automation is programmed to allocate certain transactions to specified accounts, an example is parts and labour these are linked to an income account so there is no need to set the posting account. Likewise inventory purchases are posted to accounts payable and inventory asset accounts. It is however necessary for you to customise your chart of accounts to allow for specific postings. A standard chart of accounts is included in the data set of Automation, the chart of accounts can however be changed to suit an individual business. Accounts can be deleted, edited or added.
You get out only what you put in
If you want to see detail on reports, be sure to track it somewhere in Automation. For example, if Harry needs to know how his yearly travel expenses break down by airfare, lodging, and meals, first he needs to subdivide his expense account for travel expenses into three sub-accounts. Then he needs to break down his expenses each time he enters them into Automation.
What you shouldn’t try to track in Automation
There are some things that you should not try to track in Automation:
Personal finances:For tax purposes, it’s usually best to keep your business income and expenses completely separate from your personal income and expenses. (If you still want to track personal finances in Automation, set up a separate site file for them.)
Investments in shares or trusts: If the business owns these investments, you can track the cost basis as an asset. However, Automation doesn’t have the investment tracking.
Details that are not specifically related to your business accounting: For example, John needs to track when subscriptions expire so he can send reminder notices.
You can fine-tune your chart of accounts at any time by doing the following:
Add new accounts or sub-accounts. You can add sub-accounts to balance sheet accounts (for example, fixed asset accounts) as well as to income and expense accounts.
Delete accounts that have no transaction history
Change the name of an existing account.
Enter an opening balance for a new account
Arrange accounts in order of account type or name
Make one existing account the sub-account of another
Understanding the Account Types: Before customising your accounts it is important to understand what each account type represents:
Account Type |
Purpose |
Examples |
Accounts Payable |
What you owe suppliers and service providers |
Job parts and inventory purchases, what you owe for services rendered ie: accounting, window cleaning and consumables |
Account Receivable |
What your clients owe you |
Balance owing for jobs performed or parts and services provided |
Bank |
Cash you have available |
Relates to your trading account or cash on hand |
Cost Of Goods Sold (COGS) |
The cost of parts or services that you have on sold |
Includes parts taken from inventory, catalogue items or parts and services purchased for a specific job |
Credit Card |
Allows you track the transactions logged on your company credit card |
Purchases made for parts and services provided to your business |
Equity |
The net worth of the business |
Automation has 2 standard equity accounts – retained earnings and opening balance equity. |
Expense |
Expenses you incur to run your business |
Examples are bank fees, electricity, rent and vehicle expenses |
Fixed Asset |
Items of plant or buildings your business owns |
Tools, office equipment, shelving or the value of a property from which you operate your business |
Income |
Parts and labour you have sold |
Items and services sold on cash, charge or job invoices |
Other Current Asset |
Other assets that are not registered as a standard asset |
Examples include stocks & shares, loans made to other companies or individuals |
Other Current Liability |
Liabilities other than purchases from suppliers and service providers |
Includes tax owing and loans made to your business |
Long Term Liabilities |
Liabilities, such as loans |
Includes non-current liabilities |
Other Expense |
Any expense that you decide not to allocate as an expense |
Examples may include personal expenditure |
Other Income |
Income that is generated from activity outside of selling parts and labour |
Can include items such as rent or interest received |
Chart of Accounts, Accessing: From the top menu bar select lists / chart of accounts you can now view the standard chart of accounts and add, edit or delete (only non-system accounts and accounts that have no transactions applied).

Chart Of Accounts, Creating New Accounts: From the bottom of the accounts listing select new, this action opens the account details form enter the name of the account ie: Office equipment, account number (if you use these as references). It is possible to group account numbers by entering a dash in the record. If the account is a non-posting account (all master accounts should be set as Non- posting) enter NP or type Non-Posting into the account number field. Do not select non-posting accounts when processing transactions.
Chart Of Accounts, Creating Sub Accounts: If you wish to attach an account to a master select the arrow to the right of the sub-account field. A list of accounts is displayed, highlight the account you require and double mouse click. The account will appear in your chart of accounts as a sub account. Ie Depreciation – Hoist
You may want to use sub-accounts for two reasons:
You want a further breakdown of amounts for an existing account. To accomplish this, set up sub-accounts of the existing account. From now on, use the sub-accounts instead of the parent account. (You may want to edit earlier transactions so the breakdown shows up on reports covering a period before today.) For example, suppose you have an Insurance expense. You add sub-accounts for building, equipment and personal
You already have related accounts that you want to subtotal on reports (Or you may want to find them more easily). You set up a new parent account and then make the related accounts sub-accounts of the new parent.
Chart Of Accounts, Entering Opening Balances: Before entering your opening balances it is suggested you give some thought to how you want your chart of accounts to work for your business. If you require detailed reporting on any account you can set up sub accounts under a “parent” ie: you may wish to track the individual expenses related to running a motor vehicle in this situation you can create a parent account titled workshop utility and attach sub accounts to the “parent” which can include Fuel & Oil, servicing, insurance and lease payments. Using this method will allow you to report on each component that makes up the total running expenses of the workshop utility.
You may also wish to create individual accounts under fixed assets such as hand tools, hoist, computer system etc. Give some thought to items such a other liabilities these can include loans and taxes owing.
If you receive income from any other source that selling parts and labour set up specific accounts under other income, maybe you collect rent from a tenant if so this should be allocated to other income into an account titled rent.
Once you are satisfied with the structure of your chart of accounts you need to enter the opening balances into Automation. The standard chart of accounts records a zero balance on all accounts, it is possible to add an opening balance to an account posting if it falls into the following:
It is a new account
A standard account that has a zero balance
An opening balance can only be entered once, however if you make a mistake you can adjust with a journal or funds transfer entry.
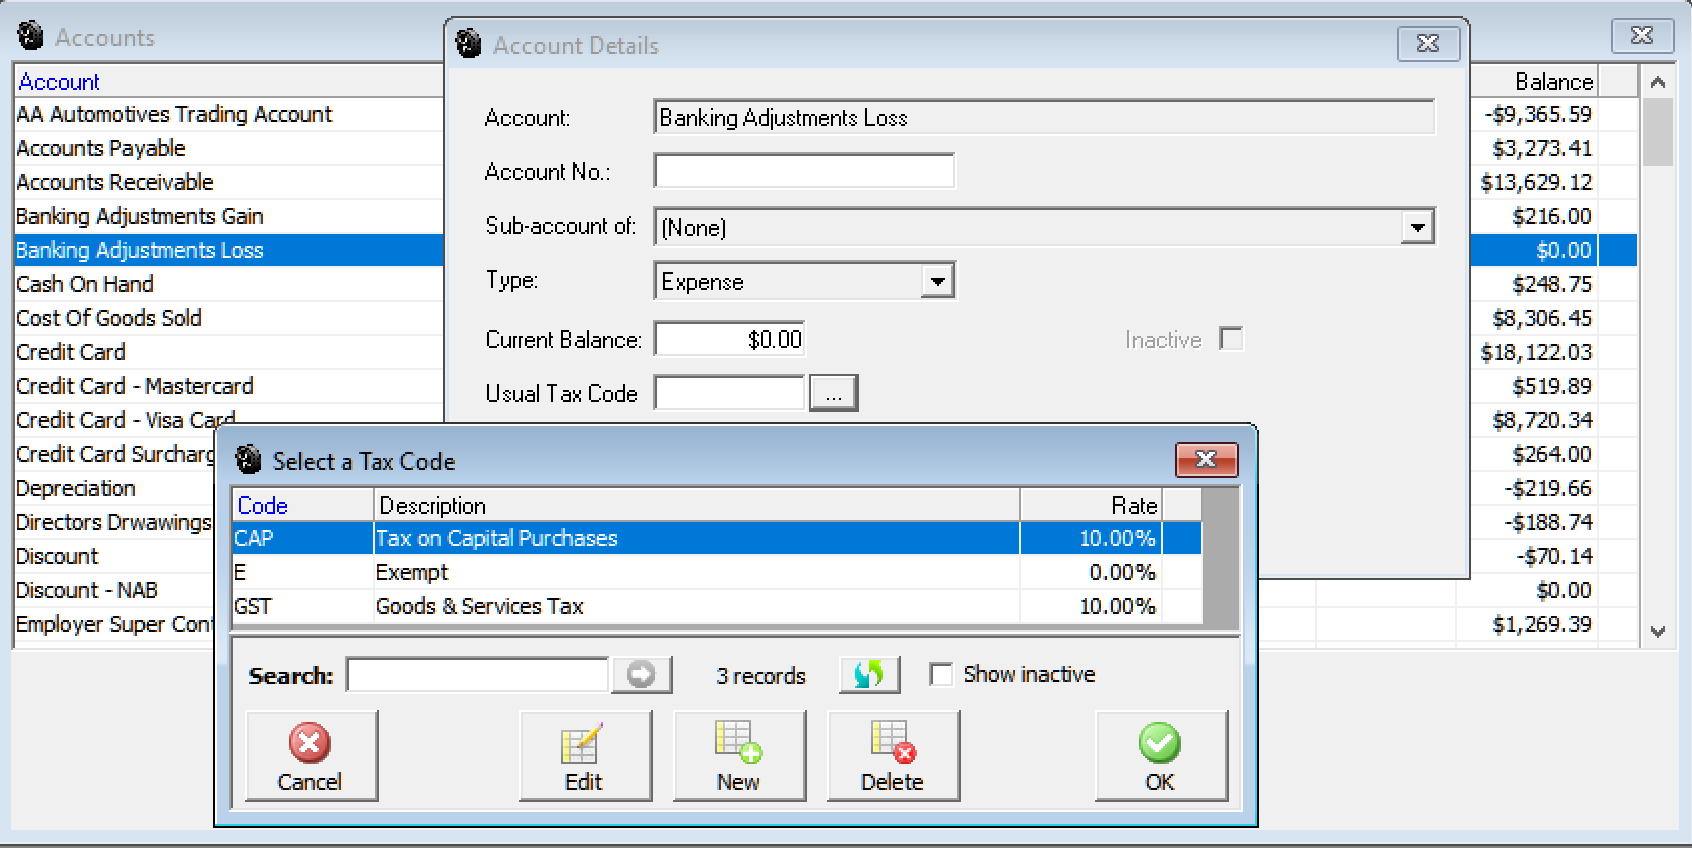
Default Tax Code: Selecting the button to the right of this field will display your tax code list highlight the record you wish to attach to the account and select OK (F12) to enter. You can only add tax codes to expense and fixed asset accounts. When posting to an account with a default tax code the system checks the code against the line item, if this does not match a warning message is displayed.
Your business’s equity comes from two sources:
Money invested in your company (capital investments)
Profits of your company
Of course, the owner can also take money out of the business. Such withdrawals, called owner’s drawings, reduce the company equity. Automation sets up two equity accounts automatically:
Opening Balance Equity:For every balance sheet account you set up with an opening balance, Automation records the amount of the opening balance in the Opening Balance Equity account. (Asset account opening balances increase the equity; liability account opening balances decrease the equity.)
Retained Earnings:If you have data for more than one financial year. The Automation balance sheet has a balance for the Retained Earnings account equal to the net profit from prior financial years. The balance for the Retained Earnings account does not display on the chart of accounts.
Some people like to track owner investments, owner’s drawings, and retained earnings prior to the Automation start date by putting them in separate equity accounts. If you decide to add additional equity accounts, Automation still adds the Retained Earnings and Net Income lines on your balance sheet.
Equity accounts for sole proprietorships/trader
Since all the equity of a sole proprietorship/trader company belongs to one person, tracking equity can be very simple. As of your Automation start date, all the equity is in the Opening Balance Equity account. Keep the equity in this account and perhaps rename the account to something like “Owner’s Equity.”
Note: When setting up a new account for owner’s drawings, enter a negative opening balance to show the total draws prior to the start date. The negative opening balance indicates that the draws have reduced the company’s equity. (Or, enter a zero opening balance and record drawings from now on)
Each partner may have invested in the partnership, and each receives a specified share of profits. Since partners are not employees, they don’t receive salaries or wages, but they may withdraw money against their share of profits. As of your Automation start date, all the equity is in the Opening Balance Equity account. Set up separate equity accounts for each partner.
If you don’t want to see further detail, the opening balance for each partner’s equity account should equal the partner’s equity as of your Automation start date. Since the company’s equity belongs to the partners, setting up new accounts should reduce the balance of opening balance equity to zero. Record each partner’s capital investment, drawings, and share of profits in the partner’s single equity account.
If you want to see further detail by adding sub-accounts, the opening balance for each partners “parent” equity account should equal zero.
(Optional) Add sub-accounts to provide the level of detail you’d like to see on the chart of accounts and on the balance sheet. For example, add sub-accounts for each partner’s investments, share of profits, and drawings.
In a company, you’ll usually want to separate the shareholders’ investment of capital from the shareholders’ share of earnings. To track paid-in capital or investments of shareholders, add an equity account with a name such as “Capital Shares.” Although you do need to have records of the names and investments of each stockholder, you probably won’t want to show this detail on your chart of accounts. For the opening balance, enter the total paid-in capital as of your Automation start date. After you have set up all your accounts, the amount remaining in Opening Balance Equity represents retained earnings prior to the start date. You can rename this account with a name such as “Prior Earnings” or “Pre 2016 Earnings.” Automation automatically tracks the company’s retained earnings for completed financial years in the Retained Earnings equity account. After the end of the year, you may distribute some or all of the retained earnings of the company to shareholders as dividends.
Journal Entries, Overview: During the course of business over a period of time you will make hundreds or thousands of accounting entries. To help you manage your accounts Automation allows you to make journal entries. A journal entry is simply a way of changing the balances of accounts.
All journal entries are double sided comprising of a both a credit and debit entry to your accounts the balance of a journal entry must always equal zero. It a journal does not balance Automation will not allow you to post the transaction.
Point at the field below the last account entry and mouse click, from the account list select the account you wish to make a debit entry to, we will select bank charges enter $20.11 into the debit column. The transactions now balance and the unallocated amount is zero.
Journal Entries, Using Tax Codes: You may need to allocate an amount to tax when processing certain journals. An example would be when adjusting a client’s account to write off a bad debt, say the amount to be written off was $110.00 you would credit the clients account with $110.00 and split the opposing debit entry between an expense account ($100.00) and GST ($10.00).
|
To apply tax to a journal select the tax code field click on the down arrow, next point and click on the required tax code, the tax amount is automatically calculated and placed into the tax amount field. Tax is calculated on the value of the debit or credit entry entered on the same line.
Journal Entries, Displaying: To display journal entries click on the accounts icon at the top of the screen and select general ledger. The general ledger transaction journal is displayed. To view journal entries only select the arrow to the right of the field at the top of screen displaying All Types – select journals from the drop down list. To display the details of a journal entry highlight either the debit or credit entry and double mouse click or select edit from the lower menu bar this action will display the journal entry form. The form displays debit and credit entries including the date reference number and any text memos.
To filter journal entries by date select the field at the top of the screen-displaying month to date. Select the arrow to the right of the text. Next highlight the period you wish to view or alternatively type the from to dates into the date fields also located at the top of the form – selecting the arrows on the right hand side allows you to pick from a calendar
Journal Entries, Creating: To create a new journal transaction select the Entry button from the bottom of the general ledger display or select admin / journal entries from the top menu bar. Either of these actions will display the journal form.


To enter transaction details select the button to the right of the first entry in the account field column.
You will see a list of accounts, select the account you wish to debit or credit to, double mouse click the account name is entered into the account field. Next point at either the debit or credit fields, enter the value. ie: Trading account enter a credit of say $20.11 (according to the principles of double entry accounting a credit to your bank account will be logged as a debit in your chart of accounts).
Journal Entries, Adjusting Debtor & Creditor Accounts: Automation allows you to adjust individual accounts assigned to accounts receivable (Debtors) and accounts payable (Creditors) with a journal entry. The entries are recorded in the bill payments (creditors) and Receive Payments (Debtors) forms, payments and receipts can be allocated to these transactions in the same way as process bills and invoices.
To adjust a debtors account select the button to the right of the account field, from the chart of accounts select accounts receivable, the name field can now be accessed, point and click on the button to the right of the field, from the client list select the client you wish to raise the adjustment for, select OK from the bottom of the client listing. The clients name is now displayed in the form.
If you wish to increase the balance of a debtors account place the value (in tax) into the debit column on the same line as the client’s name. Next select the account you wish to post to if there is a tax value enter the excluding tax amount to the debit column on the same line, to enter the tax value select the tax code and the calculated value is automatically entered in the tax amount field. Note: That the tax and debit or credit value can be changed, however the total credits must always be equal to the total debits for the transaction to be posted.
Journal entries are displayed in the following format on the bill payment and receive payment forms

Receipts (Debtors)

Bill Payments (Creditors)
Ticking the box at the end of the line allows the operator to allocate payments or receipts to a journal.
Note: It is best to view your chart of accounts pre and post when entering journals, this is an easy way to determine whether the transaction has debited and credited the correct accounts. Do not worry if you get it wrong Automation allows for easy editing of journals.
Journal Entries, Editing:To edit a journal go to the general ledger by selecting the accounts / general ledger option from the top menu bar. Search for the entry you require, highlight and double click on the line item or select edit from the lower menu bar. You can now alter any of the details except the reference number.
Journal Entries, Deleting: Journal entries can be deleted from the journal form by selecting the delete function or the general ledger screen. If deleting from the general ledger use the transaction type filter to display only journal entries, your search can be further defined by the entering the date or transaction number. Highlight the transaction you wish to delete and click on the delete icon at the bottom of the screen. Only journal entries that have not been reconciled can be deleted.
Journal Entries, Viewing: Use the previous and next options at the bottom of the form to locate previous entries, if you wish to create more than one journal entry using the next option will open a blank transaction form.
Journal Entries, Recurring Creating: Automation allows you to store recurring journal entries, to store select the recurring option at top of form from the drop down list select the cycle ie: Monthly, next move to the next date field and ensure the next payment date is entered. Save with OK (F12).
Journal Entries, Recurring Posting: To post any due recurring journals go to Activities / Recurring Bills & Journals on selection your saved bills and journals are displayed, entries that have exceeded the posting date will have a tick in the check box, you can however manually select the entries for processing prior to the due date. Once selected selecting the OK (F12) option will process the journals (and bills if you wish) creating new entries automatically for the next cycle.
Journal Entries, Reversing:If you wish to reverse entries (debits to credits, credits to debits) select the reverse option located at bottom the journal form
Funds Transfer, Overview: Automation allows you transfer funds from one account to another using the funds transfer feature. Fund transfers vary from a journal entry, you can allocate a media type from this form ie: cheque, cash, credit card or EFT.
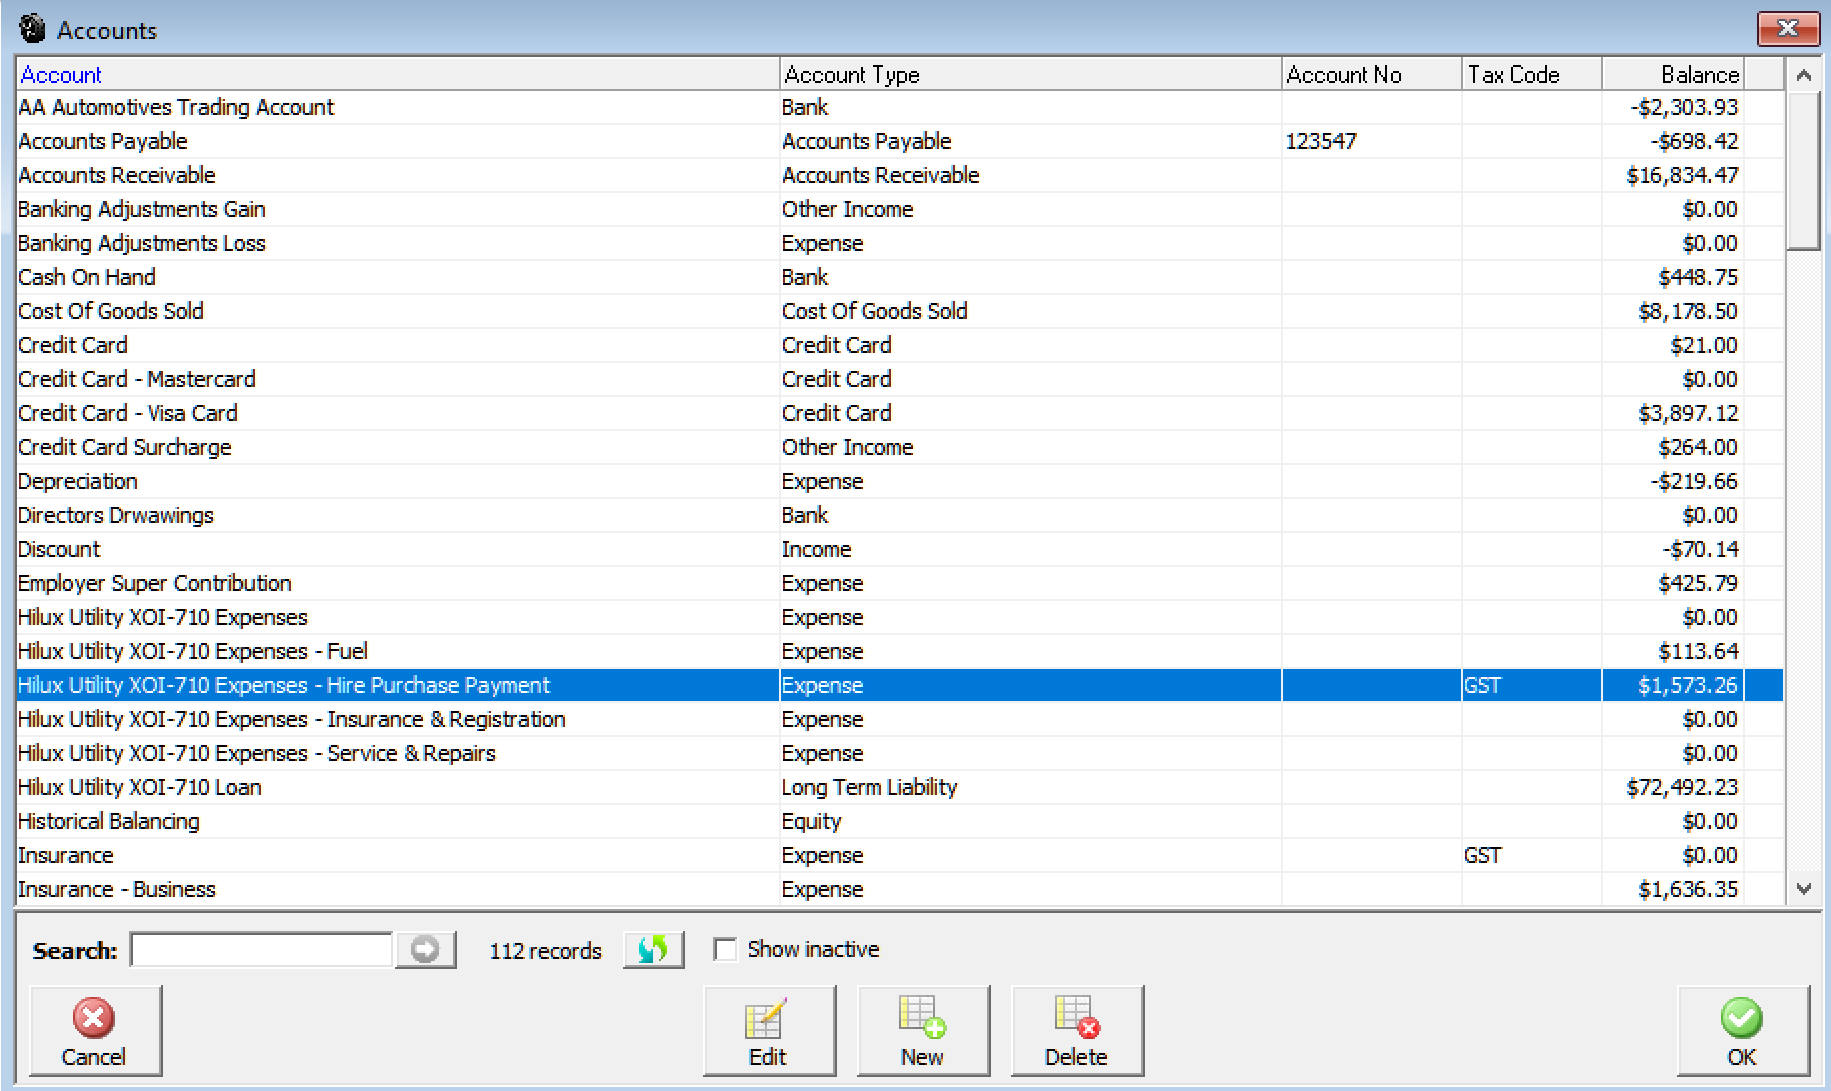
Funds Transfer, Accessing: From the top menu bar select Admin / Transfer Funds, the transfer form is now in view. Alternatively transfers can be viewed from the general ledger screen by using the filter to select transfers. To view the details of a transfer highlight the line item and double mouse click or select edit from the bottom menu bar of the general ledger transaction display.
Funds Transfer, Transferring between Accounts: You can transfer funds between any two balance sheet accounts in your chart of accounts. For example, you may need to transfer funds from a savings account to a current account to cover your weekly payroll.
From the Admin menu, choose Funds Transfer
Enter the amount you want to transfer
Select a media type from the drop down menu
Select an account to transfer funds from, and an account to transfer funds to.
Click OK.
Funds Transfer, Deleting a Transfer: Transfers can be deleted by selecting the delete option at the bottom of the display or by opening the general ledger screen highlighting the transfer you wish to remove and select delete from the bottom menu bar of the display.
Note: Only transfers that have not been reconciled or allocated on the bill payment or receipts form can be deleted.
The funds transfer form allows you to transfer money between accounts and allocate a media type. To make adjustments between accounts you should use the journal entry function.
Navigating Transactions: Use the previous and next buttons to scroll through transactions. If you wish to enter more than one transfer completing the transaction with next will open a blank form.
Overview: Automation allows you to enter opening balances into any account type displayed in the account list, you will need to access this feature if you wish to transfer closing balances from your previous accounting system. Accounts payable and receivable values need to be allocated against each individual supplier and customer this is done by selecting a “special” entry from the parts listing and applying to a charge invoice for customers, for suppliers (accounts payable) create a bill and apply the current outstanding value via the add other option.
Opening Balances, Entering Values: To record an opening balance against an account select lists from the top menu bar from the menu select chart of accounts, if you wish to record a value against an existing account point and double click on the line item or highlight and select edit (F2). At the bottom of the display is the opening balance field, enter your amount and save with OK (F12).
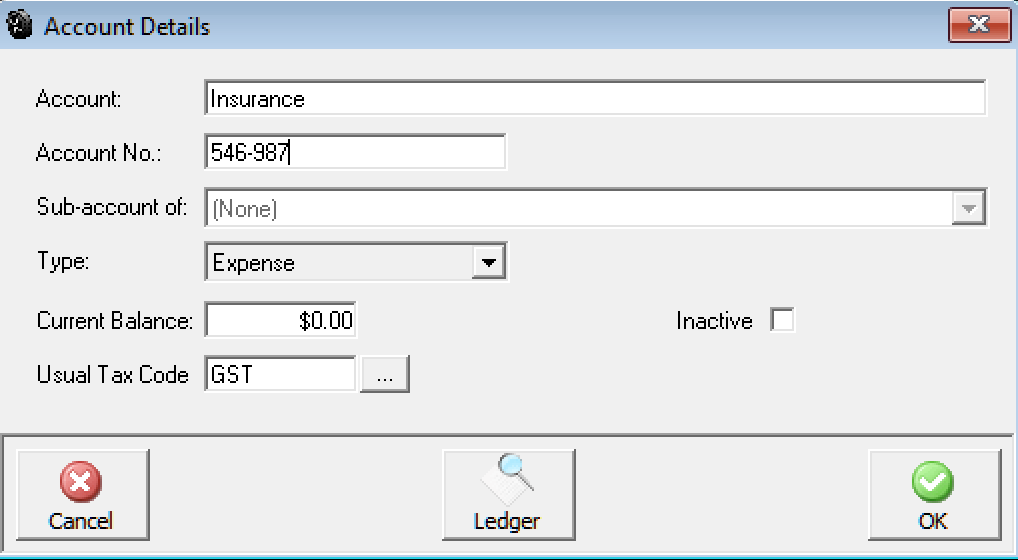
The current balance field can only be used once to add an opening balance. An opening balance can’t be applied once transactions have been recorded against the account. If the current balance field is “grayed out” it is not accessible indicating that transactions have been recorded. The balancing account is opening balance equity, the account value will increase / decrease by the amount entered depending on whether it is a positive or negative balancing
Opening Balances, Debtors:It is necessary to create charge invoices for clients that owe you money. Automation has a “special” entry DEBTORS (Part No. Field) displayed in the parts listing that needs to be applied to the charge invoice. The amount entered should be the total that the client owes. It is also suggested that the invoice is closed on the last day of the month the debt was incurred. To enter a client’s opening balance perform the following:
1) Select Invoices / Charge from the top icons (alternatively press F7)
2) Create the client if not already entered by selecting new from the bottom of the client listing entering the relevant details, save the client form by selecting OK (F12).
3) With the client highlighted select OK from the bottom of the client listing – A charge invoice is displayed.
4) From the charge invoice screen select add parts, search the listing for an item with the part number DEBTORS select and select OK from the bottom of the parts list.
5) Click on the value of the DEBTOR item at the end of the line and enter the outstanding balance. (GST applies if you are reporting on a cash basis, with accrual the tax code should be set to E for exempt – please check this with your accountant before proceeding).
6) Select Close from the bottom of the charge invoice

Change the date on the job close form to the last day of the previous month and select OK.
The transaction is displayed in your sales screen; the balancing accounts are Accounts Receivable / Opening Balance Equity. Note: Do not change the balancing account set-up on the DEBTORS item
Opening Balances, Creditors: On the opposite site of the ledger you need to enter the value of outstanding bills against each supplier, again this can be entered as a single value through purchasing. To enter outstanding values against suppliers perform the following:
1) Select the purchasing icon from the top of the screen
2) Select new from the bottom of the display, select your supplier, to make an entry select new from the bottom of the supplier list complete the details and save with OK (F12). Highlight the supplier and select OK; you are now in the bill form, enter OB (opening balance) in the Invoice / Ref # field. Change the date to the last day of the previous month.
3) Select the Add Other option from the body of the screen, highlight the CREDITORS OPENING BALANCES item and select OK (F12). A new entry is displayed on your bill.
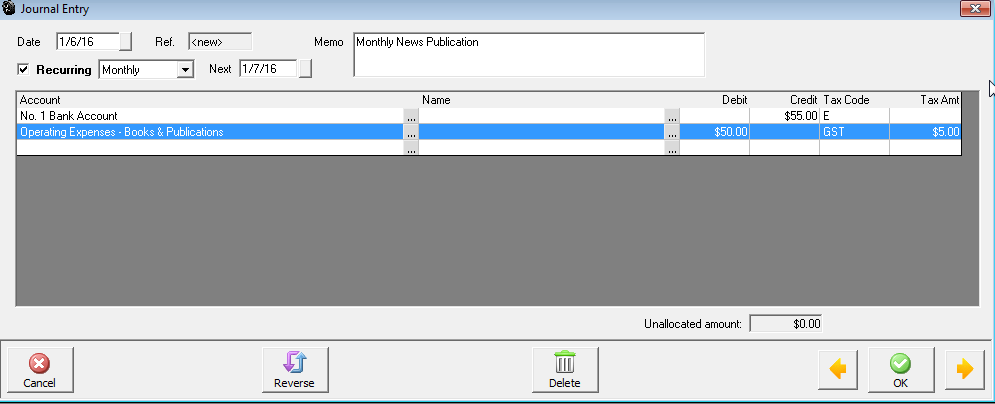
Click on the value of the CREDITOR item at the end of the line and enter
the outstanding balance. (GST applies if you are reporting on a cash basis,
with accrual the tax code should be set to E for exempt – please check
this with your accountant before proceeding).
Save the transaction by selecting OK (F12) from the bottom of the bill display – The amount can now be processed in the normal way. Note: Do not change the balancing account set-up on the CREDITORS item.