
Overview: Automation Premium must be connected to the internet to perform correctly, the server application has to check the Microbase server for registration compatibility, uploads and downloads of site specific data.
Internet, Accessing Functions: To access options select the on-line option from the top of screen, the drop down menu contains the following selections:
Microbase Website:Connects you directly to www.microbase.com.au
Microbase Support::Connects you directly to the support pages.
Release Notes: Option takes you to Microbase version release notes.
Contact Us: Microbase contact page, to send an email point and double click on the email address.
Suggestion Box:Send us your suggestions for future development.
Online Job Card: If you are setup to use the online job card selection will take you to the login option.
Auto Update:Allows you to manually check for on-line software updates
On-Line Utility: Support application that you may be requested by Microbase to select.
Capricorn Website: Connects you directly to www.capricorn.com.au
Capricorn Reconciliation:Initialises the Capricorn statement reconciliation feature.
Microbase Quick Support: Allows you to open Install and open TeamViewer for online support.
Site Communications Report: If your location uses central marketing services this option allows you to print a marketing report for activity over any date range.
Customising: The online settings from File / Settings option are configured in the following way
SMS, site messages, Navigator / Pro-link, Repco / Coventrys supplier selection & detail, Remote group, remote bookings, customer satisfaction surveys, invoice emails, enhanced marketing emails. Dynamic Rewards & Node settings (Online job card).
Automation allows the user to send SMS messages to single or multiple clients, for this feature to work you must have an internet connection plus an account and password from Microbase Australasia. Enter the account details into the fields provided.
If you wish to send a default text message to your clients on job card close select the Send SMS on job close option, point and click on the button to the right of the field, a list of SMS messages is displayed, select the one you wish to send and confirm by selecting the OK (F12) option at the bottom of the list.
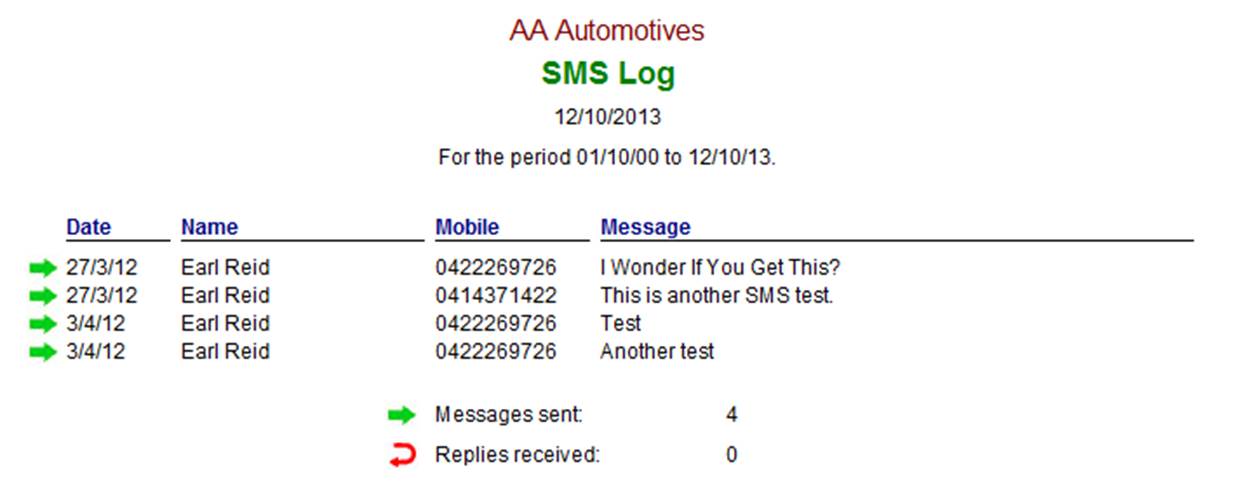
Select check for SMS replies on this machine. This option should only be selected for one machine. Replies to SMS are logged on this machine, SMS messages - sent and replies are stored on the client form in the tasks section. It is also possible to run an SMS report for any date range from Reports / Other reports
On installation of Automation your site will be recorded on the Microbase server which allows our support staff to communicate directly with a site through Automation. This facility will primarily be used to enhance support procedures
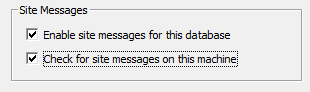
Microbase generates site messages from the central server. Most of these communications relate to support issues. If you wish to receive these messages select enable site messages and nominate which machine you wish to view these from (only one machine should be set to receive messages).
Receiving a message: Automation when connected to the internet is constantly scanning for incoming messages, when a message is received it will be displayed on your screen.
When the OK option is selected the message is saved to the site messages list available from Lists / Site Messages. The stored messages can be read by clicking on the line. To delete a message simply highlight and select delete from the bottom of the list

To send emails from Automation Premium you need to enter the details of your outgoing server (SMTP) it is not necessary to enter the SMTP prefix in the field. Selecting authentication provides you with further log on options.
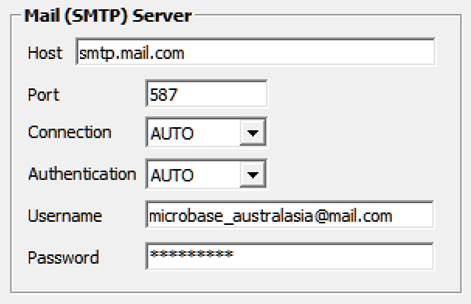
By selecting pop you can use your email address and password to connect to your service providers outgoing server. Note: Some services require additional information to logon, you will need to contact your internet service provider to obtain these details.
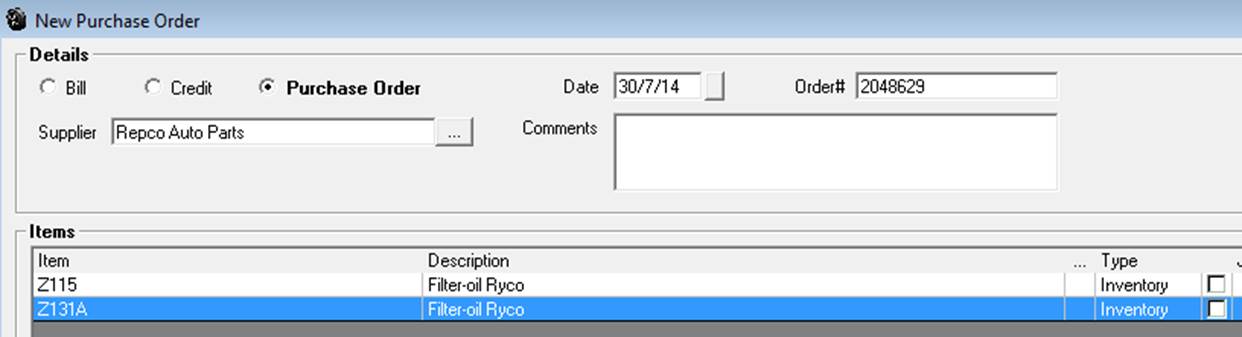
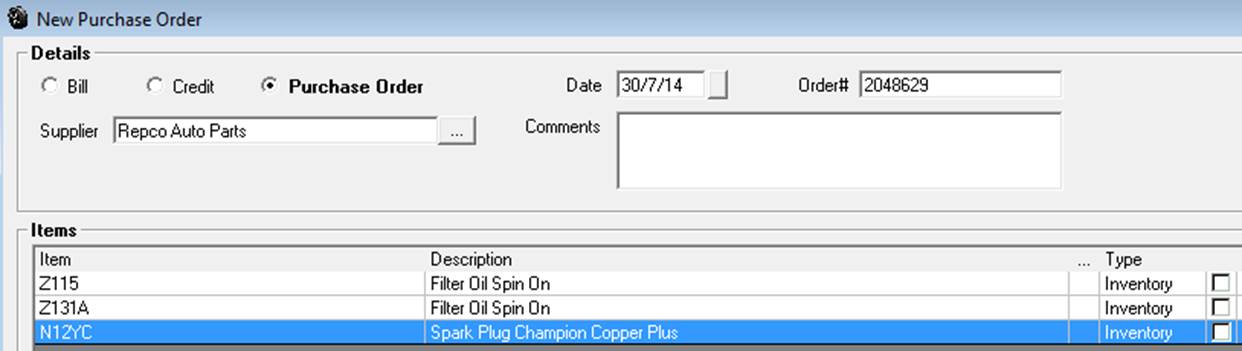
Function Overview: Microbase in conjunction with Repco Auto Parts and Coventrys have developed an on-line facility that allows Repco / Covs registered users to import bills directly to Automation’s purchasing module. Line items included in these imports can be allocated to inventory or jobs as buy-ins. For this feature to operate you will need an internet connection plus your Repco / Covs account has to be activated for data import via the application, you will need to contact Repco or Coventrys for these permissions.
Set-up: To initialise your Repco invoice retrieval feature select from the top menu bar File / Setup, point and click on the on-line tab. The Repco invoice retrieval options are located on the bottom left hand side of the display.
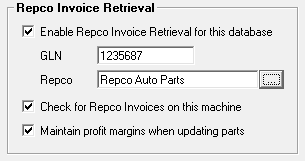
Enter your GLN (account number) into the GLN field, select the button to the right of the Repco option, your supplier list is displayed point and double click on the Repco account you wish to use for import, the supplier name is displayed. There are two further options – Check for Repco invoices on this machine, selecting this option will initialise the import on the one machine, usually this would be your administration or office computer. The second option allows for the automatic maintenance of profit margins for any item that has increased in price the retail will be increased by the same percentage.
Managing Imported Repco Invoices: Imported bills are listed in your purchasing screen; the invoice number is displayed in blue, and once the invoice has been opened and closed the invoice number will be displayed in black indicting to the user that the transaction has been processed. It is suggested from an operational perspective that imported transactions are accessed and processed when the paper invoice is received. All items will be received as inventory unless the part number has already been allocated as a buy-in on the local system in which case it will retain the previous allocation. Version 261D and later allow for easy conversion of parts between buy-ins and inventory.
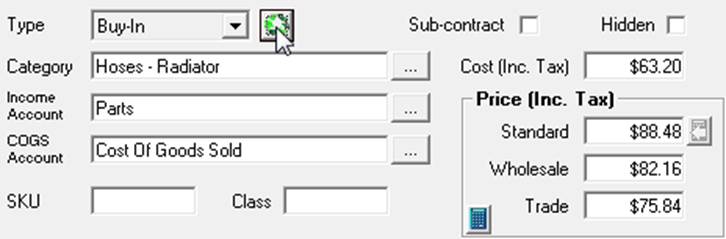
To convert an inventory item to a buy-in (or visa-versa) point and click on the line item, from the part form point and click on the button to the right of the type field, select the conversion option. Using the import process requires all buy-ins to be allocated to jobs from the purchasing module.
Function Parameters Relating To Data Import: Catalogue or new items will be allocated to inventory – when a catalogue part existed before download the item is converted to inventory the cost is recorded in the part form however the sell if originally zero will remain with no value recorded..
When a duplicate reference number is found, the user is prompted with three possibilities:
a) Replace existing (automatically backing out previous data).
b) Keep existing and create a new record (with automatically created different reference number)
c) Keep existing and ignore new data. There is also a checkbox at the bottom of this form which you can check if you want to use the option you select for all duplicates in the current download (saving you from clicking the button for each and every invoice).
If a match is found from a new bill to an existing PO (this field is in the Repco data), the link is created and the outstanding/received fields are populated accordingly. Inventory items/Buy-ins can be interchanged from the part details form by selecting the button to the right of the type field
Overview: Microbase in conjunction with Repco Auto Parts and Coventrys have developed a seamless interface that allows customers to order parts on-line via their local purchasing module. Parts identified by Repco / Coventrys part numbers within the Automation stock listing can be selected, placed on a purchase order and transferred directly into the ordering system. Our interface constitutes “push and pull” architecture allowing the amalgamation of parts sourced from within Automation or from Navigator / Pro-Link to be appended to the final Automation purchase order.
In addition parts can be sourced directly from the job card via the Navigator interface, any selections where there is no stock on hand within the Automation parts listing will result in the purchasing module creating an order for transfer to Navigator.
To complete the Repco functionality Automation Premium interfaces with Smart Estimate facilitating the download of servicing information either onto a job card or estimate. The manufacturer’s checks for the service type is also imported into Automation.
Navigator / Pro-Link Interface Settings: To initialise the interface you must be a Repco customer with a valid account that allows you access to Navigator and Smart Estimate. Currently you will use a site code, username and password to activate the Repco modules, these need to be entered into on-line setting within Automation, when recorded you will have a seamless entry to Navigator / Smart Estimate ie: no need to log on as Automation will perform this task.
Navigator / Pro-Link Setup: From Automation Client select File / Settings, point and click on the on-line tab
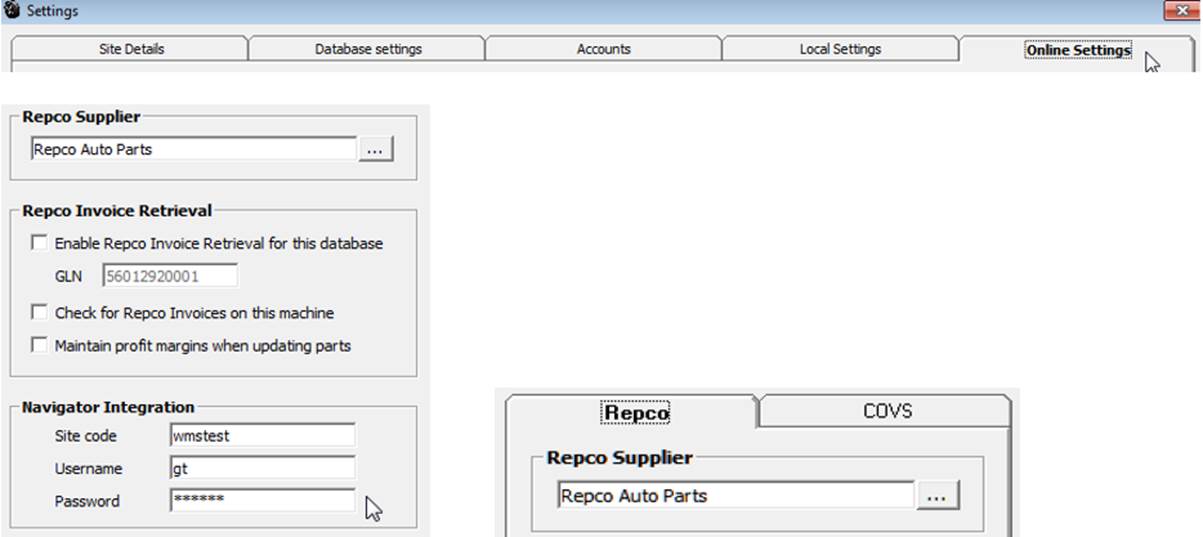
You can select single or dual interfaces, the following instructions reference Repco, however the process is the same for Coventrys Pro-Link application. In the center of the form you will see your Repco parameters, select the button to the right of the Repco supplier field, from your supplier listing identify your Repco account from the list, highlight and save with OK. The record will display. Next move down the form and enter the site code, username and password. Save your choices with OK (F12). If you are using the Repco / Covs invoice retrieval system there is no need to search your supplier listing for the Repco / Covs account as this will already be entered in the supplier field.
The Job Card, Integration: Create the job card in the normal way, to add parts from navigator directly to the job card select the Navigator option from the bottom of the form you will launch into Navigator. If the vehicle details in Automation correspond with the Repco listing you will be taken to categories for the make, model, series and engine type recorded on the job card. If the vehicle details are not recognised by Navigator then you will need to “drill down” in the normal way to the specifications required. Use Navigator to select the categories and parts required, populate your odrder pad, check the items are correct then select the return parts option at the bottom of the Navigator order pad.
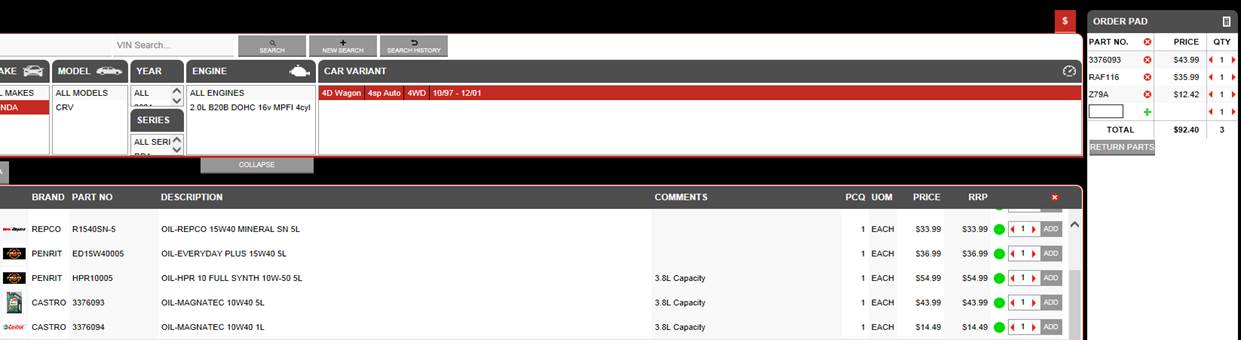
Selecting return order initialises the import of parts to the job card, when the process is complete you maybe requested by some browsers to close the web page, if you see this message select yes.

Parts that are not in the local parts file will be added to the list, any parts that are not available from local stock are highlighted in red. If you wish you can create an order for these items directly from the job card by selecting the order option from the bottom of the form.

When selecting order you will be prompted to select whether the order is to made via Repco, to use Navigator select yes, this action will open a purchase order displaying the parts not available on the job card
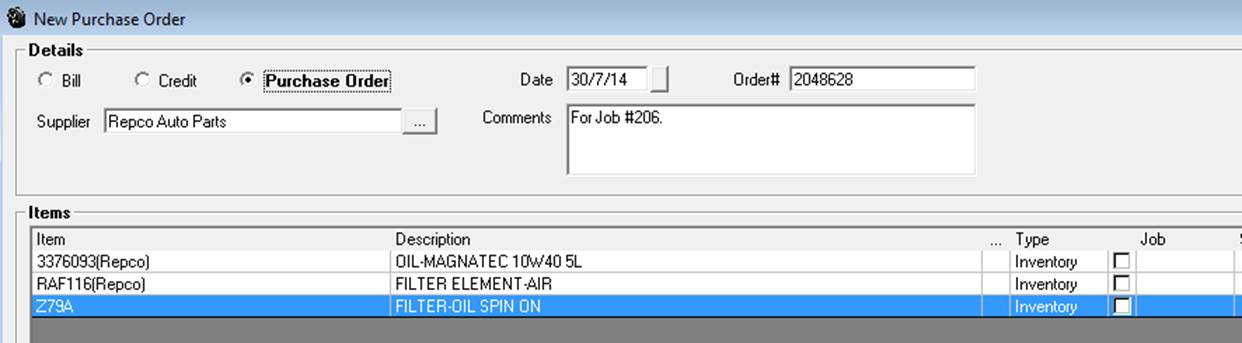
If some of the parts to be order are buy-ins, select the line item point and double click, from the part form change the inventory item to a buy-in by selecting the 3 green circles to the right of the type field, close the part form then select the job and service allocation from your PO. To send the order to Repco select the Navigator option at the bottom of form. Again If you are prompted with an option to close a web page select yes. Once the order has been sent to Repco this is indicated on the PO therefore avoiding torder duplications.
Purchasing, Integration: To purchase parts via navigator go to purchasing in Automation, select the purchase order option, select your parts to order from your stock list, be aware only parts with Repco numbers will be accepted by Navigator. To process the order select your Navigator option, this action will launch Navigator into the parts ordering screen. If you wish to make further selections from Navigator direct do this in the normal way on selecting send order the PO in Automation is automatically updated with your Navigator selections.
Parts selected in Automation
One addition made in Navigator

On completing the order 3 items populate the Automation purchase order
Navigator / Pro-Link, Parts Categories: Unfortunately Navigator does not export any category information so additions to the parts list will need to be categorised (default for Repco locations).
Smart Estimate Integration: The integration also allows for importation of servicing information from Smart Estimate. The information can be included on a job card or estimate, to enter the Repco system displaying the correct vehicle details it is essential that you complete as much information as possible on the vehicle form – For Repco locations most of this is available from the make and model listing which includes make / model / engine type.
Job Card, Importing Service Parts & Text: Open the job card in the normal way, you can initiate the data transfer to a blank or populated job card. Only exception is the labour service (LAB). Smart Estimate brings service times onto the job card as labour, if you already have a labour service on the form it will be overwritten by the imported data. If you wish to use LAB on the same job card or estimate we suggest you place a service on the job card such as 100,000 kms. Service then move the Smart Estimate parts to that service, retain labour on the form and add parts as you would normally.
Service parts, labour and text in Smart Estimate
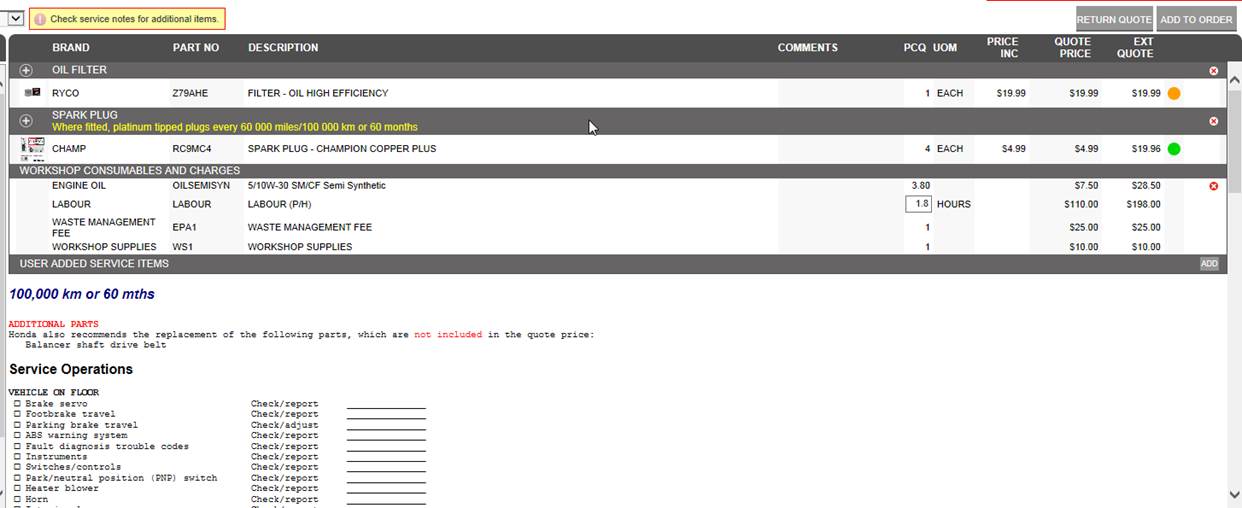
On selecting the return Estimate option parts service and text populate Automation Premium

Text Editing, Smart Estimate Import: Text imported from Smart Estimate often contains checklists, for Automation to import these lists in columns our text field has to be reset to courier. When using Smart Estimate checklist you will need to retain this font for any additional text in the work done field. To change the text box font type select the fixed width option located to the right of the field.
Note: Once selected all text in that field will be fixed width
Parts Ordering: If you wish to order parts directly from the job card via navigator select the order option from the bottom of screen, parts listed in red will be inserted onto the purchase order for transfer via the Navigator utility.
Service Text: If you do not wish to import service text to the job card there is a global setting in File / Settings / On-Line that disables this feature. If you wish to delete text from a job card simply highlight using your mouse and press the delete key on your keyboard.
Estimates, Smart Estimate: To populate an estimate using Smart Estimate follow the same process as described for a job card. The parts order will not be visible in purchasing until the estimate is converted into a job. To upload an order follow the instructions in this section.
Repco / Coventrys Locations, Invoice Retrieval: Microbase passes the order number onto Repco via Navigator, if this order number is received with the on-line invoice it will convert the original order into a bill. We do suggest whether you use invoice retrieval or not you regularly check your purchase orders to ensure there is not a “back log” of orders that have already been delivered.
Converting Orders To Bills: When parts are delivered it is possible to convert the original purchase order to a bill by simply opening the purchase order, selecting the radio button titled bill and entering the supplier invoice number. For further information on this process refer to the purchasing notes in your operations manual.
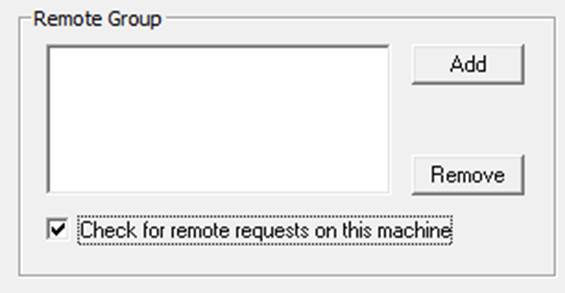
The right hand side of the online screen allows the operator to setup single or multiple sites to contact to check stock on hand.
Before adding sites ensure that the remote and local site/s have replicated with the Microbase server. This only needs to be performed once to record the site id., if you do not intend to send any further data to the server turn the replication feature off after the initial replication. Select add to enter a new site, type the site id. Into the field provided, save with OK (F12). Repeat the process for any other sites in the group. o finalise the setting select listen for requests on this machine, only one machine that has access to the internet on the network needs to have this option selected. Save your settings with OK (F12)
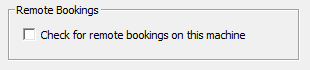
Remote Bookings
Select this option if you wish to receive on line bookings from a web site or your enhanced email communications. Only one machine should be set to receive these requests.
This feature is for Repco sites only, if you wish to use this service select the checkbox under the heading. You will need to contact your Repco representative to initialise the sending of client survey emails.

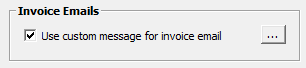
To open the option select the button to the right of the function title. You will now see the HTML editor, this screen allows you to paste HTML code directly to the form
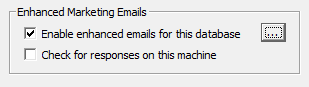
Enhanced emails allow you send html templated emails to your clients reminding them service is due. The format includes a response option that generates a booking directly back to the site. If you are using this feature select the option and nominate the machine to receive bookings. It is also possible to edit the html code by selecting the button to the right of the enable option.
Dynamic rewards is a Repco option, if you are using this feature select the Dynamic rewards option and enter your operational data into the form provided.
.

The relationship between your on-line job card, remote server database and the local machine running Automation Client combined allows access to all functions from the on-line job card. Obviously both the terminal running client and the job card are communicating with the database so data is constantly moving back and forth between terminal, remote server and on-line job card.

To make all functions available there is however a second line of communication required from the job card via the server back to the node terminal. Basically the node terminal shares some of its functionality with the job card, for instance the sending of SMS messages and accessing security settings.
Additionally the job card allows communications to go back to the terminal set as the node machine, there can only be one node machine on network. This is the terminal that will receive the order requests from on-line job cards that need to be processed from the terminal as unlike the terminal job card the on-line version has no purchasing function.
Setting the Node Machine: To set the node machine (admin) select File / Site Settings / On-Line down on the bottom left hand side of the form you have a node option.
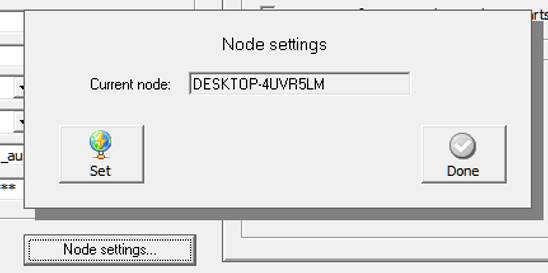
Point and double click on node, select set the name of your PC with be inserted into the current node field, if used previously the setting is overwritten. Finalise the procedure with selection of the done option. Your machine is now set as the node so the on-line job card can share certain functionality.
Overview: Microbase has adopted the remote access technologies developed by TeamViewer, this new function will allow Microbase support personnel to remotely connect to your PC in seconds. We see this feature being used primarily for support purposes, it can also be utilised to deliver remote training especially for sites outside of the metropolitan area where travel costs to do follow-up onsite training are restrictive.
Quick Support Access: Click on the On-Line menu option at the top of screen, from the drop down selection choose Microbase Quick support, when selecting for the first time TeamViewer will download and install locally, this process may take a few minutes depending on your internet speed, once the product is loaded a screen will initialise, the product takes a few seconds to generate an Id and password. You will be asked for these codes for Microbase to connect to your computer, once connected Microbase will have remote control to assist you with support or training issues.
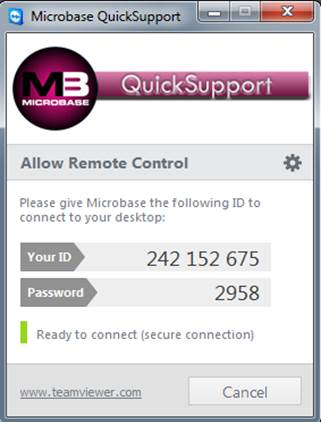
TeamViewer will allow Microbase to view operational issues in real time, walk you through functions that you may not have a full understanding of plus transfer and load files if required. Once you have initialised TeamViewer for the first time loading the application will be much shorter as the product is already loaded on your hard drive, the id and password may take a few seconds to display depending on the quality of your internet connection.
Data Maintenance, Overview: It is important that you understand how to create new databases, backup and restore your data. We recommend that you back up your data at the end of each session. If you have more than one hard disk drive; backup onto a different drive from the one where you keep your working data. If you have only one hard disk drive, backup onto a USB Flash Drive, CDRW or Zip Disk. Note: Data Maintenance is not required by sites running from the Microbase Remote server.
Server Application Overview: The server application links the client application to the SQL database and the internet functions of Automation. To open the server software point and click on the icon in the screens bottom menu bar. In the centre of the display you will see your databases listed including the last date and time the data was backed up, to the right are the application controls.
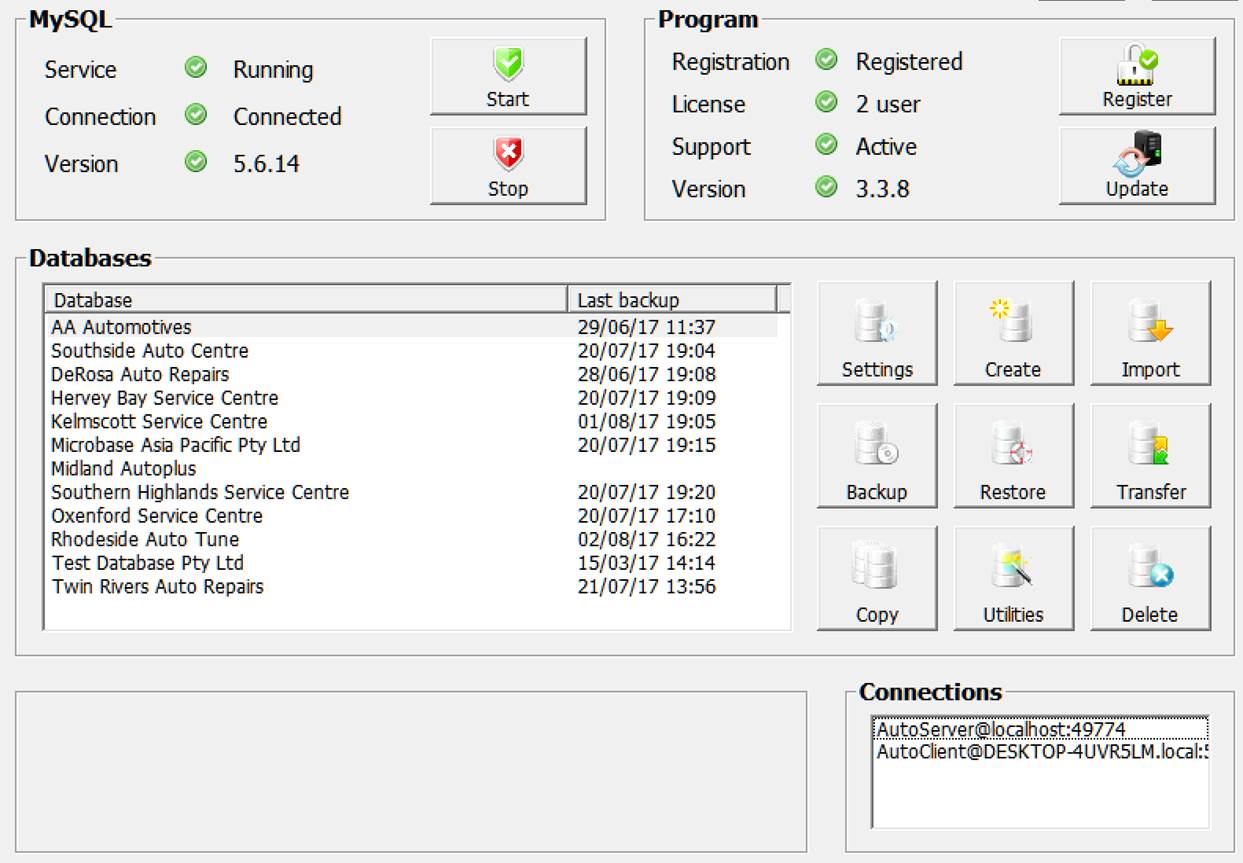
Database, Changing: To select a different database go to file at the top of the client application from the drop down menu select change database, a list of available files is displayed point and double click on your selection.
Database, Creating: Select the create option, type the company name into the field provided, select OK and the new database will be created.
Database, Import: The import option allows for the import of earlier versions of Automation databases, on selection navigate to your adb file select and the conversion process will initialise. On completion a message displaying how many records were imported and the conversion time is displayed, the new data is added to the list.
Database, Backup: Selecting backup will open your location and backup schedule options:
The default primary backup location is C:\Automation Server\Backup, it is suggested you use this default location for the primary, select the button to the right of the secondary backup location to select a location for your second copy.
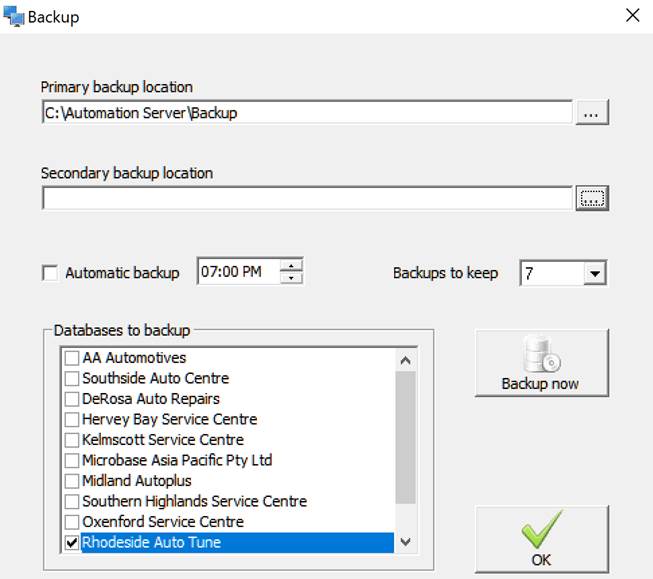
If you are managing multiple databases Automation allows you to select the databases you wish to backup and how many copies you wish to retain. We suggest you set this to 7. This setting will retain 7 days of backups on the hard and removable drive.
Database, Copy: This option allows you to copy a database to an alternate name. This is a useful feature if you wish to retain data without affecting your master database. When closing the backup screen your secondary backup device must be available. To start the backup process manually select the backup option.
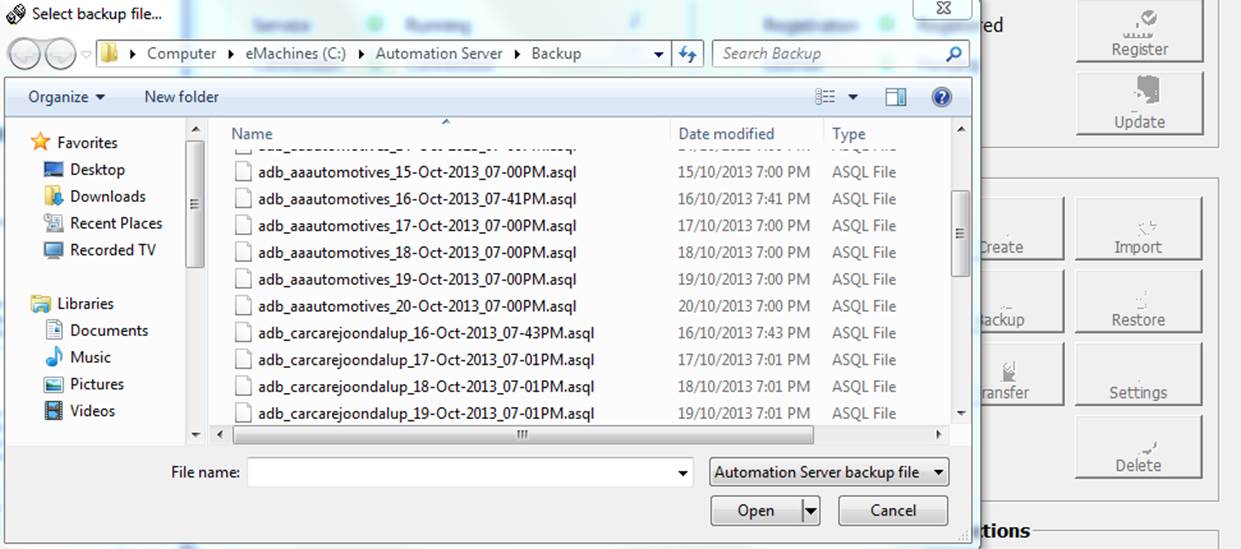
Database, Restoring: Selecting restore gives access to your backups, select the most recent file for the database you wish to restore, Automation server will overwrite the existing database when the permission option is selected.
Database, Transferring: If requested by Microbase to transfer your data you will need to open the server application and select transfer. The display allows you to choose upload and download. This feature will automatically connect you to the Microbase server.
Database, Settings: Gives access to reward program settings for Global Red.
Database, Deleting: Highlight the database you wish to erase, select the delete option, confirm you wish to proceed.
Overview: Introduction of server 3.3.6 and client 3.4.9 or higher allow the user to choose between storing data locally or remotely. When considering whether to store data locally or remotely you will need to consider advantages and disadvantages of storing data on a web server, the main positives and negatives are listed below:
Advantages
1. Ease of access: ability to run Automation from any machine with internet access from anywhere once client version 3.4.9 or later is installed.
2. Multi-user across different locations: Users based in different locations can access the data, as an example possibly your accountant requires access during working hours, both of you can work on the same database in real time.
3. Eliminates local backup requirements: Your data is safe and secure as our service provider takes care of all maintenance on the server including backups.
4. Virus safe: Your database can’t be infected by a virus as the service provider maintains firewalls and checking applications. Be aware though that your copy of client can still be infected if you are not running adequate virus and malware applications locally
Disadvantages
1. Internet Connection: If your internet connection fails then you do not have access to your data.
2. Access Speed: Depending on the quality of your internet connection you may experience a slightly slower access speed than running your database locally.
3. Internet cost: Depending on your plan you may incur extra costs if you need to upgrade.
When considering the above please be aware that you will require an adequate internet connection for the application to operate at an acceptable speed. Users logging on from other locations who do not have adequate connections will slow down access speeds for all users.
To convert your data to remote access you will need to open your server applications desktop, click on the two computer screens that overlap each other on the lower task bar. From the server desktop ensure the database you wish to convert is highlighted then select the transfer option.
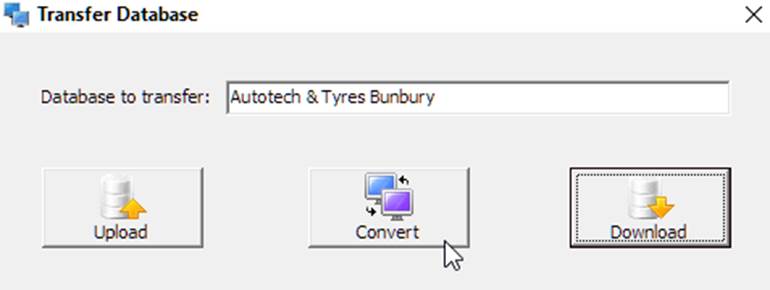
From the three options select convert, accept to continue with the process via the warning message displayed.
Once you accept to continue the conversion process will initiate, this may take a while depending on the size of your database, however you will see progress messages in the lower information field of Automation server desktop indicating the various stages.

Once stage 5 has finished the process is almost complete, next you will be requested to enter your email address and a database password, please make note of this as you will need it to access your data the first
The first time you log in you will see an updating screen displayed once this process is complete you are ready to use your data.
Please note the terms and conditions on which Microbase provides this service, you will be requested to agree to these during the conversion process:
1) That the storage of site data remotely is a chargeable service.
2) Fees are based on our costs to maintain the hosting servers including the various administrative tasks required to keep your data accessible and safe. Monthly fee $11.00 (Inc. GST)
3) Microbase agrees to not access or allow third party access to any database stored on its central server without the permission of the user.
4) All fees to be paid on of receipt of invoice, any outstanding amounts that are aged 90 days or more will result in Microbase discontinuing to provide the service. Notice will be given to the client either by email or surface mail at least 30 days prior to Microbase discontinuing to provide the hosting service.
5) Microbase and the client retain the right to discontinue the service by providing either party with a notice in writing a minimum of 30 days prior to the requested cessation of remote hosting.
