Overview: Payroll is an integrated feature of Automation Premium. This comprehensive module allows you to record employee details, default payroll payment and superannuation information for both employer and employee funds. The employee form allows you to select the master account you wish the individual employees wage to be recorded, payments and deductions can also be allocated to specific accounts. The employee record gives you the option to record the annual holiday and sick leave entitlements, Automation will calculate a value for both of these entitlements as a payroll transaction is processed. PAYGW values flow over to your tax reports; superannuation is automatically calculated and posted to a liability account of your choice. Tax is calculated through a direct link to the ATO tax withholding calculator. Payroll provides you with a broad range of reports including transaction detail by type and holiday and sick leave entitlements.
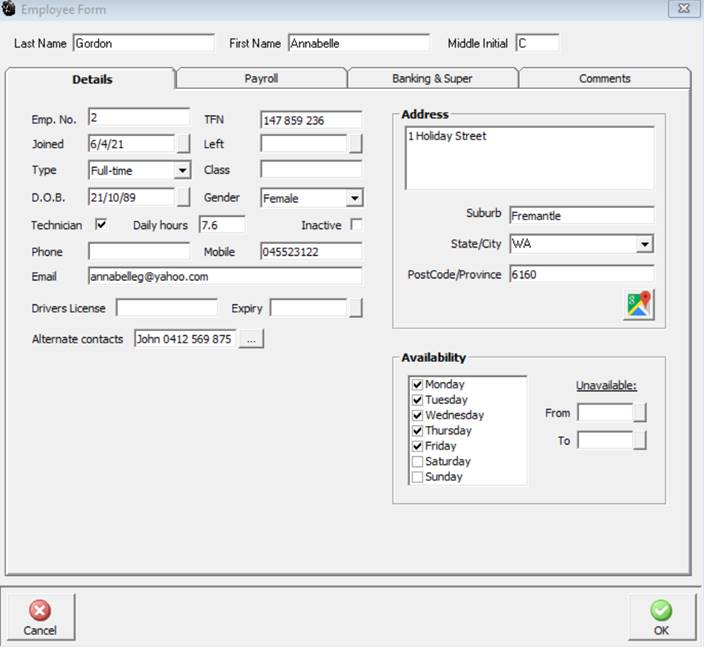
Payroll, Employee Details: To enter the details of a new employee select lists / employees from the top of the screen, select new from the bottom of the employee listing. The employee form is tabulated into three sections; Details, Payroll, Banking & Super. Details contain information such as address, date joined, special notes and tax file number. Payroll allows you to record the wage, hourly rate and tax to be paid. Banking and superannuation is a record of the employee’s bank details for direct payments and the employer / employee superannuation fund he / she belongs to including the policy number.
The details sectioncontains the following
fields:
Last Name: ie: Smith
First Name: ie: Harry
Middle Initial: ie: P
Employee Number: You can assign employee numbers, this can be as simple
as 1,2,3 etc.
TFN (Tax File Number): Enter the employees’ tax file number
Joined: Select the start date from the drop down calendar
Left: Date employment terminated
Type: Full Time, Part Time. Casual
(printed on the pay advice)
Class: Prints the relevant employment class on the pay advice
D.O.B: Insert the employee’s data of birth
Gender: Select from the drop down list
Technician: Point and click if the employee is not a technician
Daily Hours:Record the standard daily
hours the employee normally works
Inactive: Click if you wish to hide the record from the employee listing
ie: Employment terminated
Phone: Home phone contact
Mobile: Mobile phone number if applicable
Email: Details
Drivers License: Number Expiry: Expiry date
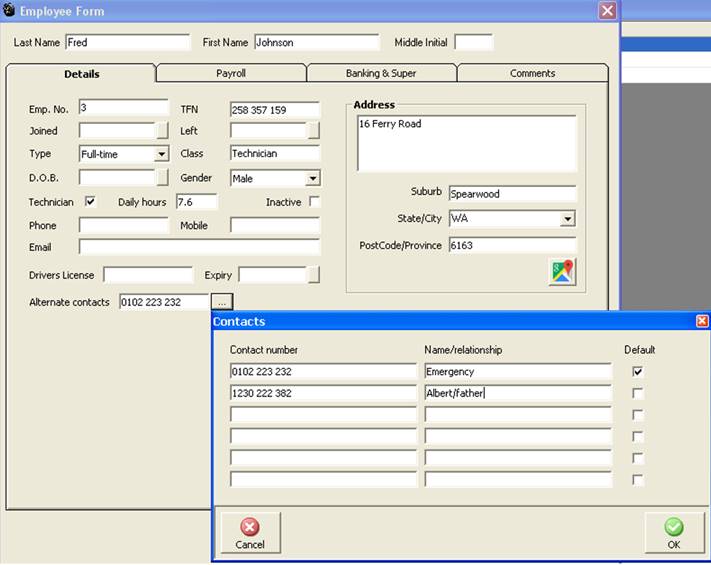
Emergency Contact:
Details
Address: Home address
Suburb: Enter suburb press enter, the state and postcode are automatically
inserted
State/City: Auto or manual entry
Postcode / Province: Free typing field
Selecting the google maps icon will take you to Google and show you the location of your employee.
Payroll, Employee Payroll Details: Select the payroll tab from the employee form to enter pay details. This screen is designed to record the standard pay details, displayed are 2 grids one displays payments the other deductions.

Payroll Payments: To enter the type of payment click on the arrow in the type field, double click on your selection. Note: If you are paying a technician hourly based on hours worked or charged it is not necessary to select a type, enter the hourly rate in the hourly rate for labour allocated field at the bottom of the form. After selecting the payment type point and click in the quantity field if you are paying an employee on a weekly, fortnightly or monthly basis you must enter a value in this field ie: 1 press enter your cursor moves to the rate field enter the hourly, weekly, fortnightly or monthly value press enter the total value is now visible in the total column, press enter to move to the next line.
Payroll, Allowances: There are 3 Allowance options in the drop down list – Tool, Zone and other selecting any of these options as a payment type will display the payment separately on the pay slip and will not be added to the taxable income. Any value allocated to allowances will also be displayed separately on the payroll summary form.
Payroll, Cost Per Hour: If you wish to enter a calculated cost per hour complete the field provided, if you wish to apply this value to the job profit report select from File / Settings / Database Settings the use employee cost per hour for job profit report.
If a payment requires the employer to pay superannuation point and click in the super check box
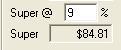
Superannuation: If a payment attracts an employer superannuation liability, tick the super check box on the payment line. To calculate the superannuation liability place a value in the super@ field located to the right of the payment grid.
|
The employer superannuation liability is calculated and displayed in the super field. Flagging multiple entries as incurring super will change this figure with the calculation based on the total of all flagged payments. |

The total superannuation value is also displayed in blue as the first entry in the deductions grid in the lower section of the form. You will note that as you add deductions to the form the employer superannuation value is NOT added to the total deductions.
Payroll Deductions: Deduction types are selected in the same way as payments, enter the type of deduction click on the arrow in the type field, and double click on your selection. Deductions vary from payments as they give you the option to nominate the account posting. Note: Do not change the posting for income tax this should always be Tax Payable / PAYGW.
To select an account to assign to a deduction type, click on the button to the right of the account field displayed in the deductions grid this will open your chart of accounts giving you access to your liability and other current assets account.
Payroll, Calculating Tax Deductions: Enter the payments, next click on the calculator next to the tax value, the tax deductible amount is entered and deducted from the taxable gross.
You can only post to account types Long Term Liabilities, Other Current Liabilities and Other Current Assets. The reason for this restriction is that deductions will either be for amounts you have to pay in the future (liabilities) or amounts that have already been paid (assets) a couple of examples are:
Loans – Imagine you advance your employee a loan of $100.00 let’s look at how you would record the loan advance and the subsequent payments through payroll.
To advance the loan transfer funds from the bank account or Undeposited funds to a current asset account titled employees loan. The amount is now recorded as $100.00 in the current asset account.
To pay back the loan and deduct the amount from the employee’s wage, select loan repayment as the transaction type; select the button to the right of the account field highlight the loan account select OK. Enter the deduction (loan repayment) in the totals field on processing you will notice the loan account has reduced by the loan repayment value.

Child Maintenance – In this example we will assume that you have to deduct $50.00 a week from your employee which is subsequently paid to the dept. of social services for child maintenance.
Firstly set up a child maintenance account as a sub account of payroll liabilities
Allocating a child maintenance deduction from payroll requires you to select child maintenance from the transaction type list, select the posting account as child maintenance (the liability account you have already setup) enter the value of the payment into the totals field. When processing the payroll transaction you will note that $50.00 has been added to the liability account – Child maintenance.
To pay the child maintenance when advised use the pay other payroll liabilities option from the activities menu, setup the government dept. as a supplier enter into the supplier field enter the date you are paying to, tick the amount for payment (child maintenance record) and process in the normal way.
Employee Superannuation Contributions: Employee voluntary contributions can be deducted directly from an employee’s wage. It is essential before selecting this option you record the employee fund name, account number and date joined in the banking & super section of the employee form. The employees fund details will be printed on the pay advice only if this information has been completed.

To process an employee’s super contribution select this transaction type from the deductions list, enter the total value of the contribution and press enter. The value will be added to the liability account you setup for the posting. Note: Employees superannuation contribution should always be posted to a liability account so payment for multiple values can be made to the fund manager.
Superannuation Payment Cycle: If you wish to print the super payments by employee on the pay slip open settings from the file menu, click on the accounts tab at the top of form, the super payment settings are located on the bottom right hand side. Select the next payment date, month and payment cycle. Total superannuation for the previous month will be printed on the employees pay slip including the next payment date.
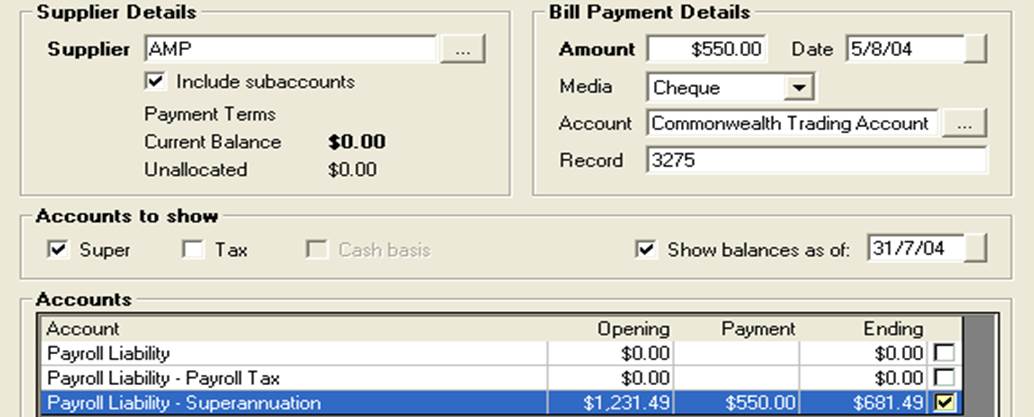
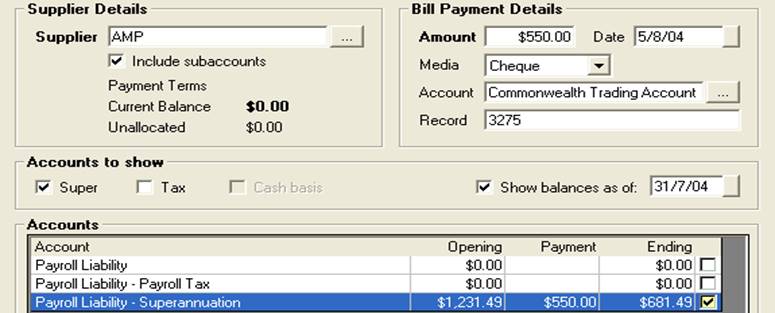
In the previous example we process a $550.00 payment to AMP leaving us an outstanding balance of $681.49 to be paid to Mercantile Mutual. Confirm the payment with OK (F12). Select pay superannuation from the activities menu the superannuation form now displays a balance of $681.49 as of the 31st. July 2004. Complete the bill payment details and process payment with OK (F12). Closing balance of your superannuation liability for 31st. July 2004 is now zero.
Superannuation, Editing Payments: Open bill payments from the accounts icon, highlight the record you wish to edit open the superannuation payment form by double clicking on the transaction or selecting edit (F2) from the bottom of the display. It is now possible to select or de-select payment allocations by clicking in the selection field aligned to the transaction; you can also alter the payment amount. To save your changes select OK (F12).
Superannuation, Deleting Payments: Payments can be deleted from the bill payments display by highlighting the record you wish to remove and selecting delete from the bottom of the screen, confirm the deletion at the warning message. When a payment is deleted superannuation payments are reversed. It is not possible to delete a payment if it forms part of a reconciled transaction
Superannuation, Viewing Payments: Go to the bill payments screen, select the entity you pay to from the supplier list by selecting the button to the right of the supplier field and click the view by supplier option. Next select the period or enter the date range for the transaction you wish to view. To view the details of a transaction double click on the transaction or select edit (F2) from the bottom of the display.
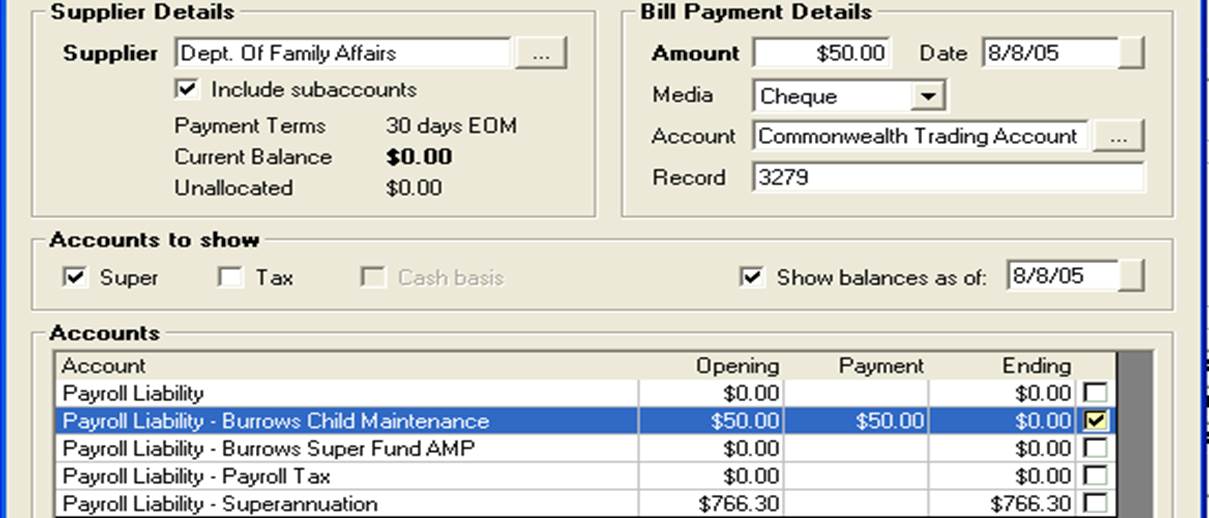
Other Payroll Liability Payments: In this example we will imagine that we have deducted child maintenance payments from an employee’s salary and we have received notification from the Department of Family Affairs to pay last month’s deductions – The process you would follow is:
1) Select child maintenance as a deduction from the deductions grid of the payroll transaction form, attach this deduction to a payroll liability account title child maintenance payments.
2) To pay the amount owing firstly setup the Dept. Of Family Affairs as a supplier, next open the Activities / Pay Other Payroll Liabilities Screen and select the Dept. Of Family Affairs as the supplier.
3) Tick the show balances as of option, enter the date you wish to pay to and press enter the values will recalculate in the form grid.
4) Tick the value on the Child Maintenance payments line, this amount will be posted to the amount field, next enter the payment media, account and record.
5) Select OK (F12) to process
Any payroll liability can be paid in the same way, it is also possible to tick multiple amounts for payment ie: employer and employee superannuation payments if they are being paid to the same fund manager.
Superannuation Funds, Recording: On the employee form you have the ability to record the superannuation fund both for the employer and employee (they may be different) at the bottom of the payroll / payments form the super fund is displayed for both employer and employee contributions. A superannuation contributions report can be run from reports / payroll which lists all contributions by employee, superannuation fund and contribution type.
Superannuation Reporting: Automation allows you to calculate and report on super contributions processed by the employer both for the super guarantee and any additional payments made over and above the set super guarantee percentage rate (employer contribution).
These values are displayed for employee’s reference on the PAYG Payment Summary with reportable super contributions, employee (salary sacrifice) and employer (additional payments over the guarantee %) being combined to populate the reportable superannuation section of the EMPDUPE for each employee.
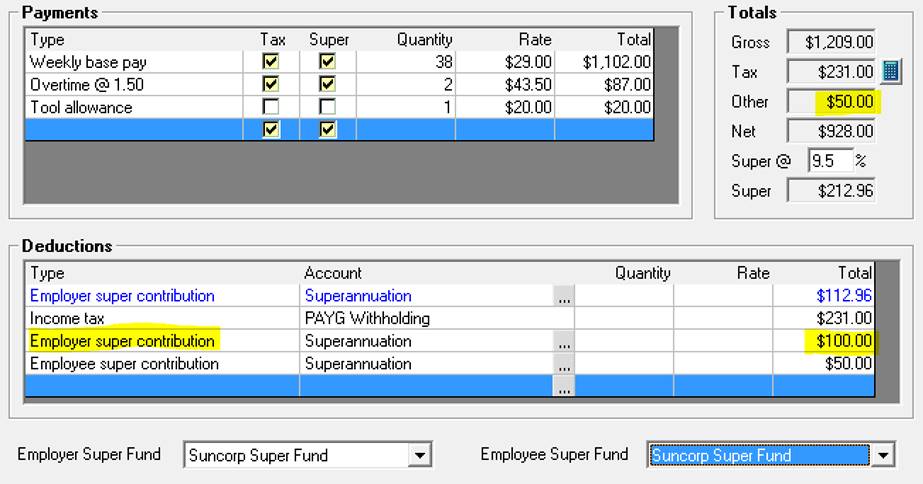
Employer Additional Super Contributions: To process an additional employer super contribution you will need to enter a second employer contribution entry in the deductions section of the payroll transaction form as the default value (displayed in blue) calculated from your SG percentage can’t be altered.
To enter an additional posting click in the type cell under deduction, a drop down menu will display, choose employer super contribution, move across to the account cell click on the button to the right to select the account you wish to post to, finally enter the value at the end of the line.
All liabilities relating to payroll payments must be setup under payroll liabilities, this way the accounts can be viewed from the pay other payroll liabilities (option from activities) for easy payment processing. Samples of the accounts you would post to payroll liabilities include superannuation, child maintenance deductions and employee voluntary superannuation payments.
One of the main advantages of using the pay other payroll liabilities feature is the ability to view values as of a certain date, as most of the liabilities incurred would be paid on a monthly or quarterly basis it is easier to view and process payment as of a certain date rather than subtracting from the current value.

In the example the employer has contributed $112.96 (9.5% of $1,189) super guarantee plus an additional contribution of $100 bringing the total employer contribution for this pay to $212.96. You will notice that the employee has also decided to contribute an additional $50.00 as salary sacrifice which will be deducted from his taxable wage resulting in him paying tax on $1,139.00 instead of $1,189.00. The $100 received as additional employer contribution is also non-taxable (up to the current annual threshold).
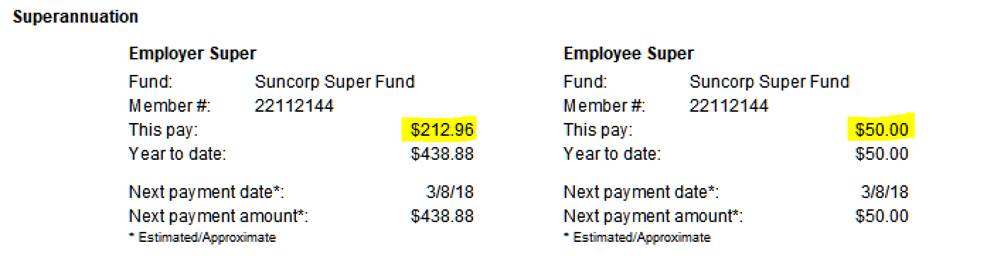
Total superannuation contribution this pay is $262.96 of which $150.00 is reportable to the ATO. The contributions are displayed on the employee’s pay slip in the following format:
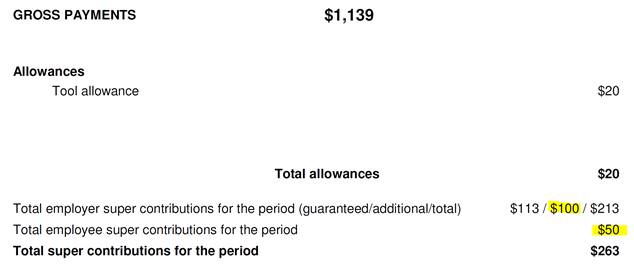
If we run a PAYGW Payroll summary report just for this transaction you can see how the super guarantee and additional contributions are displayed:

Gross payments become $1,139 ($1,189-$50.00 employee salary sacrifice) with the reportable super contribution of $150 (Employee + Employer additional) flowing through to your EMPDUPE file.
Super Contribution Reporting: To view the super contribution types and values allocated over any period you will need to access Reports / Payroll Reports / Super Contribution Report. The report format displays the total value paid by for each type including the fund name and member number.
In our sample payroll transaction, the Employer Additional and Employee Contributions will be added together as reportable and added to the EMPDUPE file against the employee record.
Automation allows you to create and select a specific account for each employee or group, it is suggested that if you wish to record wages in this way you set up a master wages account and add employees or employee group as sub accounts. Using this method you will totalise wage payments on your profit and loss – as an example:
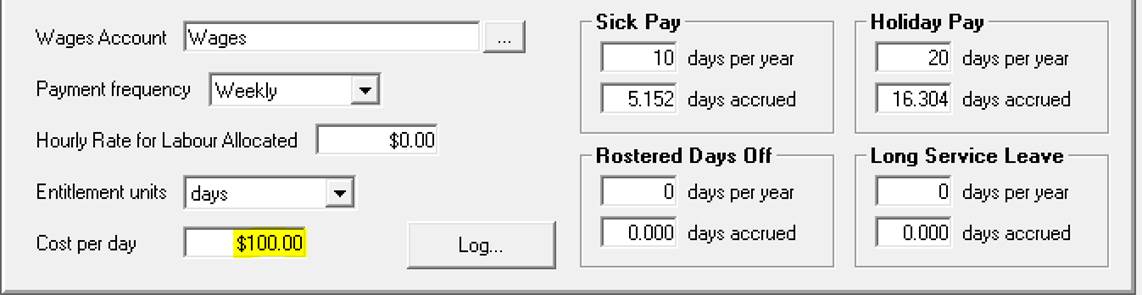
To assign a wages account to the employee select the button to the right of the wages field, select the account from the list and save with OK. Note: Wages can only be assigned to expense or cost of goods sold account types
Payment Frequency: It is essential that you choose a payment frequency from the drop down list, holiday and sick leave entitlements are calculated from this selection. Nominating a pay period allows you to process payments at any time for a period in the future; Automation will also prevent you from processing multiple transactions in a period for an employee.
Hourly Rate: Only complete this field if you intend to pay a technician based on charged or actual hours worked in a date range. If this is the chosen method of payment do not enter a base payment into the payments grid.
 Only
enter a value if paying on an allocated labour basis
Only
enter a value if paying on an allocated labour basis
Payroll, Tracking leave entitlements: For Automation to calculate holiday and sick leave entitlement it is essential that you select a payment frequency and enter the annual entitlement in the correct fields. Any accrued entitlements also require entering on the payroll form. Based on these values the entitlement is calculated and printed on the pay advice when a payroll transaction is processed.
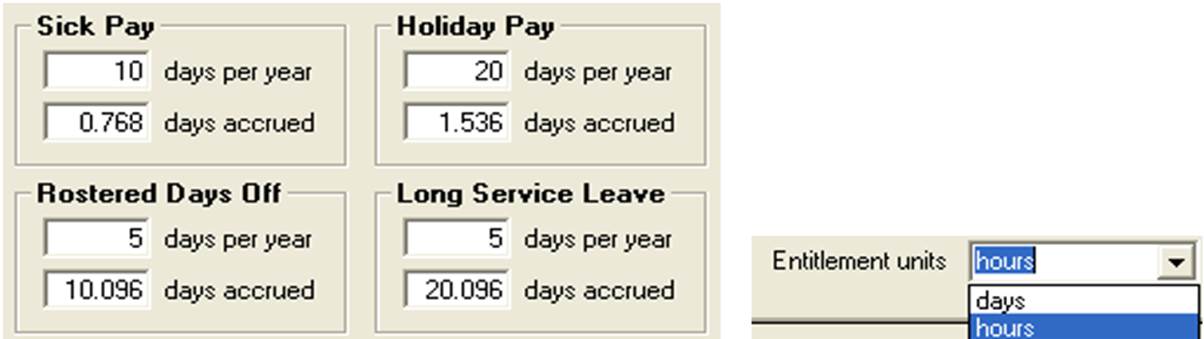
Automation will allow you to calculate entitlement in Days or hour. Enter the annual entitlement into the day / Hours fields per year for sick pay, holidays, rostered days off and long service leave. When recording for the first time enter the accrued value to date into the days / Hours accrued fields. Automation will calculate entitlements as transactions are processed. To change the entitlement display to hours or days select the entitlement units’ option from the employee form. Note: Whichever format you choose to record entitlements must be same when processing payments.
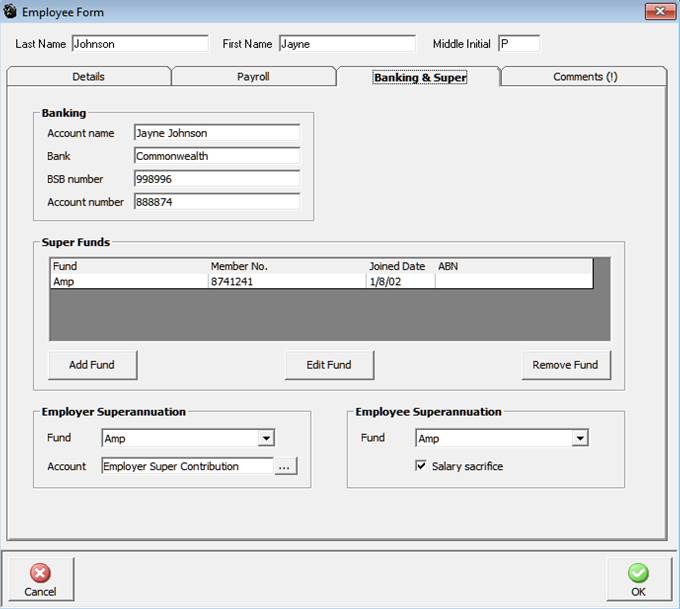
Payroll, Employee Banking & Super: To enter the banking and superannuation details of an employee click on the Banking / Super tab of the employee form. You can enter bank account details for your reference when paying employees direct and record the employer and employee’s superannuation account details.
Payroll, Salary Sacrifice: If an employee elects to salary sacrifice into a superannuation fund select the salary sacrifice option available from the employee / banking & super form. When this option is selected the contribution is not taxed and the value does not appear on the employee’s payroll summary.
Employee Accrued Entitlements Liability: The Holiday, Sick, RDO & LSL report includes an accrued cost value based on the cost per hour for the employee entered on the employee form
Note: Cost can be per day or per hour depending on the calculation unit selected from the entitlement units field.

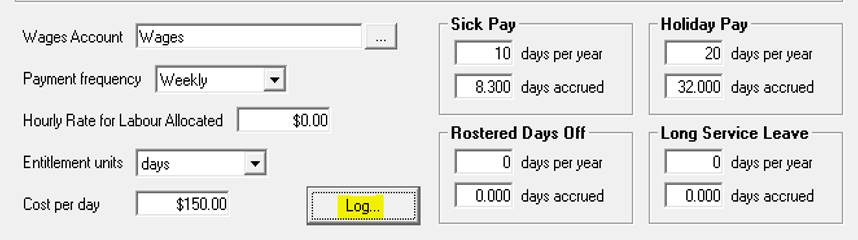
Entitlement Editing, Auditing: To view an audit trail of entitlement editing, select the employee you wish to audit from the employee list, point and double click to open the employee form. Select the log option located on the right of the cost field.

You will now see a log of changes made to the various entitlements, the user name will only be visible if a user was logged onto application when the adjustments were made.


It is also possible from this form to select the employer superannuation posting account, the default is an expense account titled Employer Super Contribution. Selecting the button to the right of the account field will give you access to expense and cost of goods sold accounts you can setup a new entry and allocate the cost of superannuation to either account type.
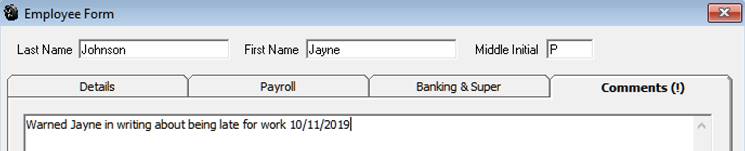
Comments: To make notes relating an employee click on the comments tab, enter your text into the 64,000-character field provided, save with OK (F12).
When comments are recorded an exclamation mark will be visible on the comments tab label plus a notes icon flags the record in the employee list.

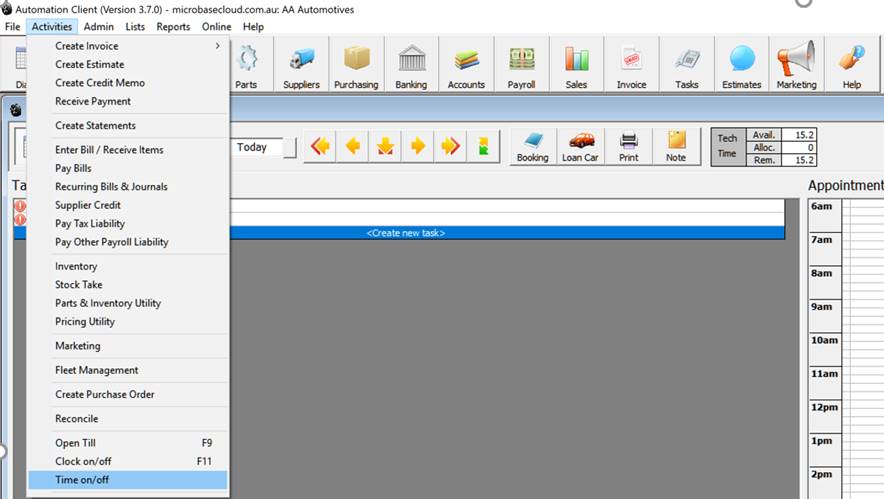
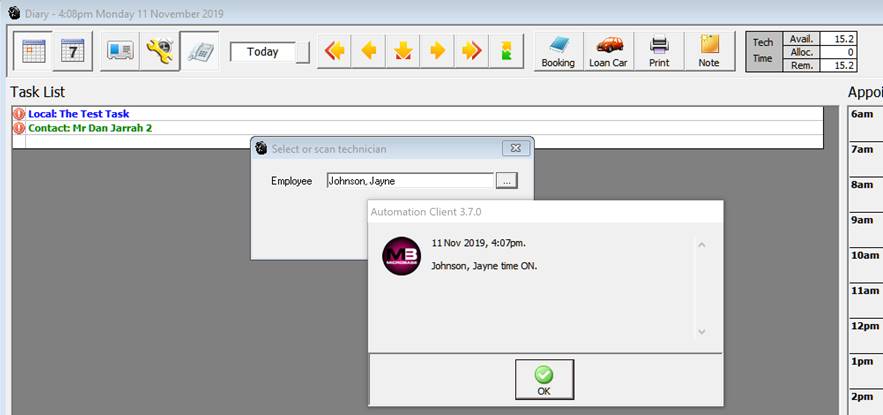
Time on / Off Option: Automation provides a second running time clock so the user can clock employees on / off for the day to locate the option go to Activities / Time on / Off
On selection you are prompted to log an employee on, the record can be selected from the employee list by selecting the button to the right of the employee field or by scanning the barcode from the employee barcode list.
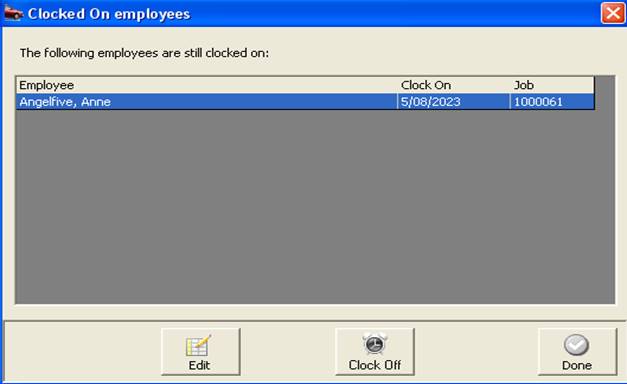
Viewing times: If you wish to view the current clocked times select Activities / Time on/off > View you will see from here times can be added, edited and deleted.

Reporting: There is an Employee Time on/off report available from Reports / Payroll Reports / Employee Time On/ Off
The report can be run over any date range for all or selective employees
Payroll, Hourly Rates Overview:Automation allows you to pay technicians based on either hours charged (invoiced to the customer) or actual hours logged against a jobs for a set period. The hours charged to a customer are automatically calculated when a job is closed, the total value can be split between multiple technicians. You also have the option to record the actual hours worked as these may vary from the hours charged, payroll allows you to then pay a technician for a predetermined period by either hours worked or hours charged. You can also run a productivity report that compares hours worked / charged by job and technician making it simple to track the “true” productivity of each technician.
Payroll, Setting Labour Rates: To set labour rates open
the employee form ensure the technician option is set to true
in the details section (default).
 Only
employees that are set up as technicians will be displayed in the labour
allocation screen displayed when finalising a job.
Only
employees that are set up as technicians will be displayed in the labour
allocation screen displayed when finalising a job.
 Next you need to
enter the hourly rate in the payroll
section of the employee form, this can be for either hours worked or charged depending on your
payment method. Save with OK (F12). Note: For this feature
to work correctly it is essential you set up the correct labour rates
in your services file. You have the option to enter three level of charges
standard, wholesale and retail, labour allocated is calculated on the
rate applied to the job or invoice.
Next you need to
enter the hourly rate in the payroll
section of the employee form, this can be for either hours worked or charged depending on your
payment method. Save with OK (F12). Note: For this feature
to work correctly it is essential you set up the correct labour rates
in your services file. You have the option to enter three level of charges
standard, wholesale and retail, labour allocated is calculated on the
rate applied to the job or invoice.
Fixed
price services calculate the hours charged on this basis:
(Service Charge) – (Parts value) = (Labour Value) / (Retail Hourly Rate)
= (Hours Charged)
Labour Allocation, Overview:
Automation allows you to track hours
charged or worked by technician. Entries are made on the labour allocation
form as a job is closed, labour can be split between multiple technicians
on an hourly or dollar value basis. The labour allocation form also allows
for entry of the actual hours worked by technician. Labour entries can
also be made from an open job card by selecting the labour button.
Labour Allocation, Posting: This task is performed as the job card is closed or by clicking the labour button from an open job card, the labour allocation form displays automatically if auto close has been selected from the settings. If you are not using auto close the labour allocation form needs to be opened by selecting the labour button from the job update display, the labour allocation form allows for the allocation of actual hours charged to a single or multiple technicians. You also have the ability to record the actual hours worked.
If you wish to allocate the total hours to one technician select with the mouse and click on allocate remainder. All the labour has now been allocated to the technician selected. To enter multiple labour allocations select a technician and type in the hours or dollar value select allocate, repeat this procedure for any subsequent technicians using allocate remainder on the final entry. When the task is completed select OK (F12).
The table displays the total and allocated hours when total hours are allocated the remainder is zero. To allocate hours to the allocations section click in the charge hours or worth fields, enter the value and enter. To complete the allocation highlight the technician and select allocate remainder the unallocated balance is now applied
To allocate actual hours worked point and click in the actual hours field and enter the value, to save your entries select OK (F12).
Labour Allocation, Viewing: You may wish to view previously posted labour allocations, this can be displayed from a closed job card by selecting the labour button located to the right under the parts and labour section of the display.
 Labour can be viewed from closed
and open (if allocated) job cards.
Labour can be viewed from closed
and open (if allocated) job cards.
Labour Allocation, Editing: Labour allocations can be edited from a closed job card by selecting the labour button; it is possible to reallocate labour as required. If you wish to delete all previous allocations select the clear option from the allocation form. Save your changes with OK (F12).
Labour Allocation, Adding New Technicians: From the top of the screen select lists / employees from the bottom of the display select new, the employee form is now in view complete the details, payroll, banking and super sections. Ensure the technician option is selected and save with OK (F12).
Payroll, Payments Overview: Automation gives you the option to process payroll payments on an hourly, weekly, fortnightly or monthly basis. You can authorise payment from any bank account or undeposited funds, Superannuation is automatically calculated from the percentage rate entered in the employee record. Withholding tax is calculated from the payroll transaction form using the ATO tax calculator; payments of PAYGW are processed from the pay tax option. Payroll has the ability to export a file in the format required to process EFT payments through the National Australia Bank.
Payroll, Accessing: To open the payroll module click on the payroll icon located at the top of the screen.
 Click on the payroll item to process
payments
Click on the payroll item to process
payments
The payroll screen includes a list of payroll payments processed including the ability to filter by employee and date range. You can edit, create new and delete payroll transactions from this screen Note: It is not possible to edit or delete reconciled transactions.
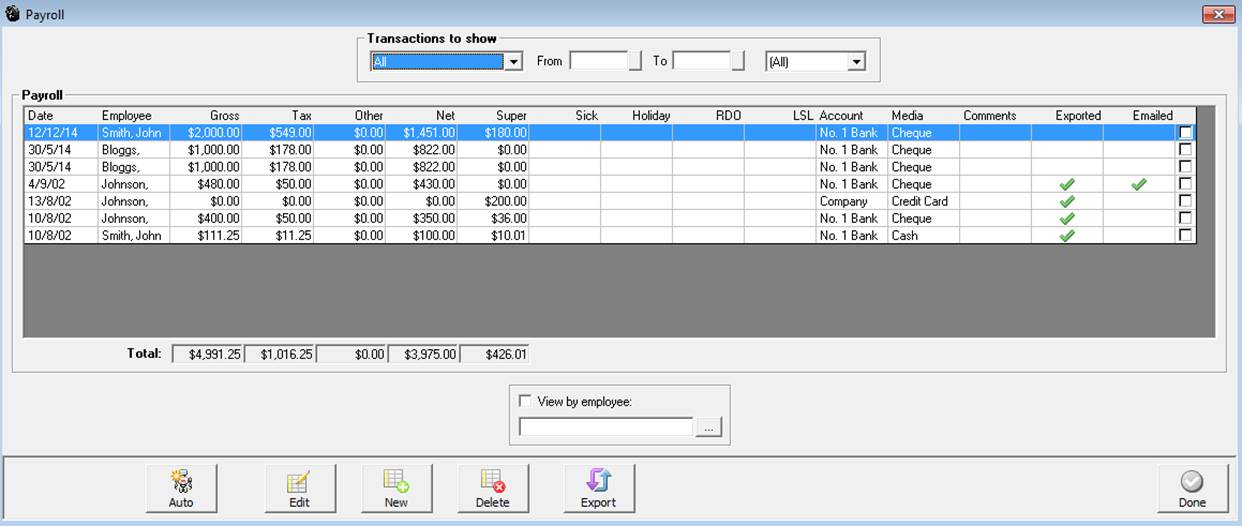
Payroll, Filtering by Employee: To filter by employee from the payroll screen select the button to the right of the employee field, the employee list is in view. Highlight the record you wish to view, confirm with OK (F12) the employee name is now displayed in the field. Point and click on the view by employee selection, only transactions for the selected record are now displayed.
Payroll, Filtering by Date Range: It is possible to select another period by clicking on the button to the right of the month to date field, from the drop down menu point and click on the period you require. You can also select the - from to dates - by either typing into the fields at the top of form in DD/MM/YY format or selecting the button to the right of the - from / to - boxes and double clicking on the date required. Today’s date is highlighted in red, to move between months select the arrows at the top of the calendar form.
Payroll, Filtering By Payment Type: Option to view transactions by payment type
Payroll, Editing Payments: Highlight the transaction from the payroll screen, double click or select edit (F2) from the bottom of the screen, make the changes and save with OK (F12).
Payroll, Exporting Data: Automation has the ability to create an export file in a format required by the National Australia Bank to process wage payments electronically. For this feature to work first process pays in the normal way, next point and click in the check boxes to the right of the records you wish to export.

 Click on the export button at the
bottom of the display, from the save in screen select the folder in which
you wish to store the NAB.ABA file, click save to complete the process
a message is displayed confirming the file path, when a record is selected
for export a green tick is displayed in the exported column. Note:
Before passing this file onto your bank, please ensure the format meets
their requirements.
Click on the export button at the
bottom of the display, from the save in screen select the folder in which
you wish to store the NAB.ABA file, click save to complete the process
a message is displayed confirming the file path, when a record is selected
for export a green tick is displayed in the exported column. Note:
Before passing this file onto your bank, please ensure the format meets
their requirements.
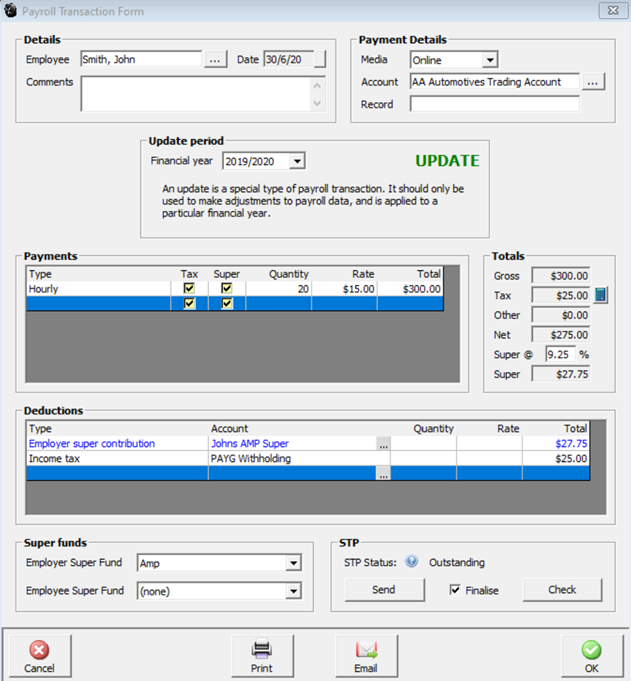
Payroll payments can only be processed from the payroll screen. Select the payroll icon and new from the bottom of the display to view the payroll transaction form.
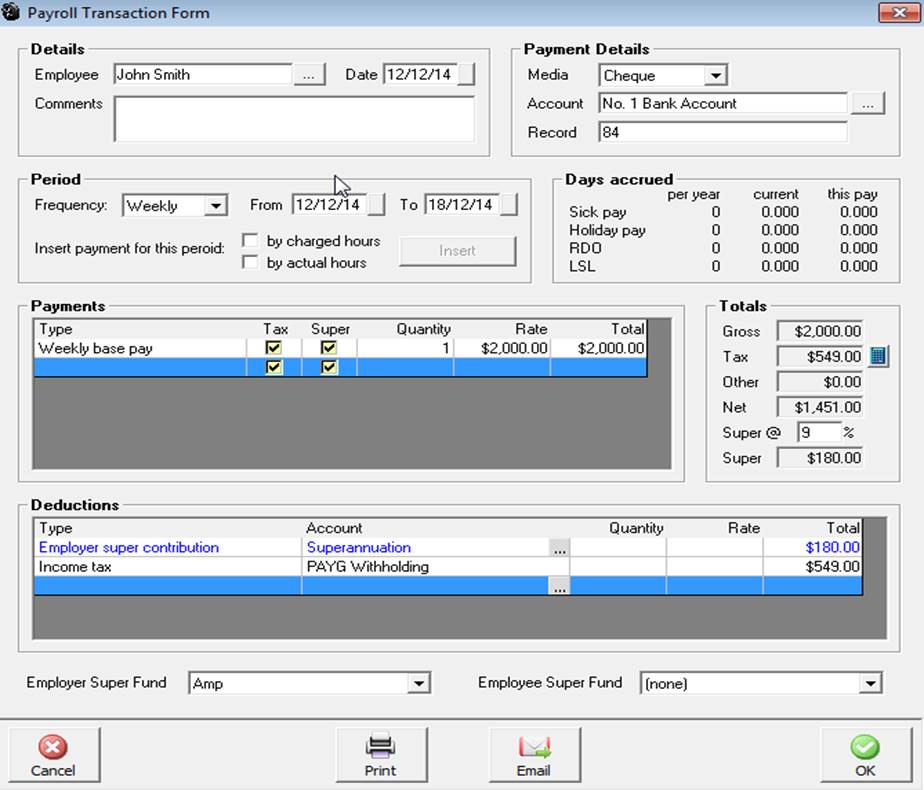
Select the employee by clicking on the button to the right of the employee field. If you are paying an employee that is on a fixed wage or salary the details entered in the employee record will automatically be entered in the amount section of the form. If amounts vary or you wish to add extra payments to the form point and click on the first empty line, from the drop down menu select the payment type, press enter your cursor will move to the quantity field if you are paying a set amount enter 1 press enter and type the value into the rate field press enter twice to move through the total field onto the next spare line.
To process payment by the hour enter hours in the quantity field and the hourly value in the rate field, total payment is automatically calculated and added to the total column. Ensure you flag all items in the payment grid that attract employer superannuation liabilities.
Tax Option: When selected the payment will be taxed if left unchecked then the payment will be excluded from the taxable gross income.
Payroll, Paying Holiday & Leave Entitlements: When processing holiday or leave entitlements it is essential that you choose the correct payment type from the drop down list and enter into the quantity field the amount of days or hours you wish to deduct from the total accrued to date. When paying leave loading the value will automatically be entered based on 17.5% x holiday pay. The value can be edited if required.
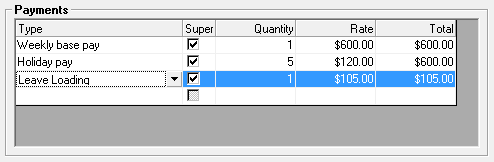
When processing holiday or sick leave payments you must enter the amount of days you wish to deduct from the total accrued into the quantity field
Payroll, Processing by Hourly Rates: To pay a technician by hours worked or charged you first need to have the employee set up as a technician and an hourly rate entered in the payroll section of the employee form. Select the employee from the payroll transaction form. Select whether you wish to pay the employee for the period displayed (automatic entry based on pay frequency and last end of period date) on a by charges or actual hours worked basis. Select insert, the total hours, hourly rate and total value will be displayed in the payments grid.

To pay a technician on an hourly basis you must have an hourly rate recorded in the employee form.
Note: There are 3 Allowance options in the drop down list – Tool, Zone and other selecting any of these options as a payment type will display the payment separately on the pay slip and will not be added to the taxable income.
Payroll, Multiple Payment Function: Selecting the Auto option from the bottom of the payroll transaction listing initiates an auto-run process for payroll payments. Select Auto from the bottom of the screen a list of employees is displayed, point and click on the check box to the right of the record to include employees you wish to include in the payment run. Select OK, the transactions are processed including pay slip printing.

Payroll Multiple Payments, Notes: The auto feature can only be used if all payments are being paid from the same account ie: payroll clearing, all payments will have the same reference number allocated so if paying by each individual by cheque you will have to edit the transaction to correct the reference, this can easily be performed from the payroll transaction listing.
To be effective this feature also requires you to be paying the amount recorded on the employee form; again values can be altered if required after processing by accessing the payroll transaction list.
If you wish to select all employees click on the all option at the bottom of the screen.
Payroll, Emailing: Automation displays a confirmation when a pay slip has been emailed both in the payroll transaction list and form.


Once an emailed form has been sent successfully a green tick is displayed on the payroll transaction form next to the email option.
Batch Emailing Payslips: To Batch email payslips open the payroll display, over on the right-hand side of a displayed transaction you will see a check box, simply point and mouse click in any record you wish to email, this can be single or multiple selections.
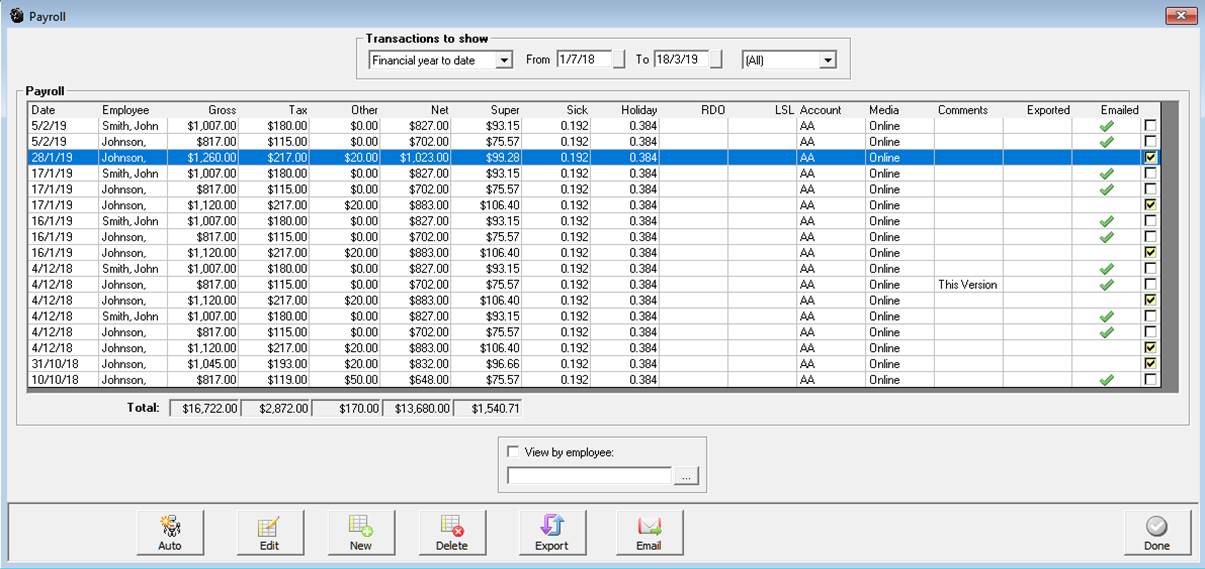
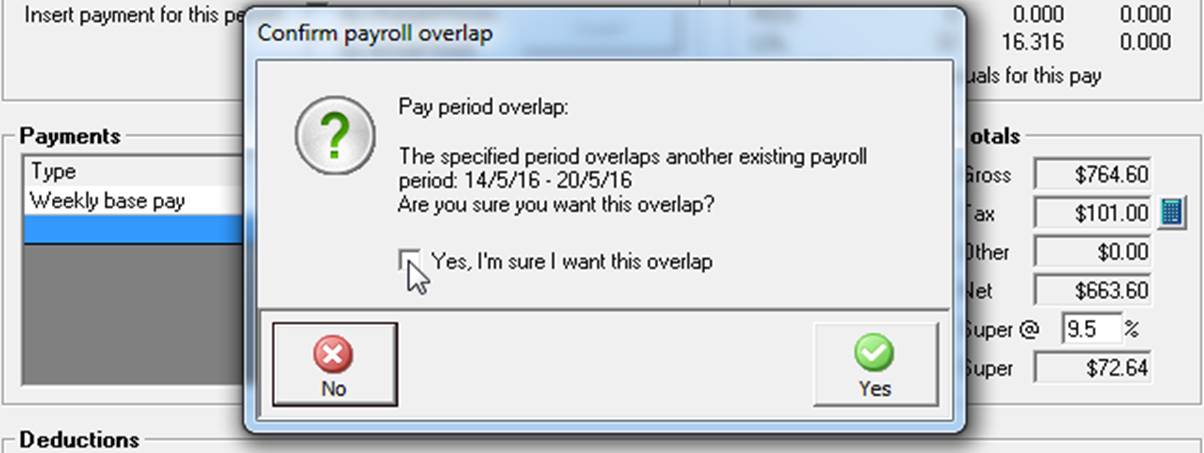
When the screen is refreshed the records that have been emailed successfully will have a green tick in the emailed column. At the end of each batch send you will see a summary displaying how many were sent and the count of failures.
Default Wage Payment Account: To record a default wage account, open settings from the file menu click on the accounts tab. Select the payment media and account from the drop-down menu. Save your settings by exiting via OK or F12
Automation provides you with the ability to calculate income tax liabilities plus deduct employee superannuation contributions and allocate other payments to liability or other current asset accounts. Deductions are taken away from the gross payment with the net payment being paid from your nominated account.
Payroll, Calculating Income Tax: When you load Automation you are given the option to install the TWC program if this is loaded you will be able to access the tax calculator directly from the payroll transaction or employee form. To calculate the taxes you are required to withhold select the TWC button to open the calculator. You next need to enter the calculation criteria for your employee, once the entries are complete select the calculate button to display the amount you need to enter into the tax field of the payroll transaction form.
Payroll, Recording Other Deductions: Deduction types are selected in the same way as payments, enter the type of deduction click on the arrow in the type field, and double click on your selection. Deductions vary from payments as they give you the option to nominate the account posting. To select an account to assign to a deduction type, click on the button to the right of the account field displayed in the deductions grid this will open your chart of accounts giving you access to your liability and other current assets account.

You can only post to account types Long Term Liabilities, Other Current Liabilities and Other Current Assets. The reason for this restriction is that deductions will either be for amounts you have to pay in the future (liabilities) or amounts that have already been paid (assets)
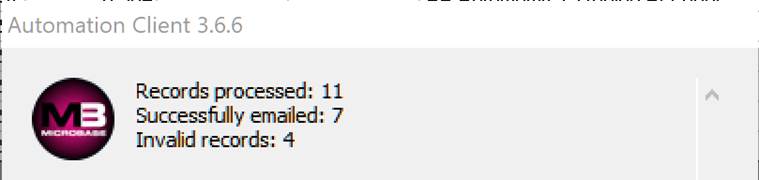
Payroll, Transaction Summary: The payroll transaction summary is displayed to the right of the payments grid. Gross is the total transaction (not including employer superannuation contribution) deduct is the total deductions including income tax. Net represents the actual amount to paid to the employee and deducted from the employer’s nominated account. The super @ field displays the percentage at which superannuation is calculated, this can be changed by pointing and clicking in the field and overtyping the current value. The Super field records the total employer superannuation contribution for the payroll transaction.
To finalise the transaction you need to nominate the payment type, select button to the right of the media field, selecting cheque will insert your default bank account and the next cheque number. Selecting other media requires you to choose the account that you are processing payment from. To record the transactions select OK (F12).
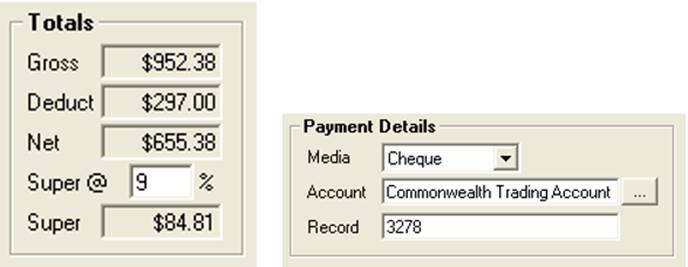
Payroll, Overlapping Dates: Version 3.4.4 introduces the ability to process multiple pays in the same period with a choice to exclude accruals (Holiday, sick pay etc.). When processing an overlapping pay you have the option to disregard accruals there is now a selection under the accrual section of the payroll transaction form

If you do not wish to add the standard accruals select the check box titled Exclude accruals for this pay.
When you select overlapping pay periods you must confirm the transaction by ticking the checkbox provided and selecting yes to continue.
Overview: Automation Premium incorporates Australian Tax Office approved payroll reporting, it is important that all clients who intend using the data exchange service familiarise themselves with the methodology and functionality of this feature prior to reporting their pays via single touch payroll.
Single touch payroll is an Australian government initiative that requires all businesses to report payroll transactions in real time directly to the Australian Taxation office. Our main focus while developing this feature was to make what is actually an extremely complex reporting process as simple as possible at the user interface level. To achieve this, we enlisted a development partner MessageXchange who act as an intermediary between Automation Premium and the tax office servers.
MessageXchange’s function is to receive our files, verify file structure then reject and notify the user if the file structure is compromised, if the file is compliant, they then compile the information into a tax office acceptable format (AS4) and deliver the information to the ATO STP server. The tax office will then attempt to record the data, if the data is accepted a message will be returned via MessageXchange to the user confirming the acceptance, if there are issues with the data a message including the reasons why the data was partially or totally rejected will be received by the appropriate Automation user.

Above is a simple schematic displaying the data exchange architecture, information is “pushed” and “pulled” to and from the Australian Tax Office servers via MessageXchange and Automation.
How Can I Ensure A Smooth Transition To STP Reporting?
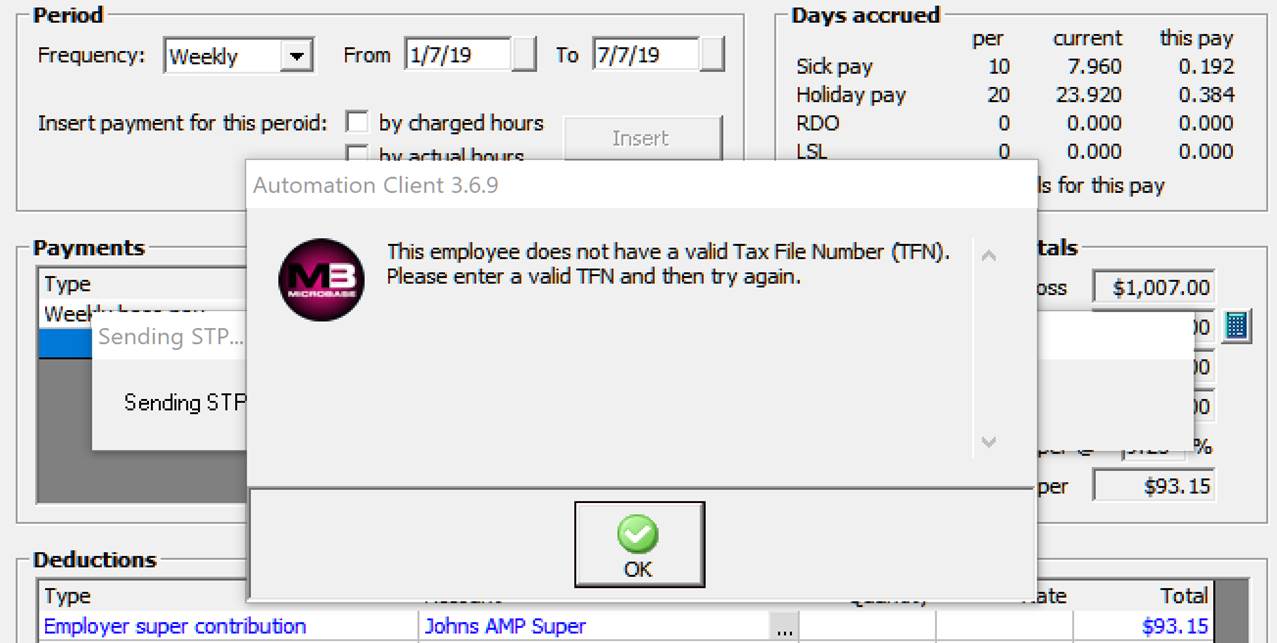
Essentially once you Choose to be STP compliant the payroll processing function does not change, there are however some new rules that we have to enforce in relation to deleting payroll transactions, due to ATO legislation this is no longer possible once a transaction is transferred. Also, it is imperative that the following are populated with the correct data, site details, employee and payroll transaction forms prior to STP processing.
Site Details
· Australian Business Number (ABN)
· Branch Number set to 1 (or your designated branch number if you use an alternate value)
· Site Contact: Normal person who deals with ATO queries
Employee Form
· Last Name, First Name
· TFN (Tax File Number): Imperative this is correct
· Date Of Birth, Gender
· Phone #, Email, Address, Suburb, State, Postcode
· Payroll Tab: Ensure the pay frequency field is populated by making a selection from the drop-down list.
Payroll Transaction Form
· Payments: Include all payment types (from the selection) and whether the item attracts tax and or super.
· Superannuation: Make sure you have the correct percentage recorded in the Super@ field (currently 9.5%)
· Taxation: Calculate the tax deductible by using the calculator. Note: no changes to tax rates in the 2019 / 2020 financial year - reduced tax liability will be via a tax offset and subsequent rebate at the EOFY.
· Deductions: Include all deductions (from the selection provided) ensure values and allocations are correct.
· Pay Frequency: An absolute must, this has to be populated from a selection in the drop-down list.

We suggest you perform a pre-STP ready check on all the information contained in these fields for each employee. By doing this you will minimise data exchange issues plus it will give you an opportunity to ensure the data entered is in fact accurate.
Can I send Retrospective Payroll Transactions?
We have engineered Automation so you can send retrospective transactions created after the 1st. July 2019, you simply bring all transactions that you wish to send up to screen then select the STP send option. Say for instance you are not compliant until the 31st. August this feature allows you to transfer the pays you transacted between July 1st. and August 31st.
STP Registration
For existing locations this is a two-step process, firstly sending a registration request via Automation to Microbase and secondly receiving an email from Microbase support informing you that your location is now STP compliant at which point you can start to use the service. Sending a registration request informs us of your intention to use the STP service provided by Automation Premium, initial registrations received will be processed on a staggered basis with all registrations being actioned prior to the 30th. September.
Note: By sending a registration it does not mean you are STP compliant, your compliance does not come into effect until you receive an email from Microbase support informing you the service is now available for your location. If for whatever reason you have not received an email prior to September 30th. please contact support via email or phone.
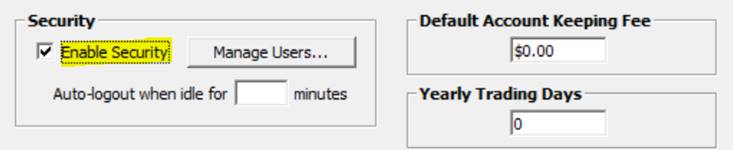
Sending A Registration: To register your intention to use the STP service go to File / Site Settings / Accounts and select the STP enabled option located on the right-hand side of the form.

Agree to the terms and conditions, a final message is displayed explaining the STP compliance process. Microbase will receive notification of your intentions and place your site in request status with a view to activate as soon as possible.
The above finalises step one, once you receive the activation email from us on opening Automation you will notice your Payroll screen displays extra functionality relating to the STP processing of transactions which indicates step two has been completed successfully and you are now STP compliant.
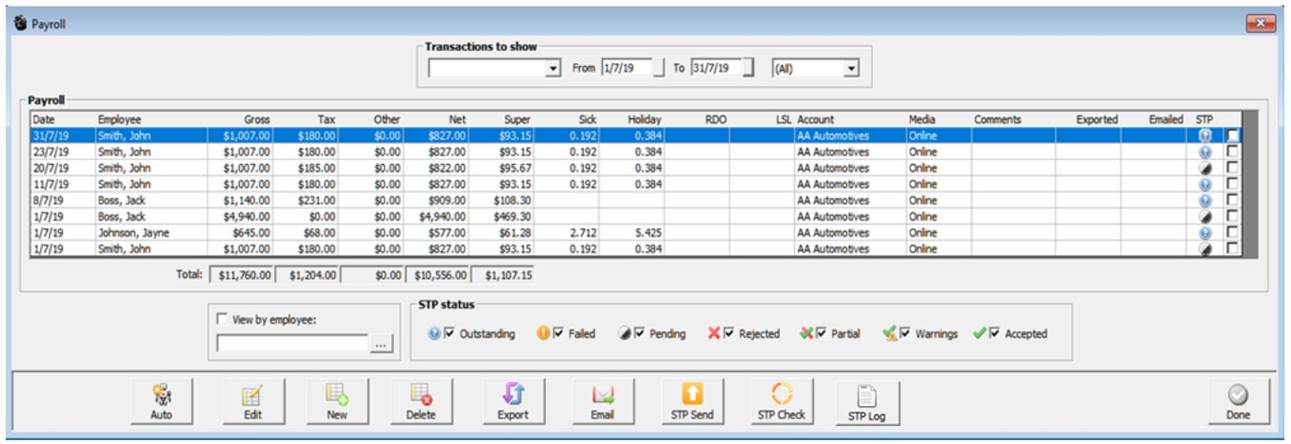
As you can see from the display the payroll transaction display has kept the familiar format with additional references to STP functionality, over to the right you will see an STP column. This column will populate with the STP data transfer status using an icon from the legend at the bottom of the screen, there are seven data status displays. All transfer stages are selected by default if you wish to see just pending deselect the other options leaving only pending flagged.

Outstanding: The transaction has not been transferred to the Australian Tax Office
Failed: The data contained in the transfer was not accepted by the MessageXchange gateway due to data file structure issues ie: missing fields
Pending: Indicates the data was transferred to the ATO via the MessageXchange gateway and is being processed by the tax office – this is the most common indicator displayed in the payroll screen. Note: the pending status will remain for up to an hour or even longer with the ATO estimating the possibly of up to 72 hours (3 days) depending on the volume of data being processed by the tax office servers at one particular time. Please do not think there is a problem with the transfer if the time to process is extended.
Rejected: This status display means the data could not be processed by the tax office due in most cases to inaccurate data ie: incorrect Tax file, non-valid ABN you will need to run an STP check on the transaction to view the ATO message sent.
Partial: Indicates some data has been accepted and some rejected, you will again need to run an STP check on the transaction to view the ATO message sent.
Warnings: Relates to future changes to data structure that your current export does not accommodate, again check for details via the payroll form by selecting the check option.
Accepted: The ATO is confirming the data has been imported to their servers and no more actions are required.
You will also notice that there are check boxes against each STP status, to see just failed transactions for instance simply select failed, you can of course select multiples if you wish.
Now you have an understanding of the enhanced payroll screen let’s look at how to transact payroll entries using STP reporting.
Processing Payroll Payments Integrating STP: Click on the payroll option at the top of form, from the bottom of the display select new, the payroll transaction form is in view, you will see STP status is flagged as outstanding. Complete the details in the usual way populating payments and deductions accordingly. To finalise select OK (F12) you are now presented with an option to submit the transaction immediately, select yes to transfer the data from this individual transaction.
You will need to then agree to the ATO terms and conditions for the transfer to initiate, this acceptance lasts for the complete day so you will not be presented with the form again for any subsequent transaction made on the same day.
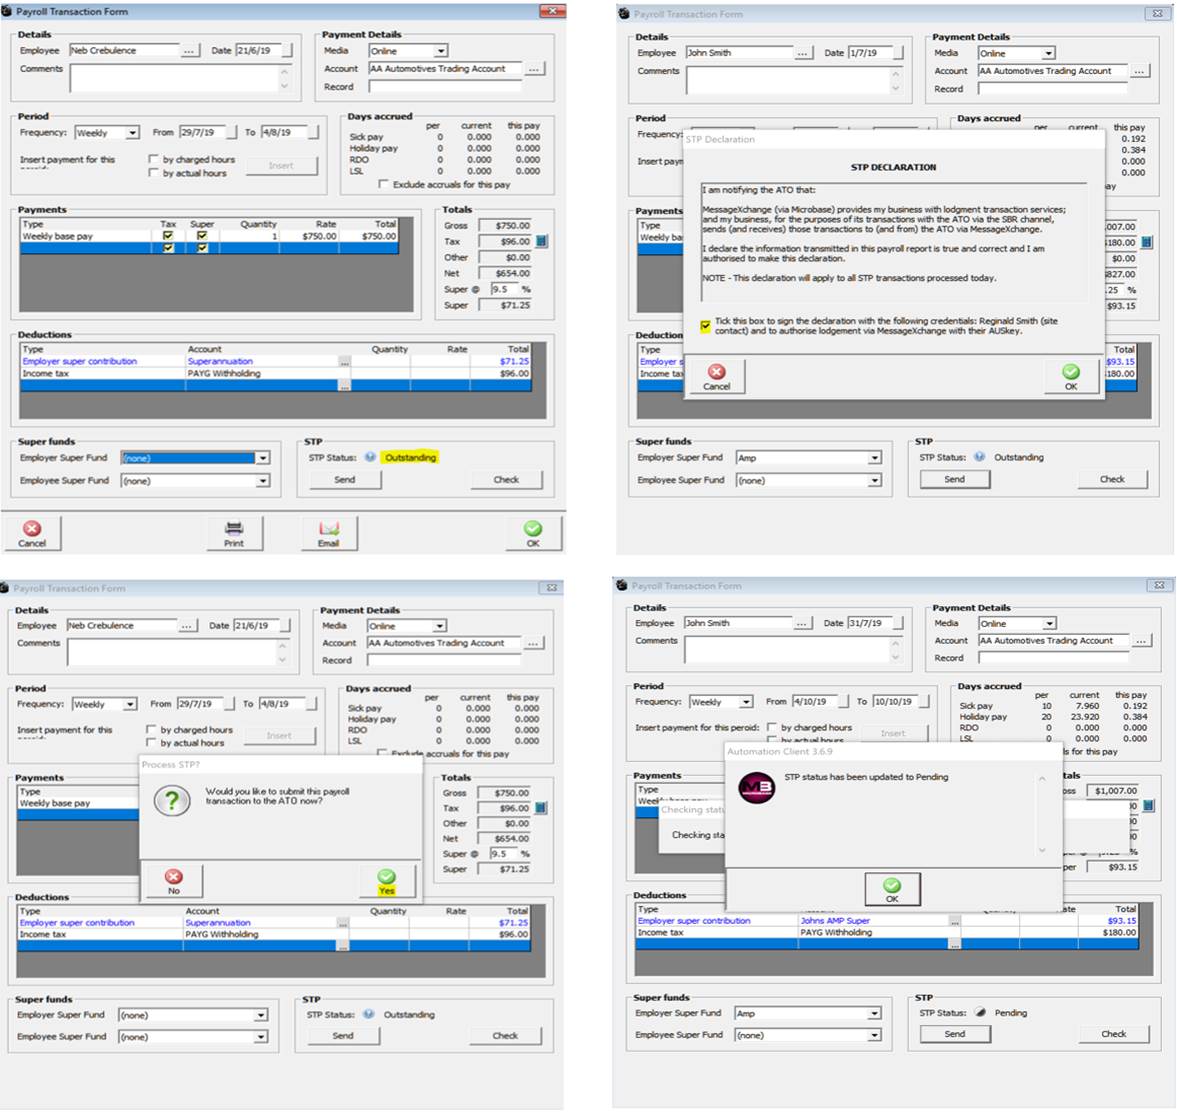
If you reject the option to transfer the status will remain as outstanding, you can then batch send any outstanding transactions later from the payroll screen. The advantage of not transferring immediately is that if you wish you can still delete the transaction which is not possible once it has been submitted to the ATO.
In most circumstances the status of any submitted payroll transaction will convert to pending meaning that it has been exported by Automation, passed through the MessageXchange gateway and is being processed by the ATO. If there is an issue that prevents the data being rejected by the gateway a message will display on your screen alerting you to the problem.
STP Transactions, Bulk Processing: As mentioned earlier it is possible to place your transactions into an “on hold” mode (outstanding) by not accepting the option from the payroll transaction form to process. In this case you will see a list of outstanding entries in your payroll screen.

To process these, simply select the STP Send option from the bottom of the display, the transactions transferred will now convert the status to pending.
STP, Updating The Transaction Status: Automation requires you to select the STP Check option to view the latest status of all transactions, once STP compliant you will be reminded to do this each time you enter the payroll screen or at any time you can select the STP Check option at the bottom of the display. This action will display the current status plus download any ATO messages generated due to inaccurate data submissions. These messages will appear on screen for each rejected transfer, to locate which transaction a particular message relates to you will need to open the transaction and select the check option from the bottom of the form.
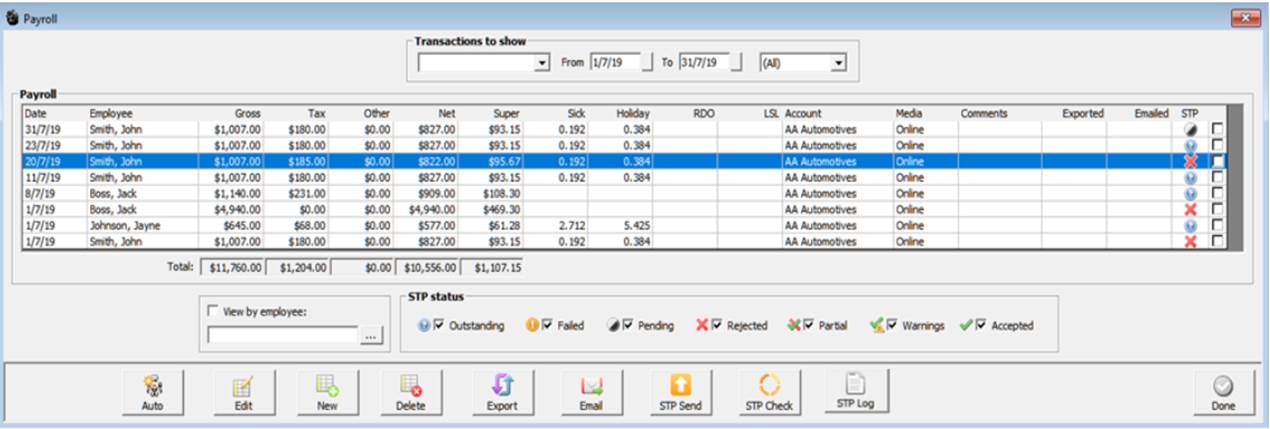
The rejected transfers are flagged with a red cross to view the error message point and double click on the line item.
STP Tax Office Messages: If your data transfer is flagged as either rejected, partial or warnings you will have access to an explanation as to what is causing the problem. To view these messages, you can choose STP check from the payroll screen for all messages or check from the individual payroll transaction form to view a single message.

The tax office messages will give you some technical data including the message id., source, error and severity code. Fortunately, this is followed by a short description that tries in plain English to describe the problem, as you can see from the example below the problem lies in the date of the transaction as it must not be later than today’s date.
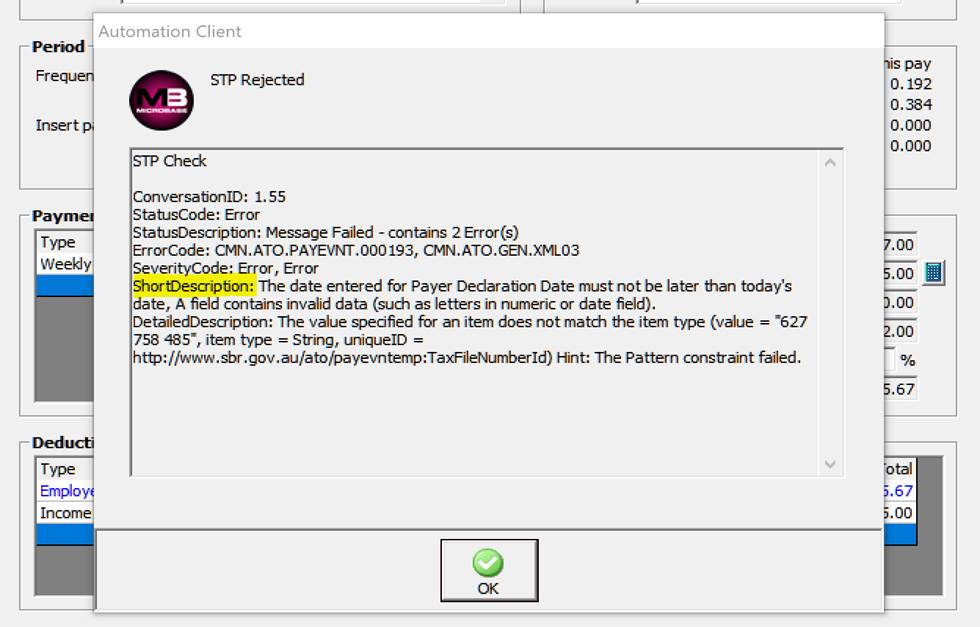
It is possible to open and edit the transaction, edit the content and re-submit, it is NOT possible to delete a transaction once it has been sent to the ATO even if the status indicates it has been rejected. As you can see from the error message displayed single touch payroll is chronologically dependent, and as such it is important that you process your pays in date order, if you don’t you will find yourself having to deal with rejected data an exercise that can be both frustrating and time consuming.
How Do I Correct Rejected Data?
You have the ability to edit transactions directly from the payroll screen, simply point and double click on the line item, make the necessary adjustments, then select send from the bottom of the payroll transaction form.

This action will attempt to resend the data, if the issue is corrected the status will change to pending in the payroll screen. Some issues with data rejection may not relate to the payroll form in which case you will need to access other forms such as the employee form and site settings.
Transitioning To STP Made Easy
Automation has made a complex reporting task as simple as a few extra mouse clicks to send and check transfer status directly from the payroll screen. To ensure a smooth transition to STP reporting it is essential that you read and understand this document, you also check that the data you will be transferring is accurate and is submitted in chronological order.
We strongly suggest that you maybe take a little more time to check and double check your payroll transactions prior to committing them to the Australian Taxation office. The time spent we are sure will pay dividends as you will not be wasting valuable resources trying to interpret messages from the tax office and having to edit and resend transactions.
In regards to support Microbase is more than happy to assist with the operation of STP functionality, however our support does not cover the entry of inaccurate data, these issues you will need to address internally, via your tax agent or the tax office. As developers of the service we are only responsible for the file structure, not the data accuracy (file content).
STP Log: Automation allows for the viewing of the data exchange log from the payroll screen. To display the detail simply select the STP Log option located at the bottom of the payroll transaction display.
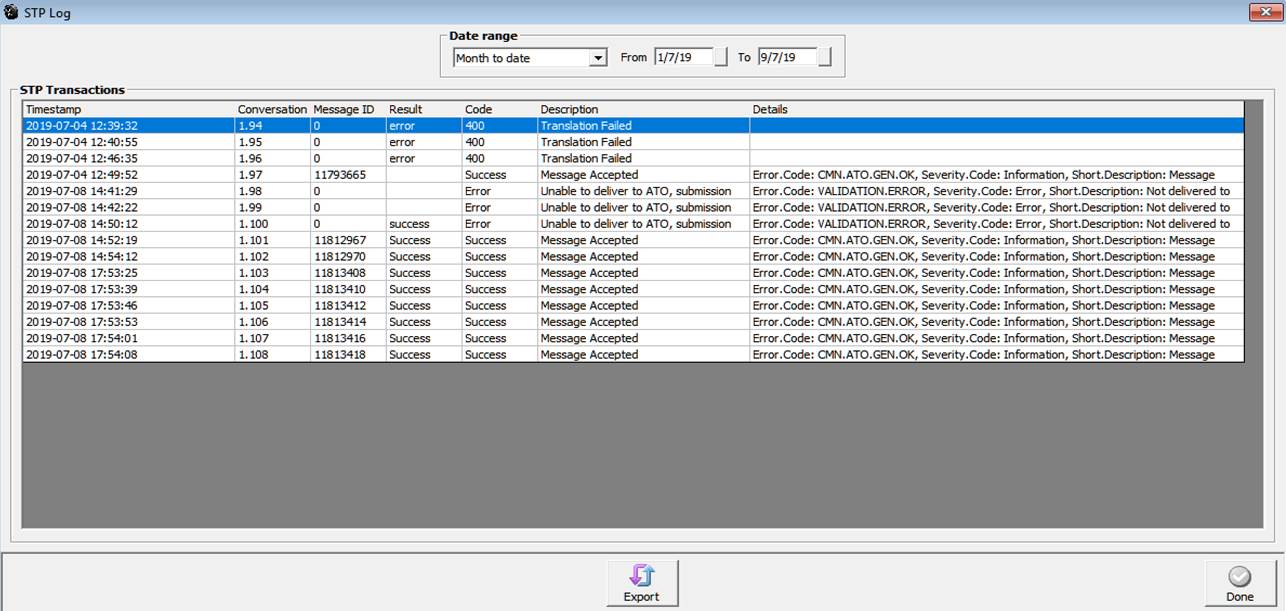
The log contains detailed information which includes the time/date stamp, conversation id., message id., result, code, description and details including information that may have been received from the ATO.
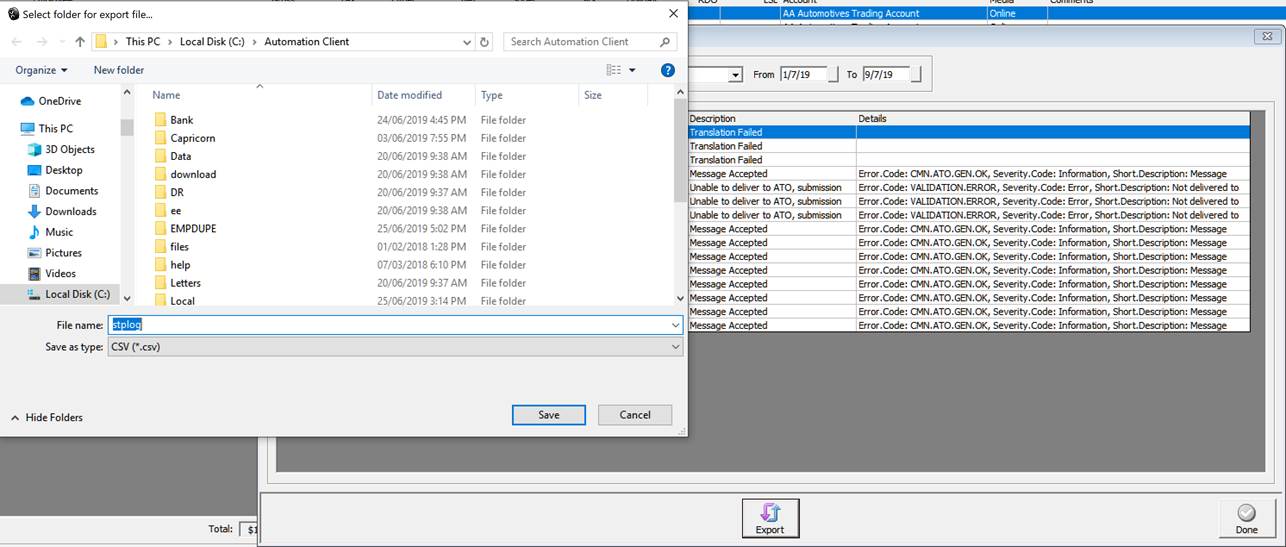
STP Log Export: It is possible to export the log file our of Automation in CSV format, to do this select the export option from the bottom of the STP log screen. Select the folder in which you wish to save the file, you can now open view the results in applications such as Excel.
Overview: Payroll provides the operator with a comprehensive range of reports, including a detailed pay advice and a selection of transaction reports. The pay advice is printed from the payroll transaction form, payroll detail reports can be accessed from the reports menu.
Payroll, Printing A Pay Advice: Complete all the details on the payroll transaction form as previously described, select the print button located on the lower menu bar, your employees pay advice is displayed on screen.
The advice is split into the following sections:
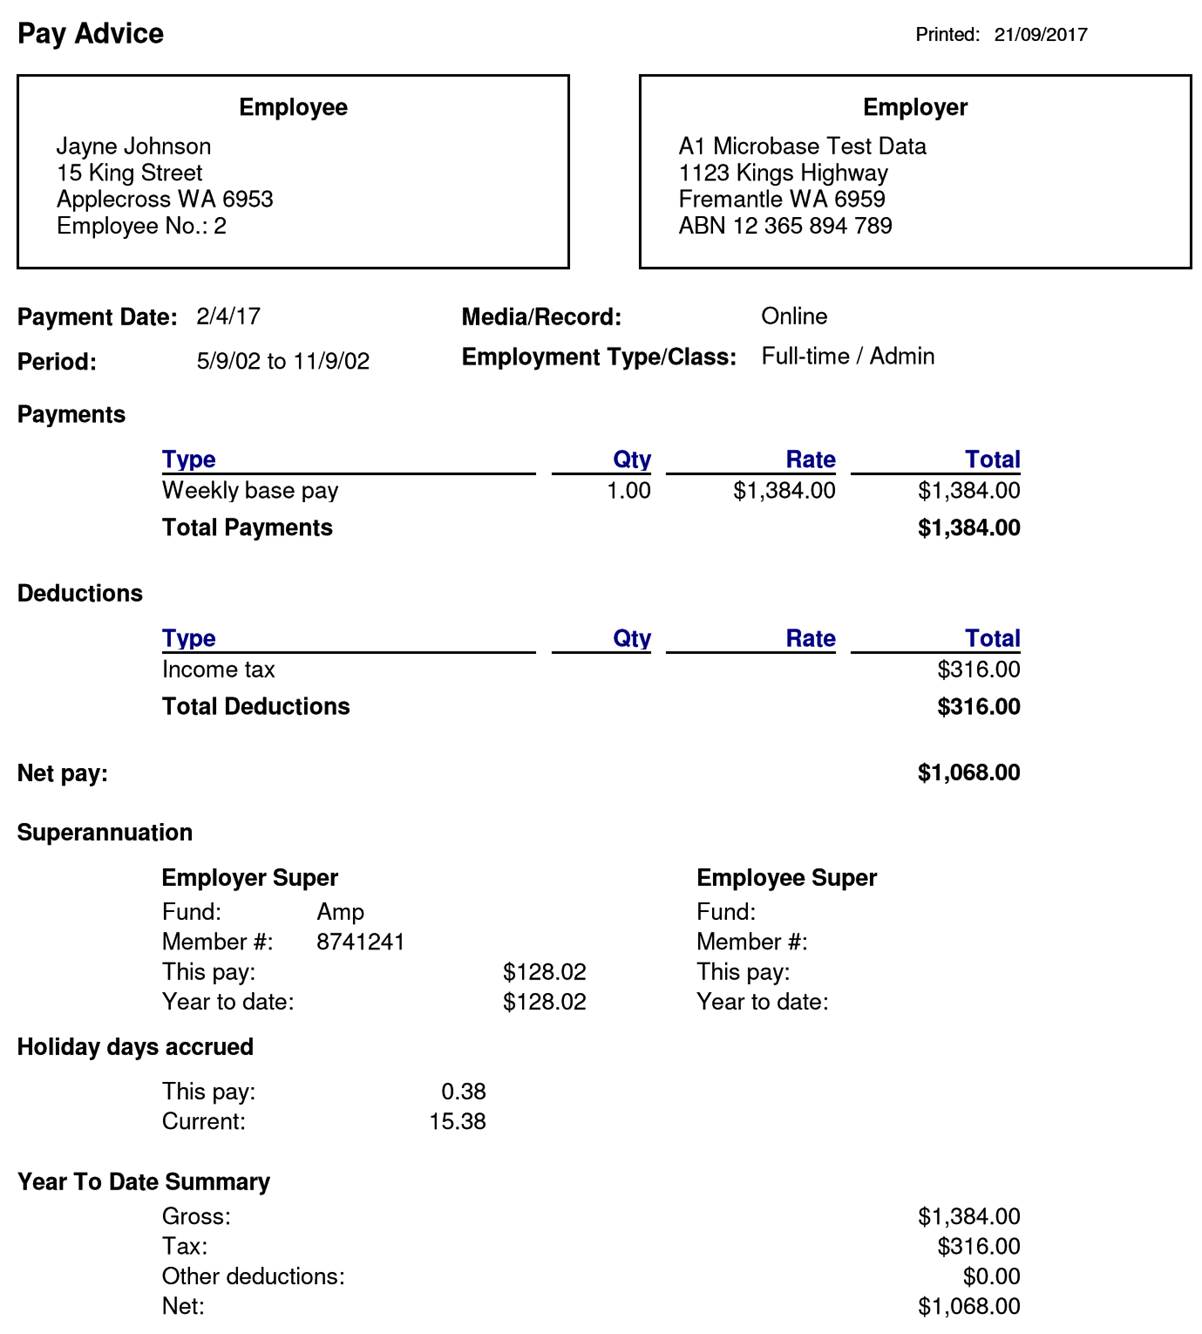
Note: It is essential that you complete the fund details on the employee form for this information to print on the pay advice
Holiday Days / Hours Accrued: To calculate holiday days or hours accrued the days / hours per year field in the employee form MUST contain a value. Any used holiday payments must be recorded in the quantity field of the pay transaction in days or hours depending on how you record your employee entitlements.
EMPDUPE File Format: As of July 1 2016 all businesses by accessing the ATO portal are able to submit their annual payroll summaries digitally, the file format required is referred to as EMPDUPE, you will need to logon to the tax office and select the appropriate upload function. Automation produces the EMPDUPE file based on the information that flows through to your PAYG Summary Statement and super contributions report (if there are any reportable values) report which includes the individuals pay summaries. The statement summary and EMPDUPE file creation must be run for the same period ie: Last financial year.
EMPDUPE, Processing: It is suggested that you first run the PAYG Summary Statement and PAYG Summaries (for employees) from the payroll reports menu this will allow you to check the information that is going to flow through to your EMPDUPE file.
Reports, Payroll: Transaction reports are accessed from the reports menu in the payroll group.
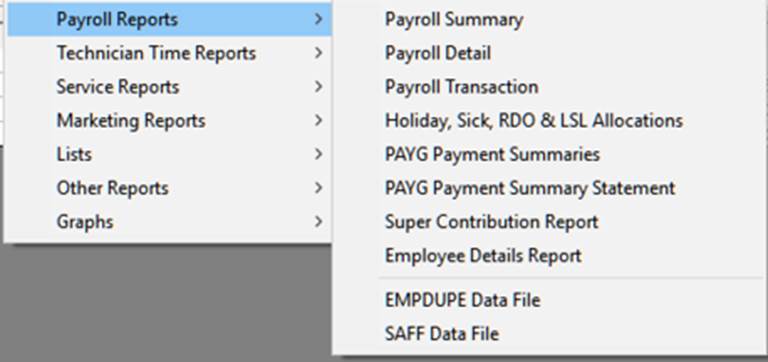
Click on the reports option at the top of screen, move your cursor down to Payroll Reports, the sub menu is displayed. To select a report point and double click on the descriptor. All reports can be filtered by data range and employee.
Payroll Summary: Summarises all payments made in a chosen date range by employee

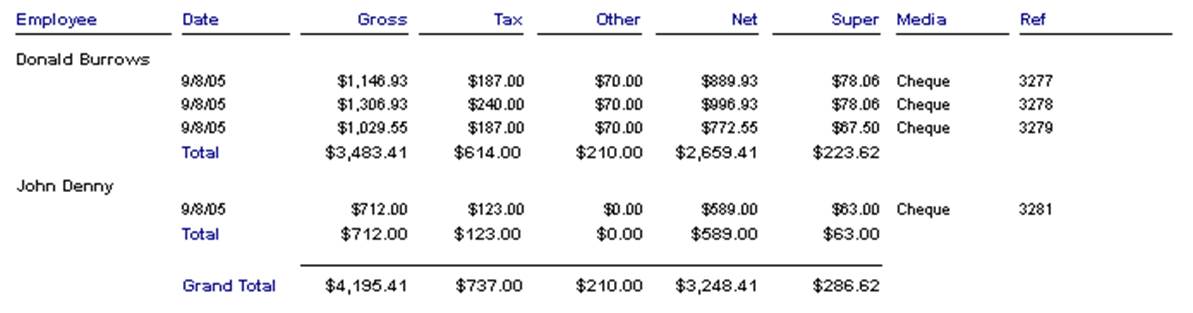
Payroll Detail: Provides details of each pay transacted in a given period including the method and payment reference.
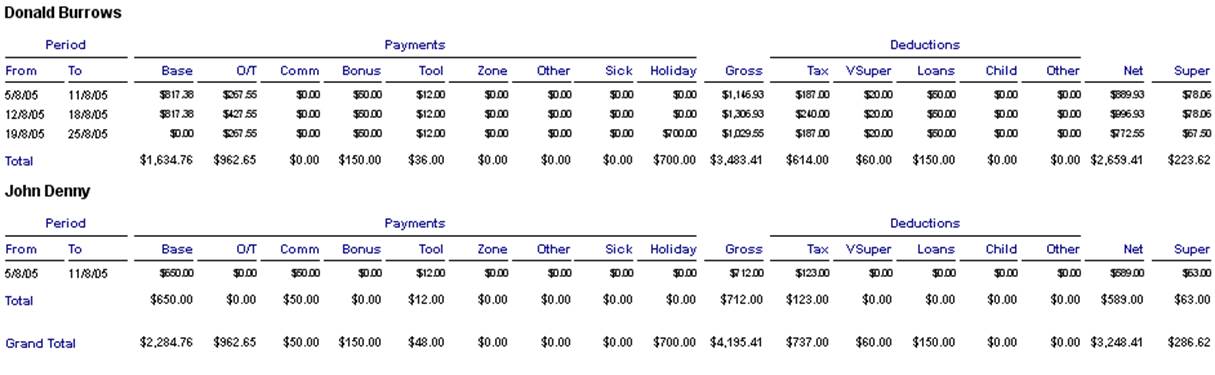
Payroll Transaction: Displays details of all payment and deduction types for a given period by employee
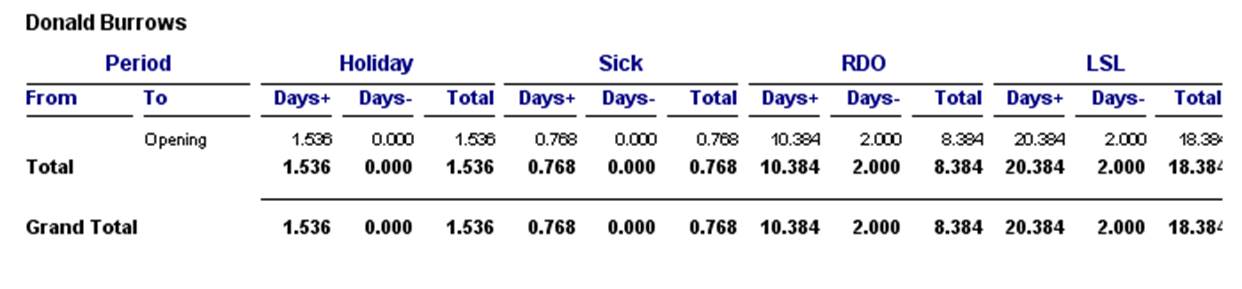
Holiday, Sick, RDO & LSL Allocations: Displays holiday and leave entitlements for each pay by employee, displaying credits and debits for both entitlement types.
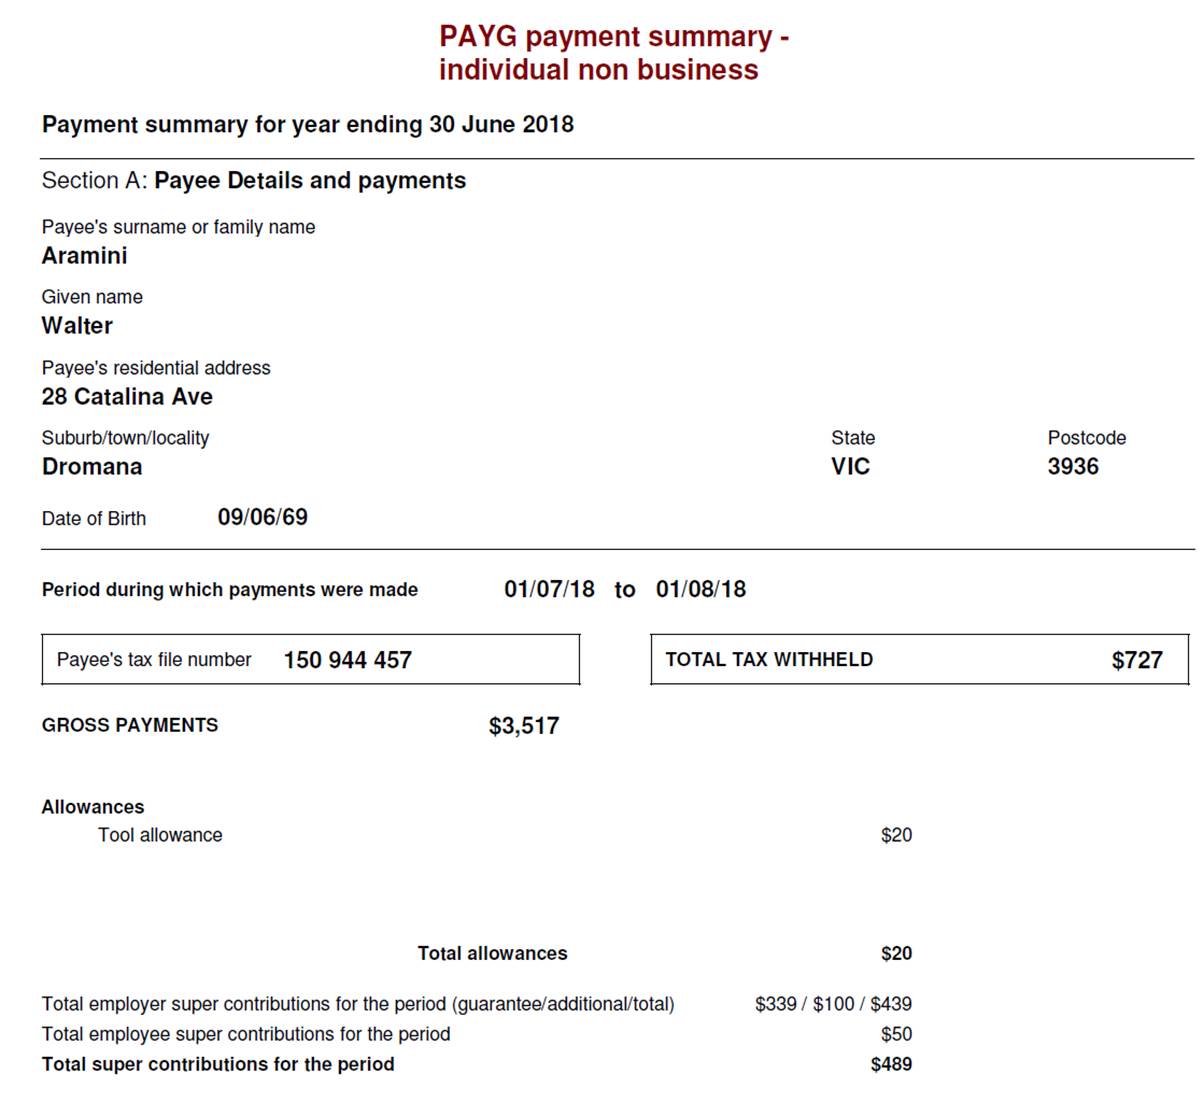
PAYG Payment Summaries: Select reports PAYG Payment Summaries
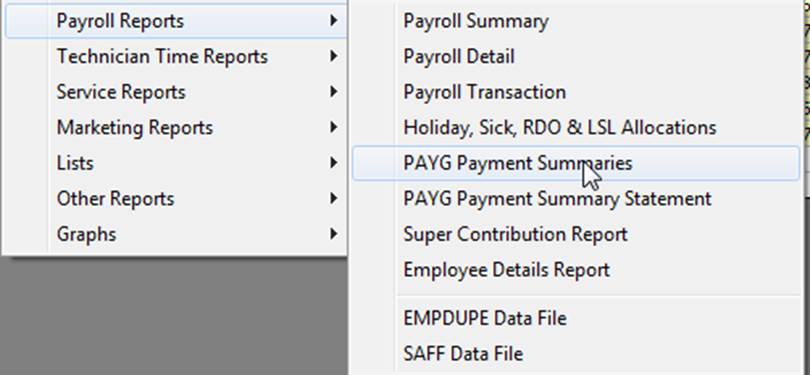
Select whether you wish to print certificates for all employees or individuals, next enter the date range and proceed with OK.
Additional Payments Reporting: When printing the PAYG summary and creating the EMPUDE file if additional payments have been made to an employee that are reportable you will need to select the payment types you wish to add from File / Site Settings / Accounts > PAYG Gross Inclusions.
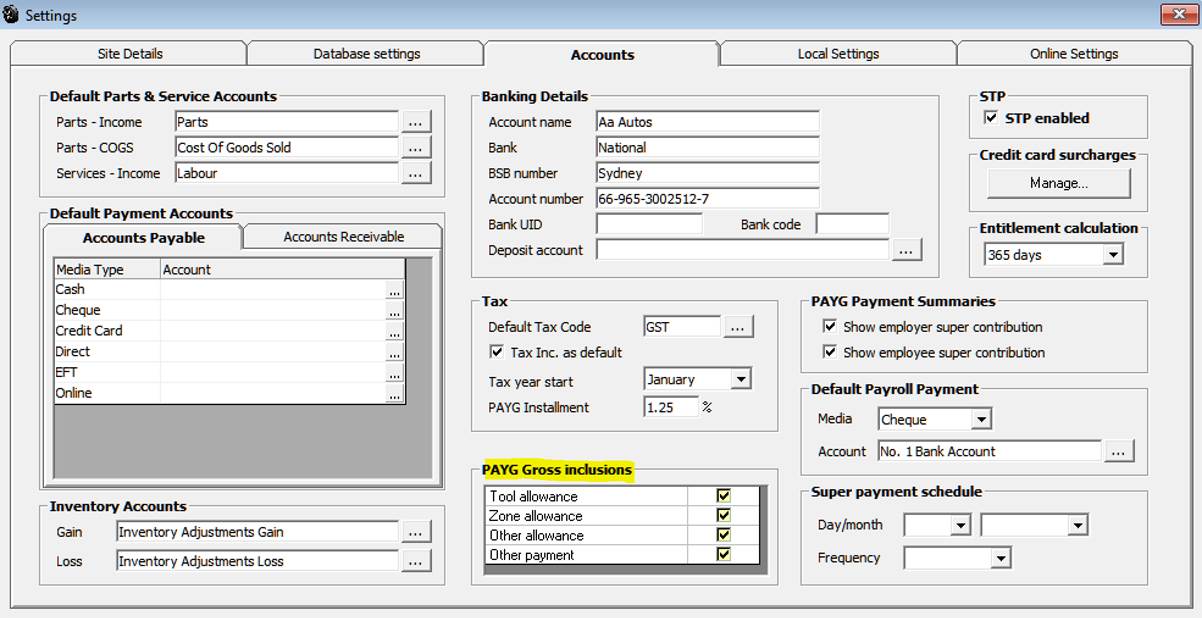
Selecting these items will include the values in the reportable taxable income for the employee both on the PAYGW summary report and as a data entry in the EMPUDE file.
PAYG Payment Summary Statement – Report available under payroll reports, displays a summary of all group certificates for a specified period.