Help Files Automation On-Line Job Card
The on-line job card provides the technician with an active job card from any device that has a web browser. We suggest due to the amount of information available that the screen is best viewed from a 10 inch tablet or greater, although any smart phone can accommodate attaching photos to a job card and manage email communications or SMS to clients.
The on-line job card interacts directly with the remote database so to use this application your data must reside on the Microbase server. You will also need to nominate an admin machine as the application uses functionality only available from Automation client.
The application is not meant to be Automation on-line it is provided to you as an extension of Automation Premium, the job card does not encompass all of the functionality that is available from the client machine. It does however provide a useful service tool for your technician as he is able to add parts directly from the inventory file, send requests to the admin machine for parts required, log on / off of jobs, add text and communicate with clients via SMS and email plus many more additional features.
Our goal in writing the on-line job card was to create efficiencies within your organization by allowing technicians access to a tool that allows them to build the job card in real time and easily communicate with administration as they require specific items, the order status of which can be monitored from the digital job card. In reality providing this extension will result in the technician spending more time where he should – In the service bay, added efficiencies will come into play in the back office as there is no longer a need to transpose a written job card into an invoice as the technician prior to assigning the job a close status will have completed all the necessary information.
The help files are to be used in conjunction with on-line application so you have a full understanding of how this powerful tool will have a positive influence on your service centre.
Firstly your data must reside on the Microbase remote server please see the relevant help files in the Automation Premium application on how you can change from a local server to remote. Once this process is complete you are ready to implement your on-line job card.
Firstly your data must reside on the Microbase remote server please see the relevant help files in the Automation Premium application on how you can change from a local server to remote. Once this process is complete you are ready to implement your on-line job card.
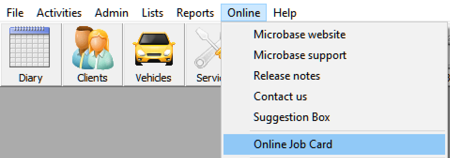
On-Line Job Card Access, Requesting: Go to your On-line menu at the top of the Automation Client screen, from the drop down select on-line Job Card.
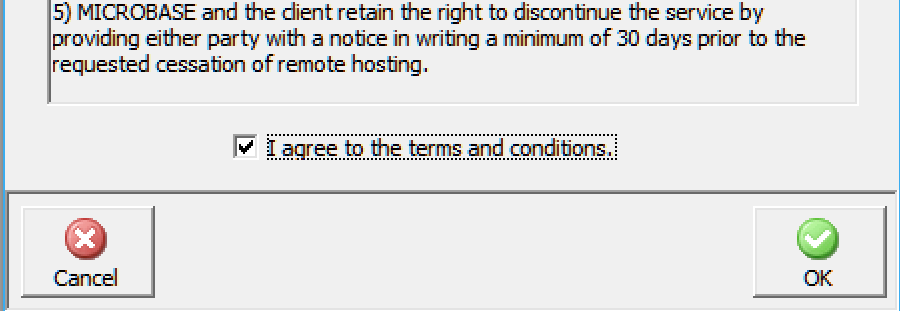
On selection we will check to see if your data is stored on the Microbase server, if it is not you will be requested to transfer your data. Next we display the terms and conditions of use, please read these and select from the bottom of the form agree
Next you will receive a confirmation that your request has been sent.

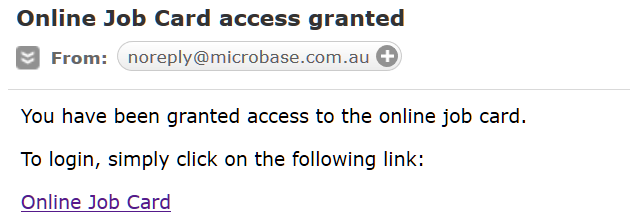
When the permissions have been set an email will be sent to your address in site settings the email includes a link to the on-line job card log-in.
Accessing Site Data: Automation on-line job card will interact with the security settings of Client, this avoids having to provide the database master password to an employee, to access the data you must first setup security on your local machine. You will also need to flag a user to gain access via the on-line job card.
To set the security function it will have to be enabled from site settings / database settings / manage users.
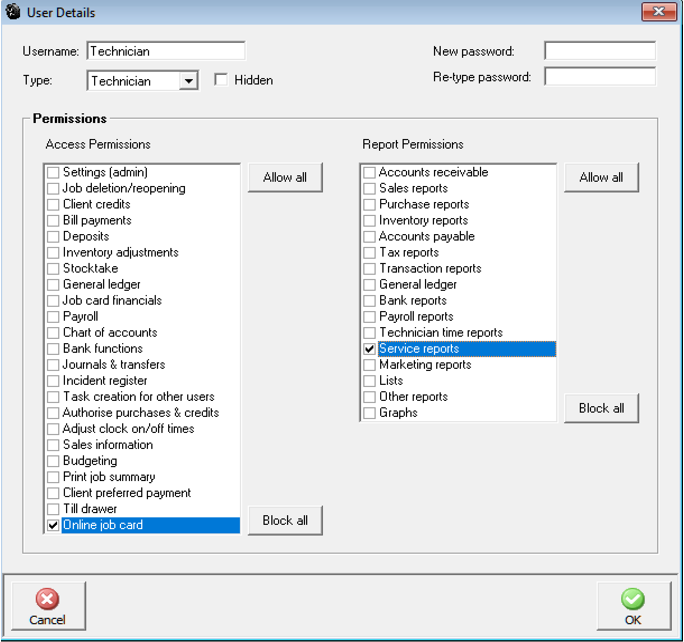
Security, Enabling: Point and click on the enable option positioned above the manage users button. Next you need to enter the user’s name (this will be their unique log in), set the user type, establish the permissions and enter a password. The password can be in text, numbers or a combination; the password field is case sensitive so if you enter a letter in capitals it must be typed in the same way for the user to be logged on.
Note: that when entering your password you are asked to confirm by re-typing, if the combination does not match the original entry a message is displayed. Simply re-key correctly.

To select the user type point and click on the down arrow situated on the right hand side of the type field. There are three user types Manager – Usually would have full access, Office – Access to limited administration functions, Technician – Access to jobs, including the on-line application and the accompanying functions only with no access to administrative tasks.
The allow all and block all function is a quick way to set or secure access to all functions, you can use this as a short cut, then simply edit the selections you wish to change.
Note: It is important that you retain your password in a SAFE place as loss can cause operational problems. It is also suggested that you limit your password to a maximum of 6 characters so it is easy to remember.
Security, User Default: To setup a new user select manage users from the configuration screen, select new, the user details form is displayed. Enter the user name, select the user type, enter the password (remember this is case sensitive), confirm by retyping in the re-type password field. Next point and click on each function you wish to give the user access to. Report permissions allow the user to print or not print all reports in the group selected.
Note: You will need to select the On-line job card option from the user profile access permissions to gain access to your data from the on-line application. It is not necessary to use full security from the terminal for on-line job access, so you don’t have to log into the application each time if you choose not to.
In this case simply create user profiles for those that require on-line job card access, ensure the On-line job card option is selected and do select the manage users option from settings.
Security, Log On: Once security is set you will need to log on to use the program, on start up a log in message is displayed, type the user name or select from the drop down list, enter the password and press enter or select OK.
If a user attempts to access functions that have not been selected in the security profile an access denied message is displayed. It is however possible to change a user’s access at any time by selecting File / Settings / Configuration / Manage Users. It is of course suggested that only the manager has access to the setting option to prevent unauthorized use of the program.
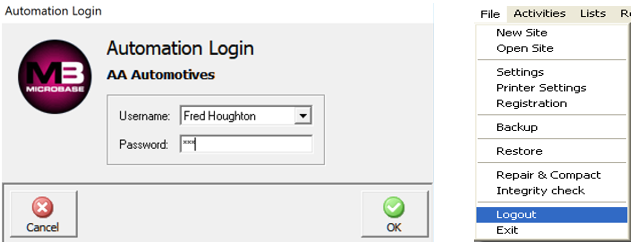
Security, Log Out: To log out of Automation select file / logout, this procedure will log you out of the program displaying the log in message for the next user to sign back in. If security is a concern it is suggested that you log out whenever you leave the terminal and log back in when you return.
Auto Log Out When Idle: This options allows the operator to set an auto log out period when the terminal is inactive. Enter the minute value into the field provided, once this period is exceeded you will be required to log back into the system
At this point it is important that you understand the relationship between your on-line job card, the remote server database and the local machine running Automation Client. Obviously both the terminal running client and the job card are communicating with the database so data is constantly moving back and forth between terminal, remote server and on-line job card.
To make all functions available there is however a second line of communication required from the job card via the server back to the node terminal. Basically the node terminal shares some of its functionality with the job card, for instance the sending of SMS messages and accessing security settings.
Additionally the job card allows communications to go back to the terminal set as the node machine, there can only be one node machine on network. This is the terminal that will receive the order requests from on-line job cards that need to be processed from the terminal as unlike the terminal job card the on-line version has no purchasing function.
Setting the Node Machine: To set the node machine (admin) select File / Site Settings / On-Line down on the bottom left hand side of the form you have a node option.
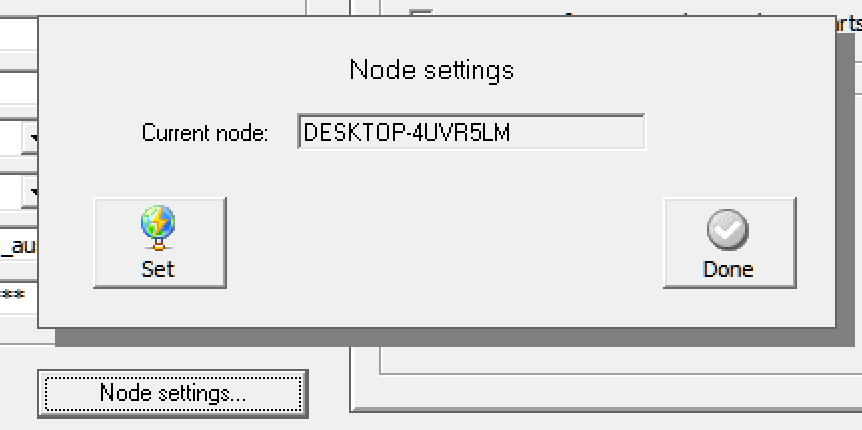
Point and double click on node, select set the name of your PC with be inserted into the current node field, if used previously the setting is overwritten. Finalise the procedure with selection of the done option. Your machine is now set as the node so the on-line job card can share certain functionality.
Open your tablet, access the internet browser and go to:
For versions up to 3.6.2 (Note: Server no longer available after 31 October 2018)
http://www.microbasedb.com.au/jobcard/login.php
For versions 3.6.3 and later
http://www.microbasecloud.com.au/jobcard/login.php
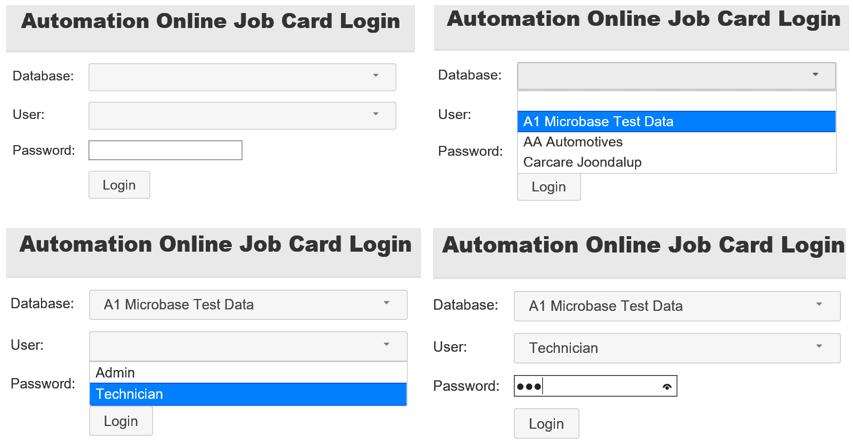
On connection you will have the ability to locate your site data, click on the down arrow to the right of the database field, scroll down to your location and double click. Next you will see the login option which is the same as your local client, to choose the user select the down arrow to the right of the username field, point and double click on the required record, type the password and select OK, you now have access to your data via the on-line job card application.
On opening you will see a list of open jobs, fields the records are listed in order of finish date and time, fields include job #, client, registration, make / model, service due (first service listed) and finish time. The finish time column is colour coded, red indicating that the job is open past the time originally scheduled, a green background is applied to jobs that are open within the original scheduled time entered in your diary screen. Jobs that are on hold are indicated by an ochore backgound in the job number field.
Changes within your diary screen will only be refleced on this screen when the page is refreshed. Ie: closing and re-opening this can be done by selecting a job and then coming back to the open job list. Please note that once a job is closed it will no longer be in the open jobs list on your tablet and as such can no longer be acced by the device.
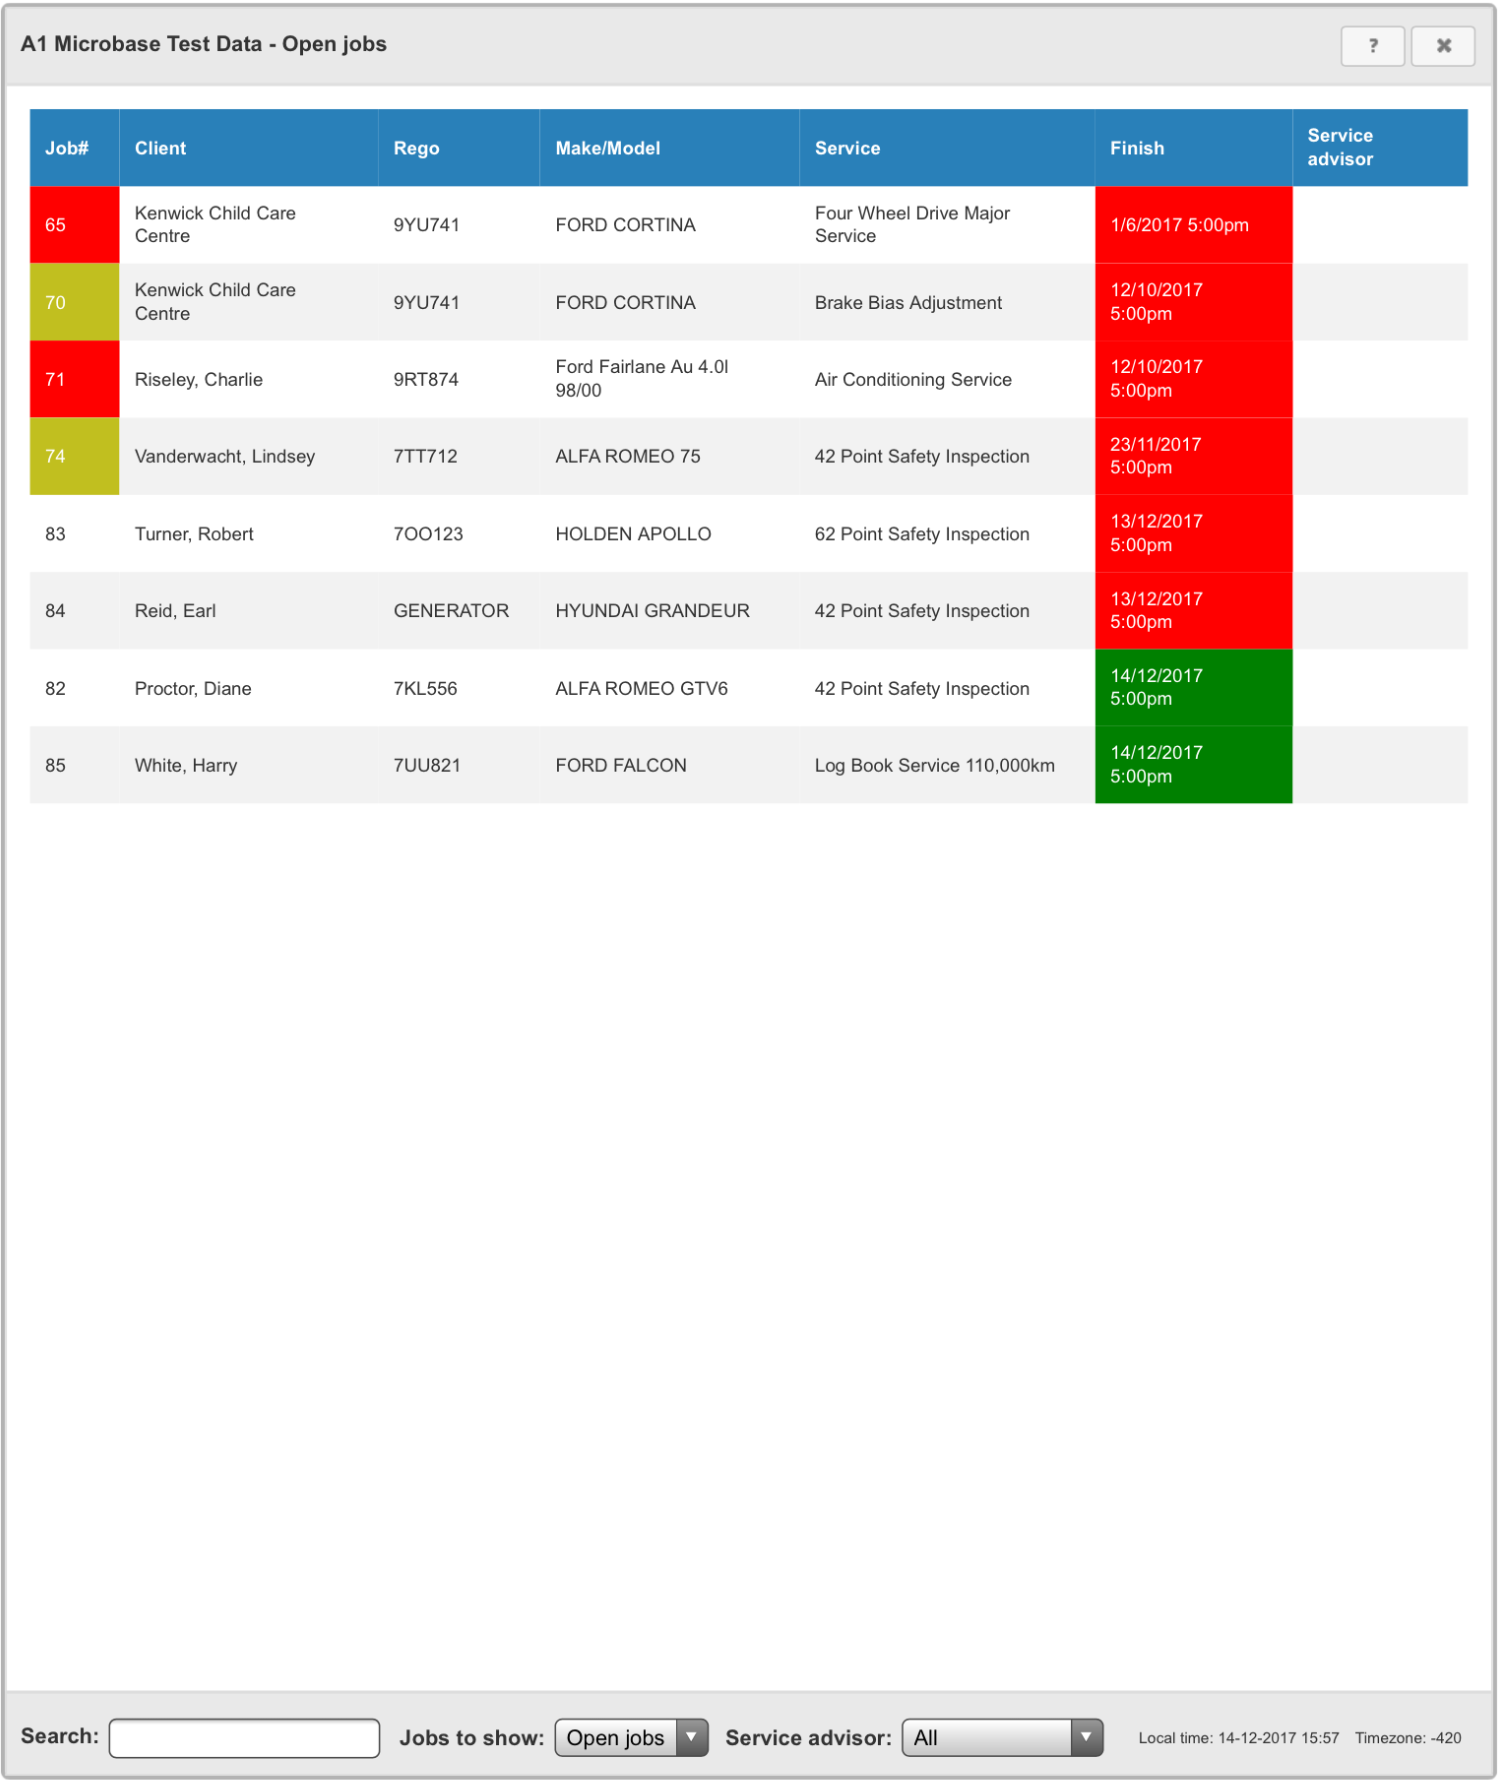
Searching Open Jobs: You can search the open jobs list by any combination of alphas and numerics for instance if you wanted to locate job# 245 simply enter 245 into the search field at the bottom of the form. To search by client enter Moore and the cursor will move to an open job that has a field matching that criterea in the client field.
Opening A job: To open a record simply double tap on the line and the relevant job card will open.
Service Advisor: To search for jobs or estimates created by a specific service advisor click on the arrow to the right of the service advisor field, point and double click on your selection, only jobs assigned to that advisor are now visible.
Job Card Selection, Exiting: To exit back to the login screen double tap on the cross located at the top of form on the right hand side.
Non-Chargeable Jobs: The online job card give you the ability to log technicians on / off of non-chargeable jobs. Select a technician by clicking on a row to highlight it. Change the option button to “non-chargeable” and select the type of N/C item from the list. Then click OK and you will have clocked on/off from the non-chargeable job
You can change to estimates view by selecting the down arrow to the right of the jobs to show field, once the estimates screen is displayed you can choose to view estimates created within the last 30 days (default) last 60 or last 90.
To view an estimate simply point and double click on the record in the estimates list.

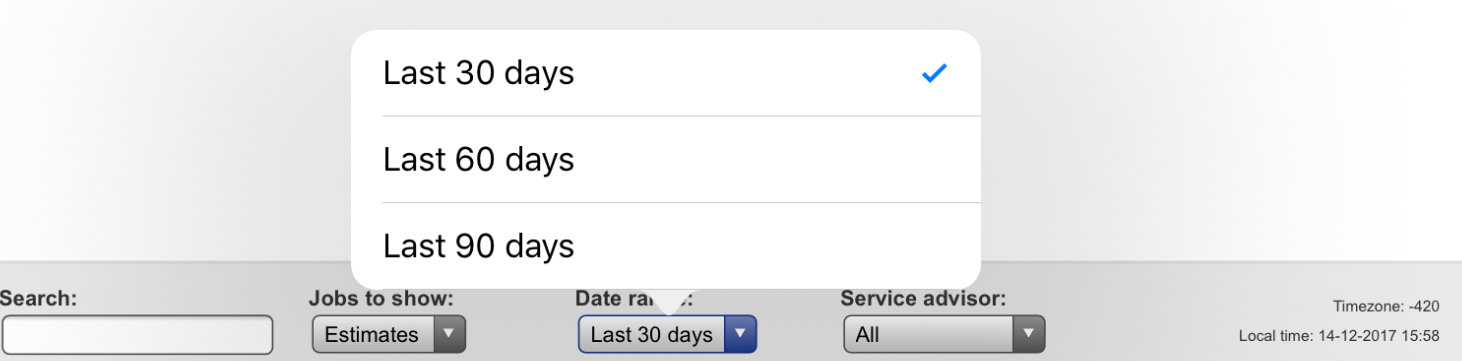
The estimate form has exactly the same functionality as the online job card.
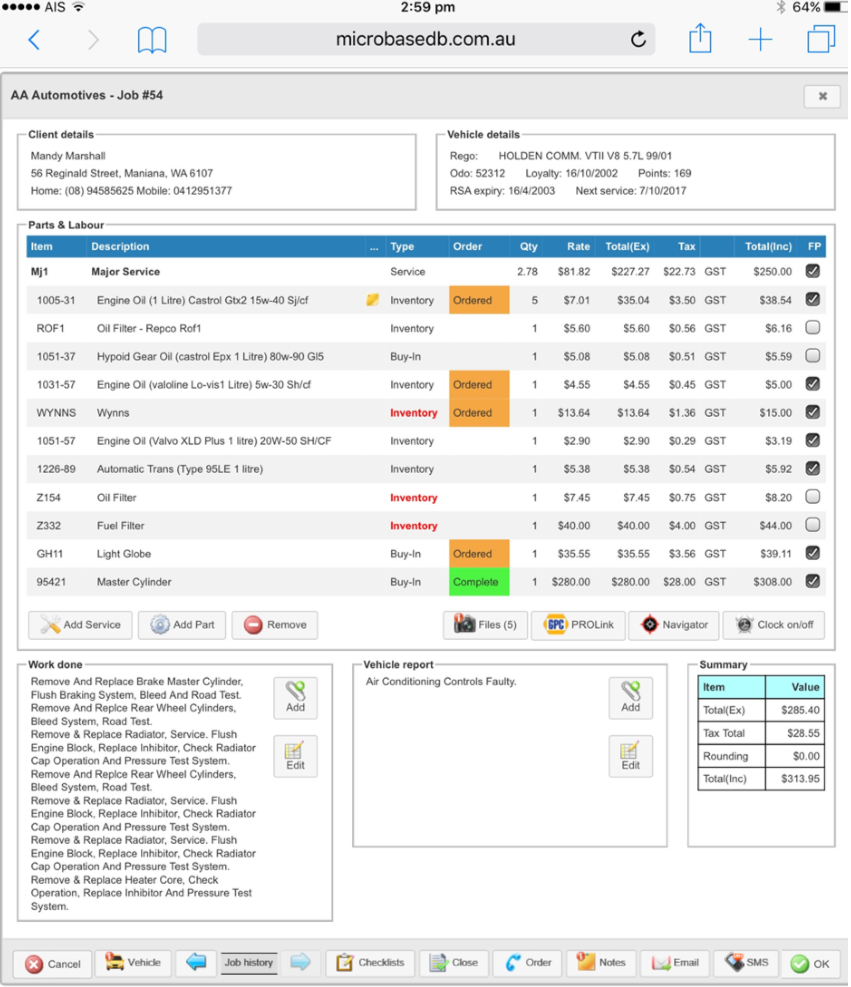
The on-line job card gives access open jobs and estimates and each form gives you access to the following functions from the task bar located under the parts and labour section of the form:
Adding Services, adding parts (from inventory and catalogue), removing parts and services. Taking and adding photos to the job including emailing images directly to the client, parts ordering from both Pro-Link (Coventrys) and Navigator (Repco), Smart Inspector (Coventrys & Repco) plus the ability to clock on/off technicians.
Text fields available include work done and vehicle faults including the ability to paste stored stories and vehicle faults directly into the text areas.
From the bottom task bar you can cancel out of the form, select and edit vehicle records, view vehicle history, access checklists, send a close request to the admin machine, transfer an order for parts listed on the job card that are not available. Send an order request for items required specifically for a job to the admin machine, send emails and SMS communications directly to the client and finally exit out of the job card with an OK option.
Parts & Labour: The parts and labour section of the job card displays services, indicating whether they are fixed price or to be sold on a parts and labour basis, inventory, catalogue and buy-ins (ordered by admin) pricing, quantity and order status.
Quantity and price fields are fully editable from the form by simply double point on the cell changing the numeric and then saving with your return key.
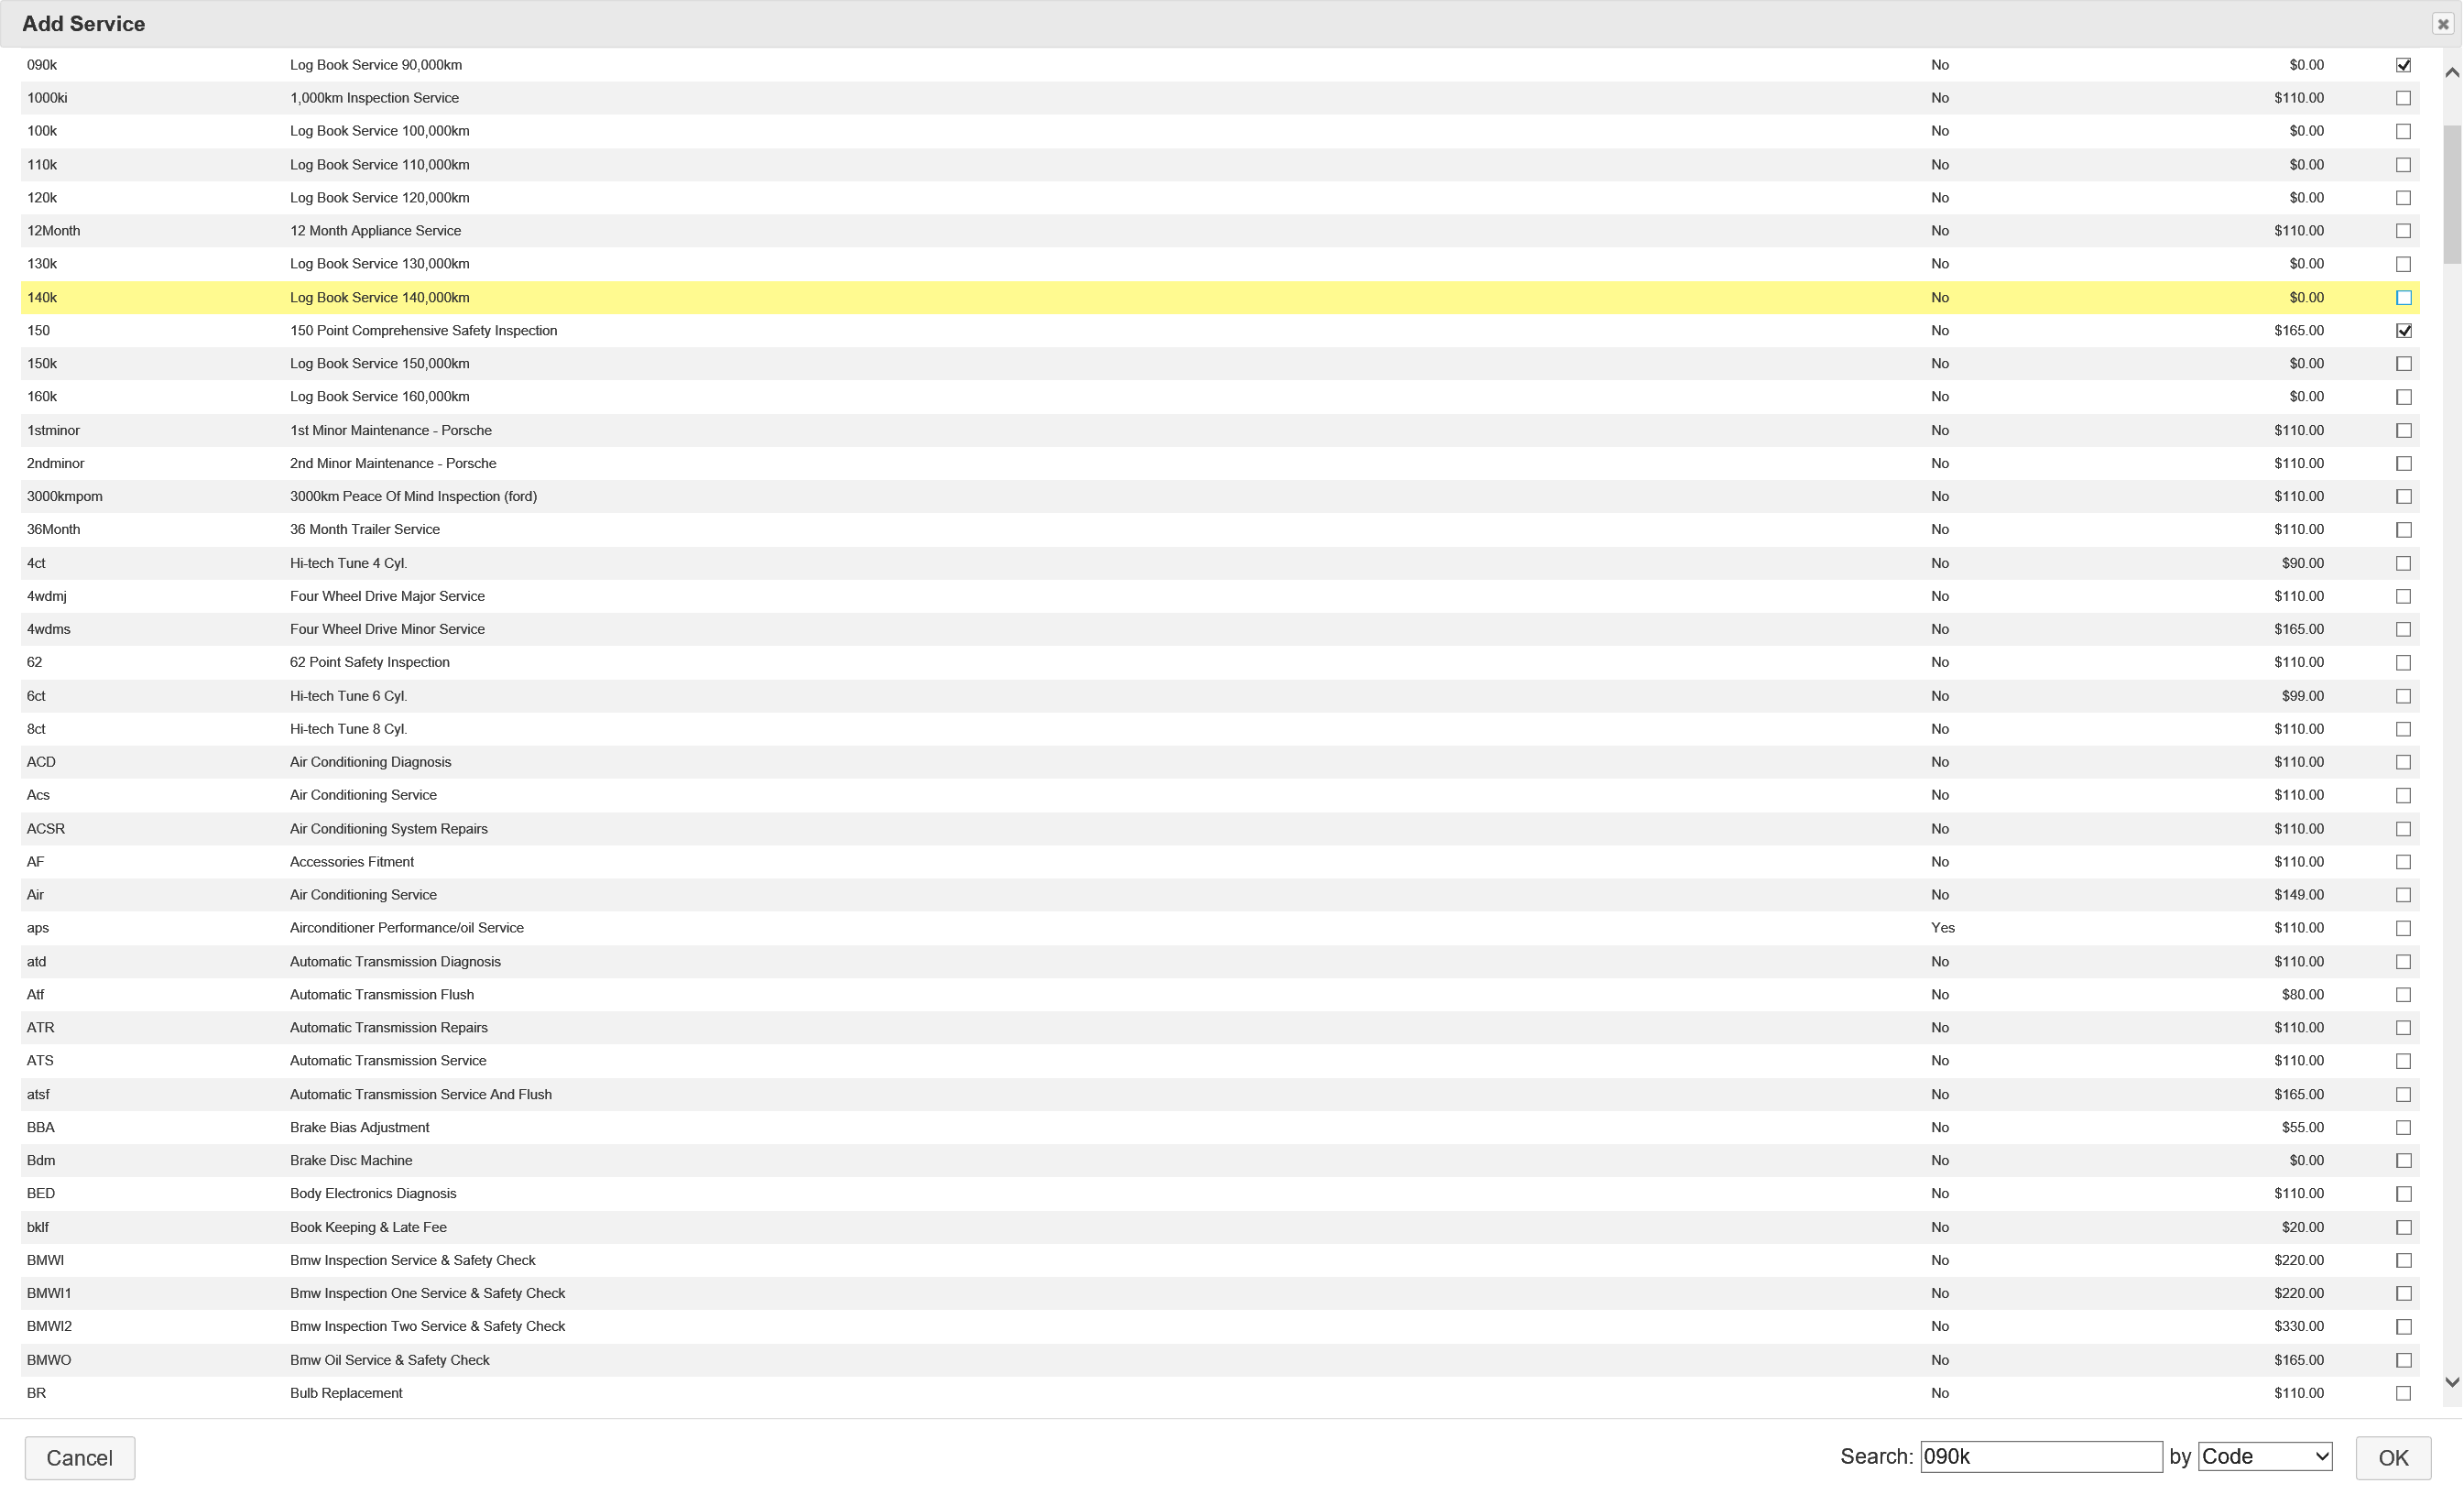
Services, Adding: To select a service double tap on the Add service option, the service listing will display, a search option located at the bottom of form allows you to search by Code, description or both,. To select the services required double tap on the checkbox to the right of the screen. You can select single or multiple records, to paste into the job card select the OK option down on the lower right hand side of the form.

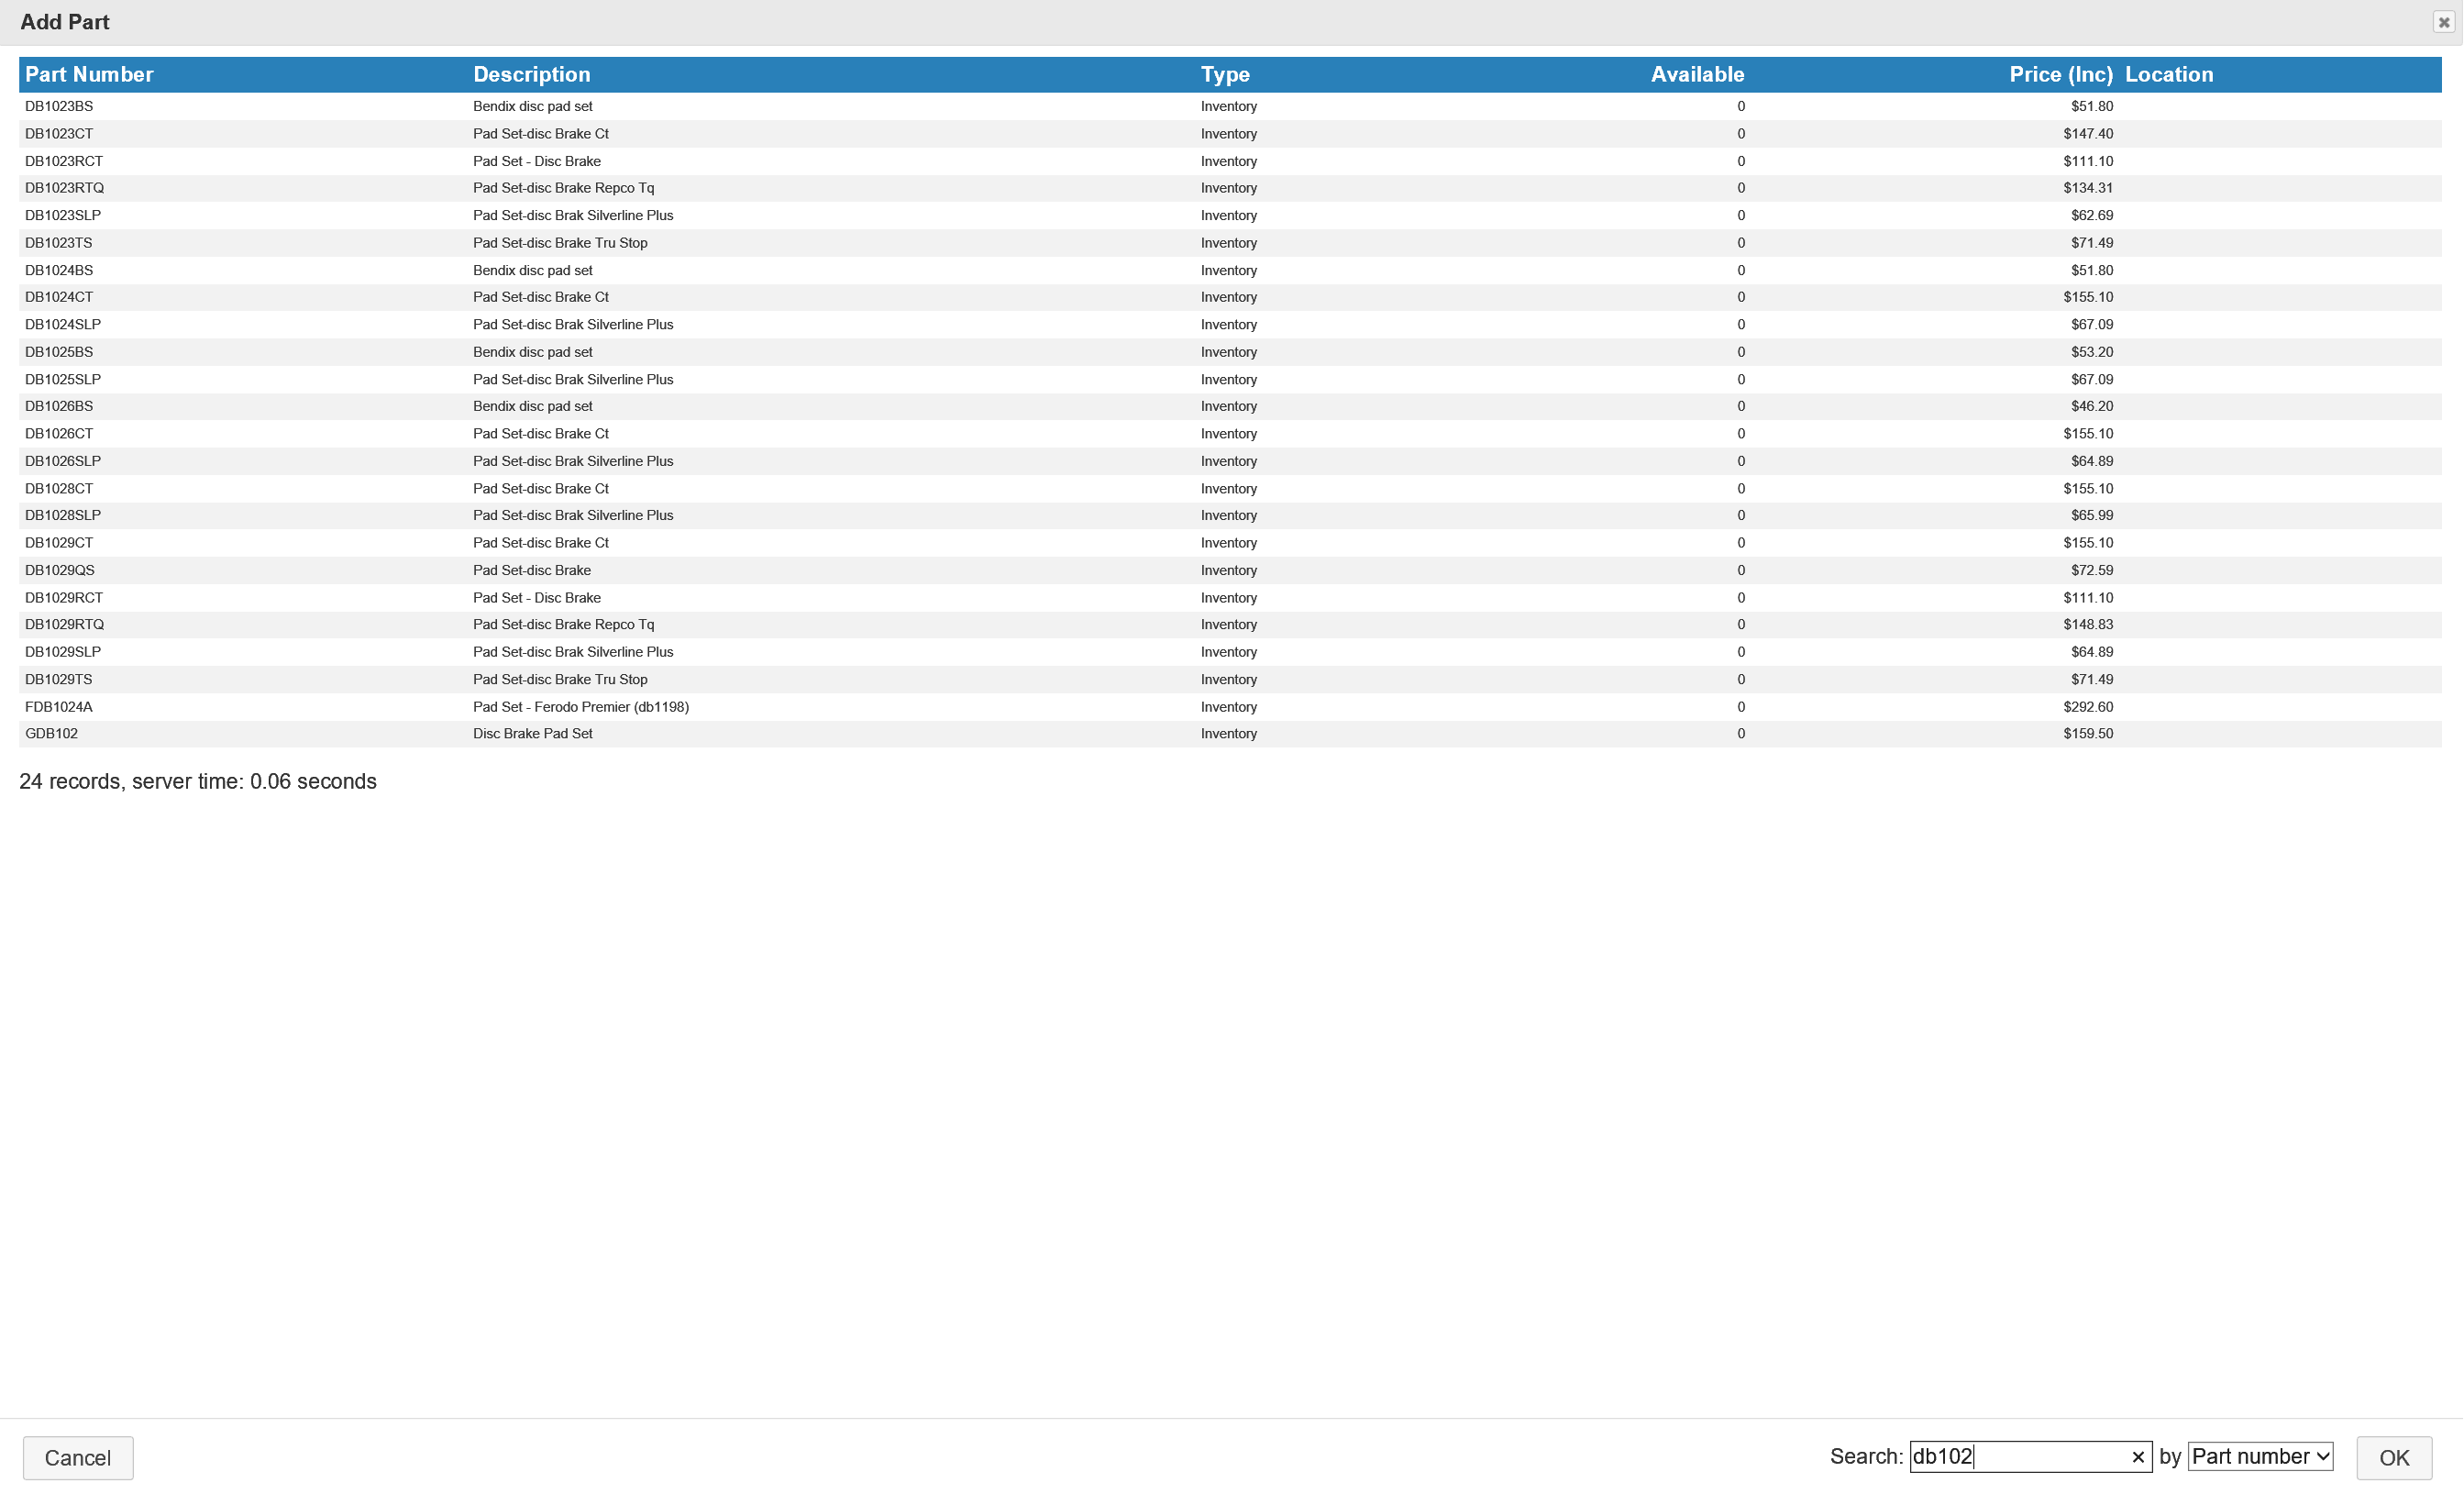
Parts, Adding: Highlight the service you wish to add the parts to, select the add part option from under the parts and labour section. From this screen you have a search option that allows you to search by part number, description or both, the selection is located to the right of the search field at the bottom of the add part form.

To select the parts required on the record you will see the item listed at the top of screen. You can select single or multiple records, to paste into the job card select the OK option down on the lower right hand side of the form.

Note: It is not possible to add Buy-in items directly to the job card, on selection the following message is displayed - Buy-ins can't be processed from the remote job card. It is suggested you raise an order request for admin to process Buy-Ins or convert them to inventory. Please process buy-ins via a desktop on your network.
Parts, Deleting: To delete a service highlight the record by tapping on the line, next select the remove function located at the bottom of the parts and labour section. All parts associated with the service will be removed.
Services, deleting: To delete a service from the job card highlight the record by tapping on the line, next select the remove function located at the bottom of the parts and labour section. Removing a service will also remove the allocated parts from the job.
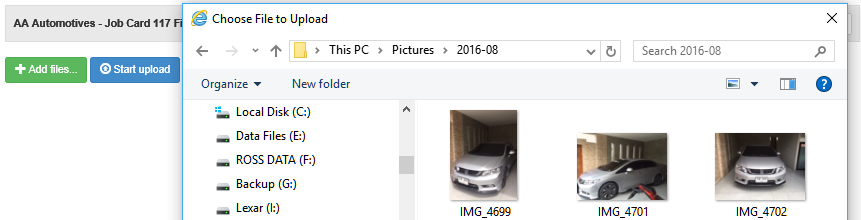
Files Function: Select the file option (Camera Button) from the job card, from the display click on edit you are taken to the Automation Online Photos upload page here you will see the options in the screen below.

To add photos or files, select the add files option you are now able to navigate your PC and select files for upload.
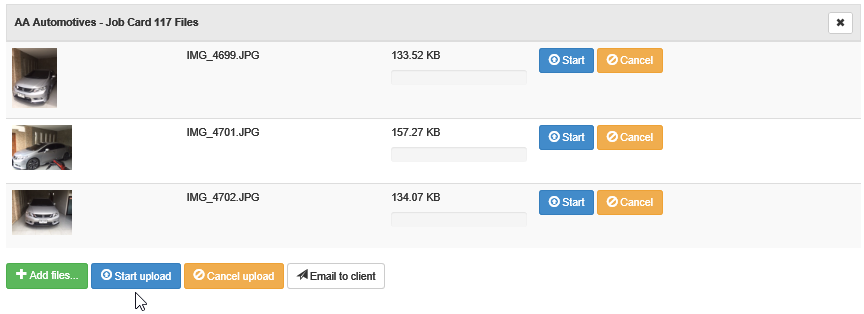
Once you have made your selection click OK (F12) you can now see a list of your photos and files including thumbnails. You next need to select upload to move the files from your local machine to the web database, as these are uploaded you can see progress bars, if you wish to only upload individual photos or files click on the start option adjacent to the thumbnail and file name.
When the files have uploaded you will see a similar screen that has extra options, the ability to select a photo or document for emailing and a delete function against each individual entry. To delete an entry simply select the delete option.
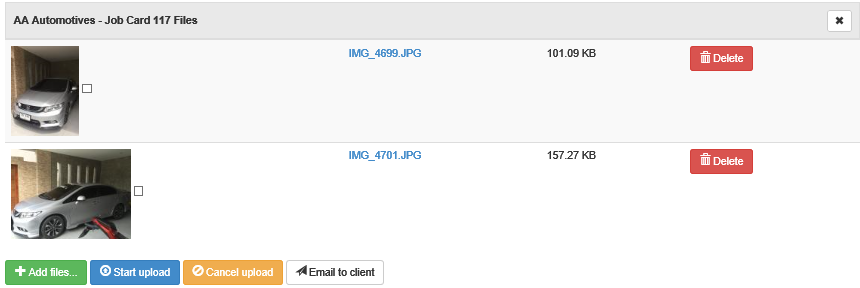
Emailing From The Remote Server: To Email files and text to a client point and click on the checkbox located next to the thumbnail, next select email to client, type the text you wish to send. The client will receive the email displaying the files, your text and contact details that can be used to contact you either via phone SMS or email (we include your email address in the body of the email).
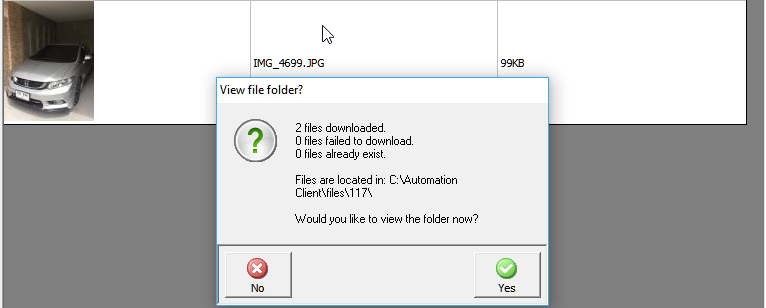
Downloading From Remote Server: Using a remote database allows you to download selected files and store them locally according to job or certificate number. To download a single file or multiples perform the following. Open the job card, click on the files icon (if files are present you will see a red exclamation mark on the icon), from the file display select download the files will be saved on your local drive in C:\Automation Client\Files, the name of the folder will be the job number or the certificate number (if you created one). A message will show you the path, giving you an option to view the folder.
Roadworthy, Jobs: Open a new job card for the roadworthy you wish to perform, select the files option, from the files form, select certificate the certificate form will display, type the certificate number into the available field and save using OK (F12). You can now reopen the certificate at any time from the job card via the files option.

Note: Once a certificate is created a red exclamation mark is visible on the certificate option, to upload / download photos and files reference the notes according to your server type.
Pro-Link / Repco Integration: Microbase in conjunction with Repco Auto Parts and Coventrys have developed a seamless interface that allows Repco and Coventrys customers to order parts on-line via their local purchasing module. Parts identified by Repco or Coventrys part numbers within the Automation stock listing can be selected, placed on a purchase order and transferred directly into the Repco ordering system. The interface constitutes “push and pull” architecture allowing the amalgamation of parts sourced from within Automation or from Navigator to be appended to the final Automation purchase order.
In addition parts can be sourced directly from the job card via the Navigator / Pro-Link interface, any selections where there is no stock on hand within the Automation parts listing will result in the purchasing module creating an order for transfer to Navigator / Pro-Link.
To complete the Repco / Coventrys functionality Automation Premium interfaces with Smart Estimate facilitating the download of servicing information either onto a job card or estimate. The manufacturer’s checks for the service type are also imported into Automation.
Navigator Interface Settings: To initialise the interface you must be a Repco / Coventrys customer with a valid account that allows you access to Navigator / Pro-Link and Smart Estimate. Currently you will use a site code, username and password to activate the Repco / Coventrys applications, these need to be entered into on-line settings within Automation, when recorded you will have a seamless entry to Navigator / Pro-Link Smart Estimate. The instructions on how to use these ordering systems interfaced to Automation can be referenced from the Help module for Automation Client.
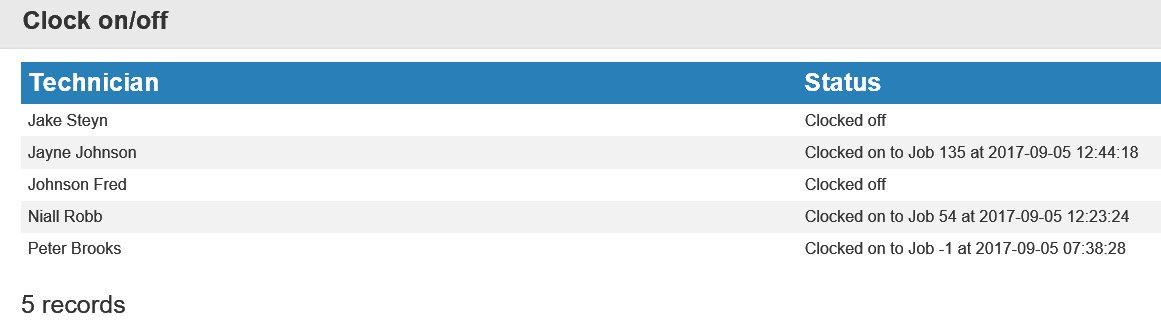
Clocking On / Off Technicians: The on-line job card allows for easy clocking on / off of technicians directly from the selected form. To clock a technician on / off a job select the Clock on/off function located to the right of the task bar under the parts and labour section. On opening you will see the current status of each technician regardless of which job they are currently logged onto.
To clock a technician onto / off of the open job, simply highlight technician’s record and select OK, a confirmation screen is displayed. The message will include the job logged off of (if any) and confirm the technician is logged onto this job. Note: it is only possible to log on / off technician for the job that you currently have open.
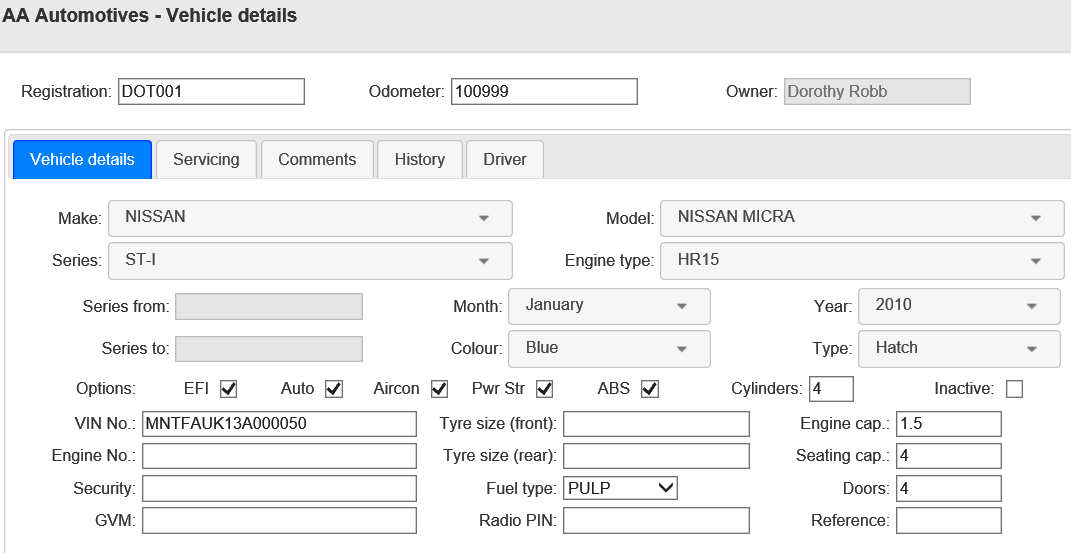
From the on-line job card you have full access to the vehicle record, to view the vehicle form tap on the vehicle button located on the bottom task bar.

This option gives you full editing access to all tabs on the vehicle form.
Editing Vehicle Records: To edit simply tap on the down arrow to the right our free type in the fields provided. To view servicing, comments, history and driver information tap on the tab at top of form. All fields are able to be edited from the on-line job card.
To view previous completed jobs tap on the arrow to the right of the history option located on the bottom task bar, you can move back and forth by using both the forward and back arrows. Closing date is displayed in red on the upper left hand side of the screen.
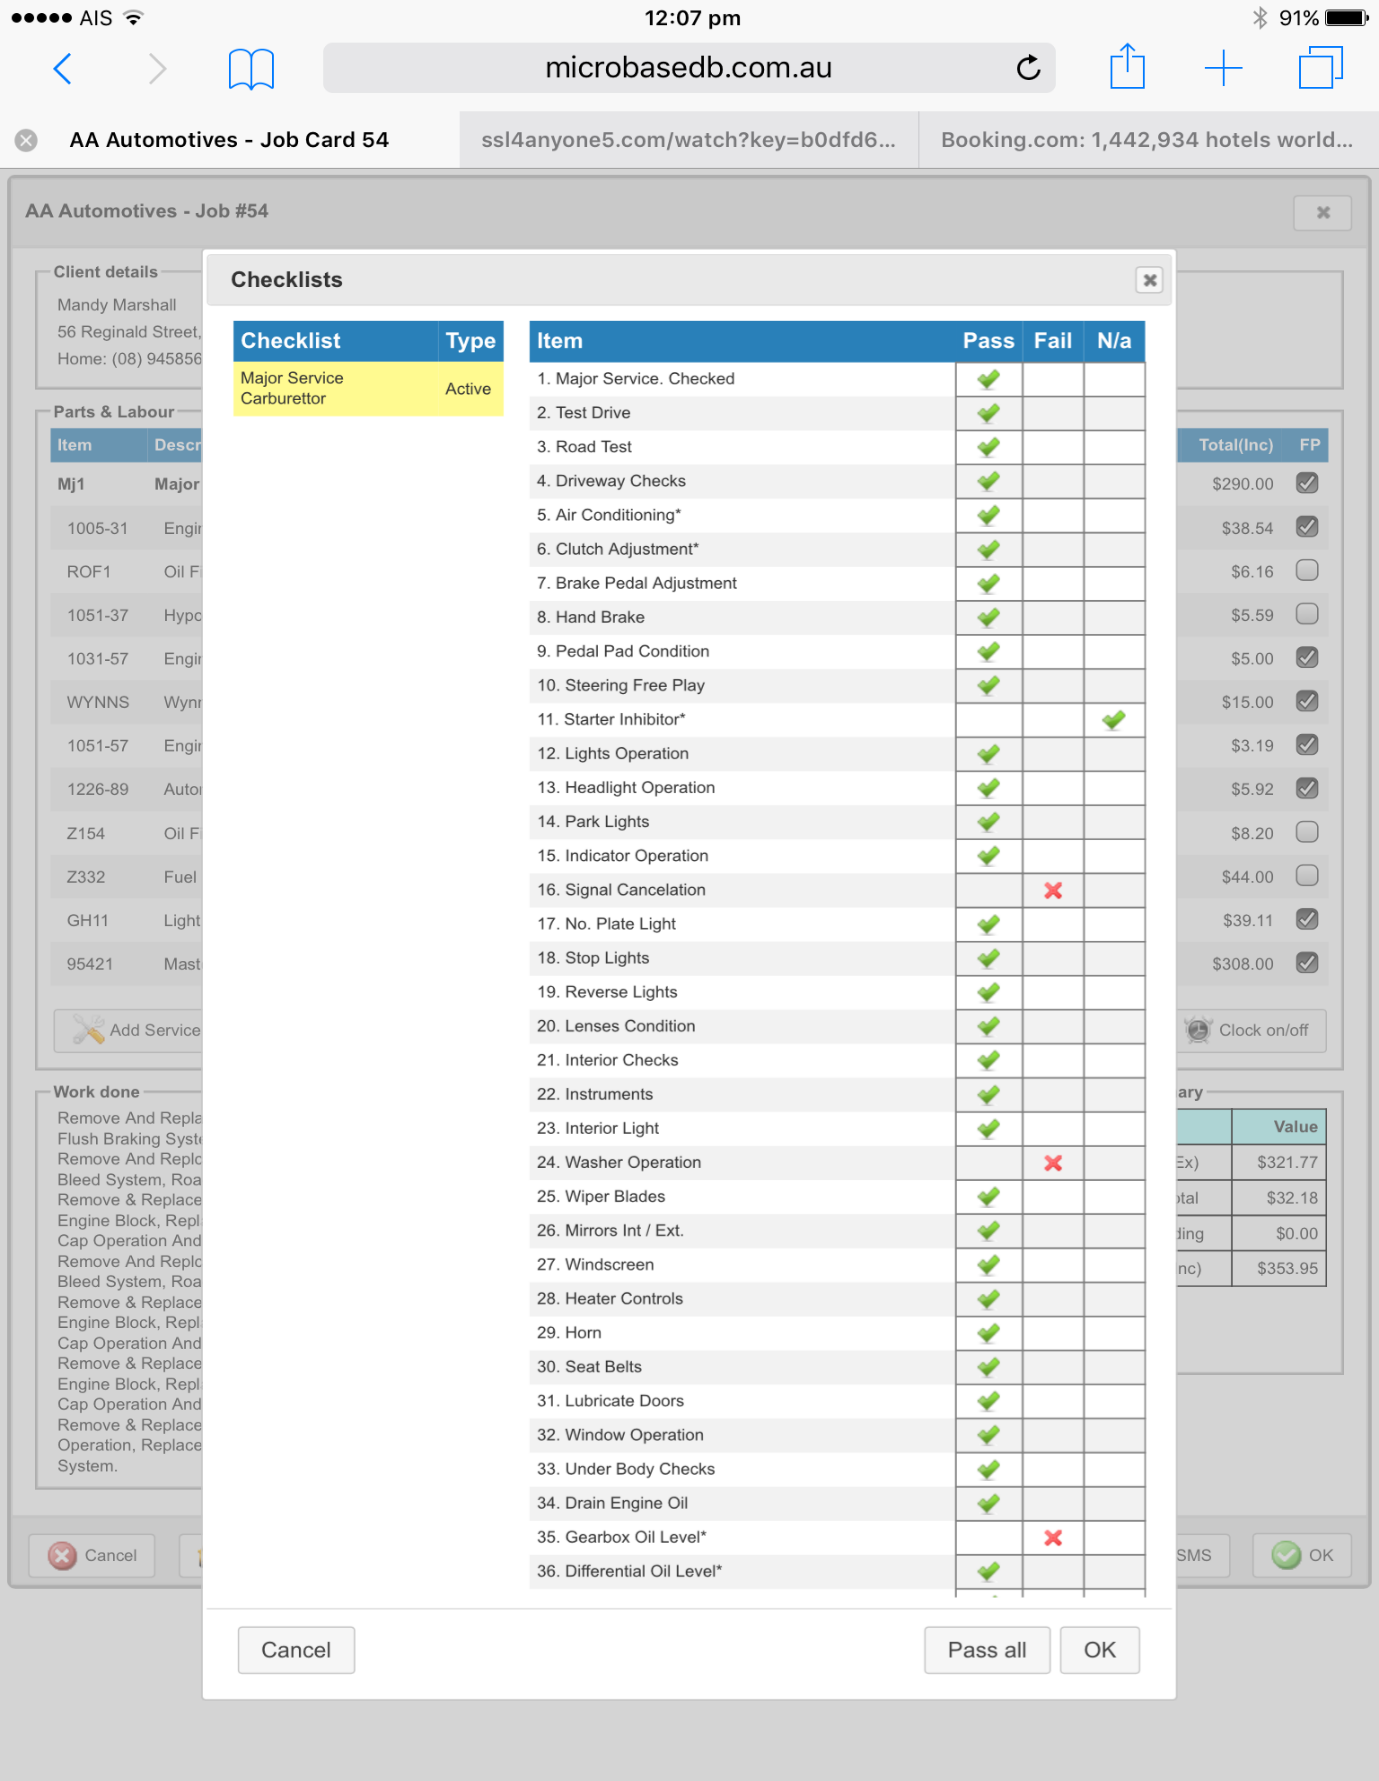
For checklists to function you must first have a service on the on-line job card that has a checklist attached, to instructions please reference the Automation Premium help system. Checklists are selected by tapping on the option from the bottom task bar.
If the checklist is inactive you are unable to select results for each checked item. Alternately if the checks are active you will have the ability to select whether the item has passed / failed or is not applicable to this particular vehicle by tapping on the required cell.
Note: If most items pass you can select the pass option from the bottom form then simply edit those items that are classified as a fail or not applicable.
On the left had side of the checklist display you will see a list of checklists attached to services entered on the job card. The table also indicates whether the list is active or inactive.
The remote job card communicates close requests and orders back to the node machine (Admin), it is not possible to close the job on-line however you can initiate a close request so the job close procedure can be performed from any terminal running Automation Client.
To send a request select the close option from the bottom task bar, from the close prompt request select yes, on this command a request is sent to the main database. To indicate a job is finalised and due to be closed you will see the background colour behind the job number on the diary screen displays in red.
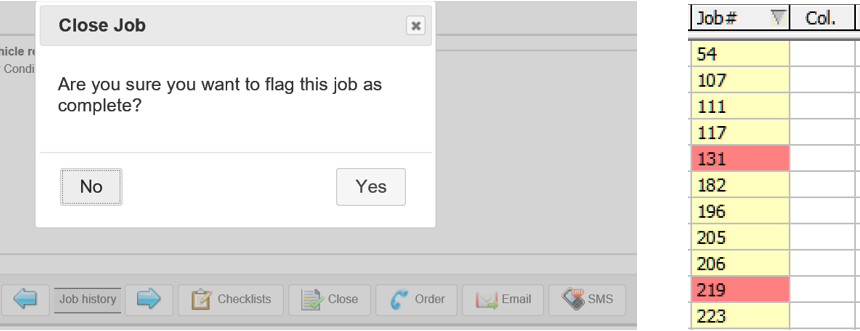
Once a job has been flagged to be closed and the request has been received by the admin machine a note is visible at the top of screen indicating to technicians that the job is flagged to be closed by admin.

In addition when a job has been flagged to be closed if a technician attempts to add parts or services a message will inform him that the job has been flagged to be closed.
There are two note types available directly from the job card, job notes and tech notes.

Booking notes created from the diary on the terminal machine will flow through to the on-line job card, these nates can be appended either on the client computer or on-line job card and can be viewed from either application.
Booking Notes, Creating: To create or append an existing booking note select the note option from the bottom task bar, a text screen is in view, previous notes are visible to edit simply type in the field and save with OK. The notes are now accessible from either the on-line job card or the diary screen of the client machine.
Tech Notes, Creating: Creating technicians notes requires the Tech notes option to be selected, a text field allows for entry again these need to be saved with OK. Note: Tech notes are only available from the job card either On-line or the client machine.
You can email the client directly from the on-line job card, firstly ensure your email settings are correct in your desktop version of Automation client as the email function accesses the node (admin) machine. Tap on the email option from the task bar you will see the recipient name and email address which are recorded on the client form. Type your message into the text field, select OK, a confirmation message is generated which includes the name of the machine set as the node.

You have access to SMS functions from the on-line job card, additionally you can access any pre-set message created from your desktop machine.
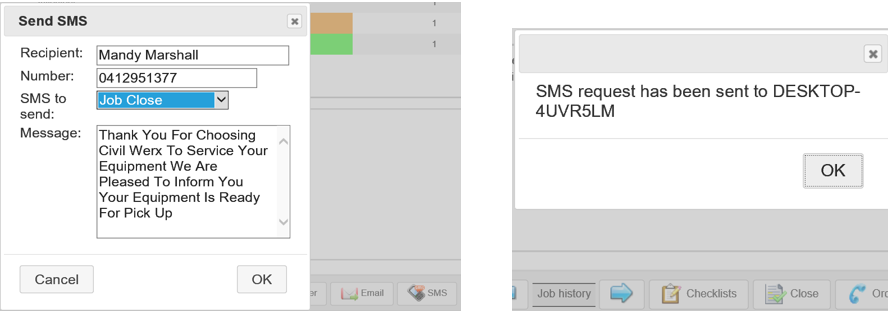
To send a text message from the bottom menu bar tap on SMS the send SMS form displays from here you can select a pre-set message by tapping on the arrow to the right of the SMS to send field. Alternatively type a message into the text area and select OK.
A confirmation message is generated which includes the name of the machine set as the node.
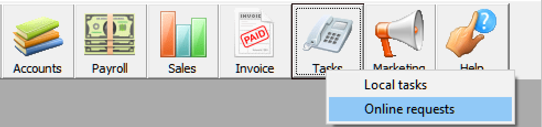
Selecting the task option from top of screen will display two option, firstly local tasks which on selection will open the task options. The second titled online request gives you access to your on-line job card communications function.
Online Requests: Online requests consist of three types, job close, order and deletion. The job close request on selection will take you directly to the job which requires closing, when the job has been finalised the request will no longer be visible from the communications screen.
Orders can be processed simply by selecting the order line item, if the technician has specified a supplier you are taken directly to the purchase order form if not the admin machine will need to select a supplier and then move forward to the purchase form.
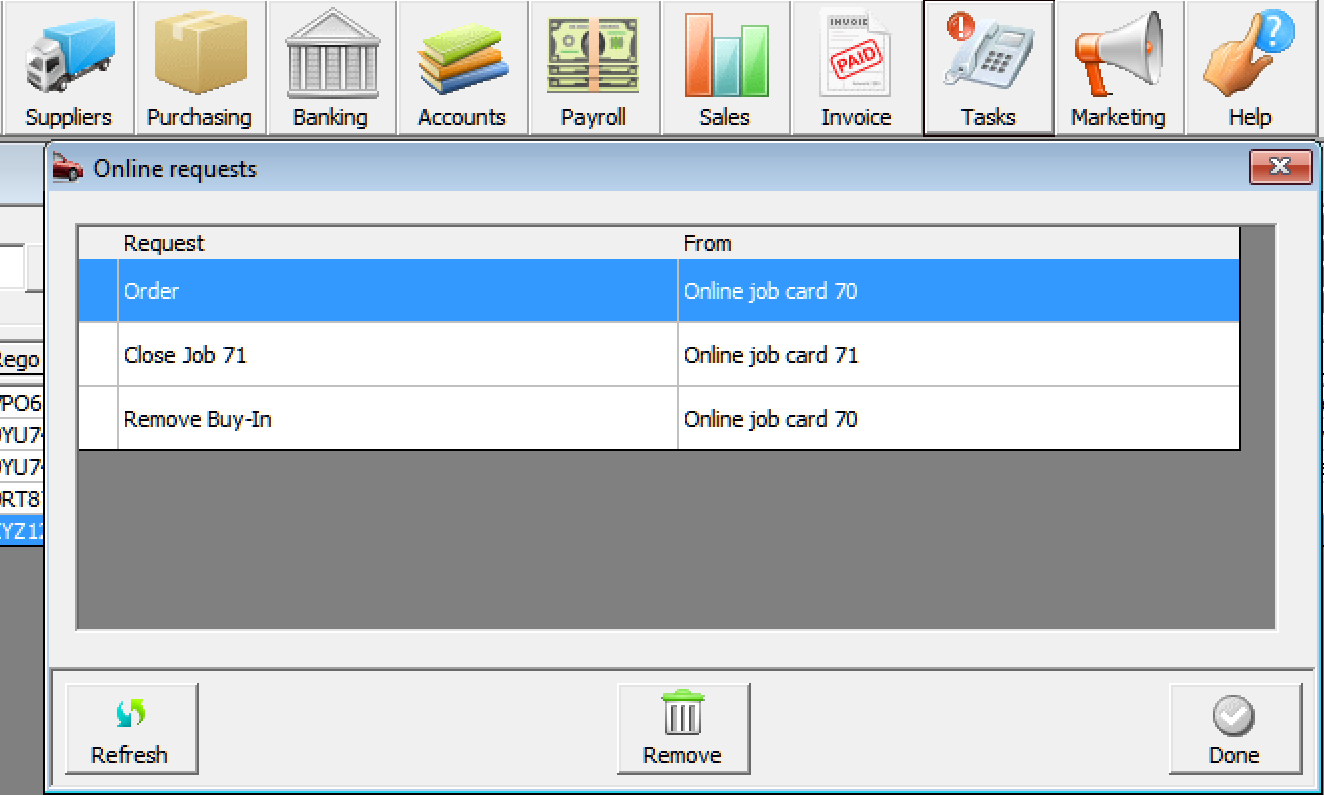
Finally, deletion request for buy-in items, selection will take you directly to the job card displaying details of the item to be removed and highlighting the line item, simply select OK, remove and the option you wish to use from the credit options.
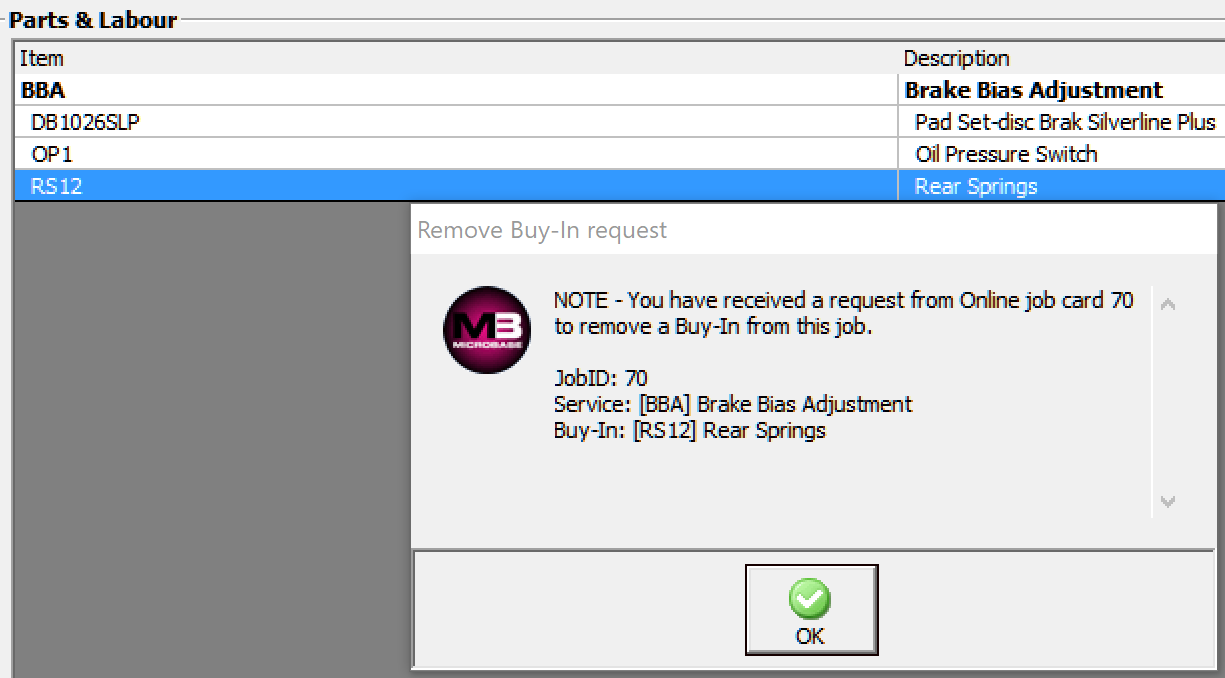
Once the task is complete the request will be deleted from the On-line requests display.Note: When tasks require attention an exclamation mark is visible on the task bar icon.
To prevent miscommunication between the online job card and admin machine when a job card is being accessed by more than one user we have introduced a warning on both the online and local job card.
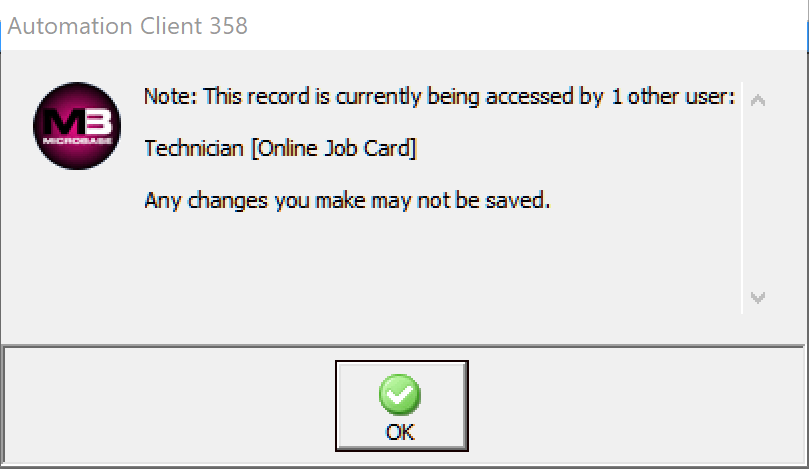
The message is informing you that the same form is open elsewhere on the network. Automation will also identify the user / users that have the same form open. In the example above the technician has an online job card open.
Note: Please bear in mind that if you decide to proceed you will have to decide on saving the form which data set you are going to retain. It is advisable that you do not work on a form that is already being accessed by another user as multiple data entries can’t be retained.
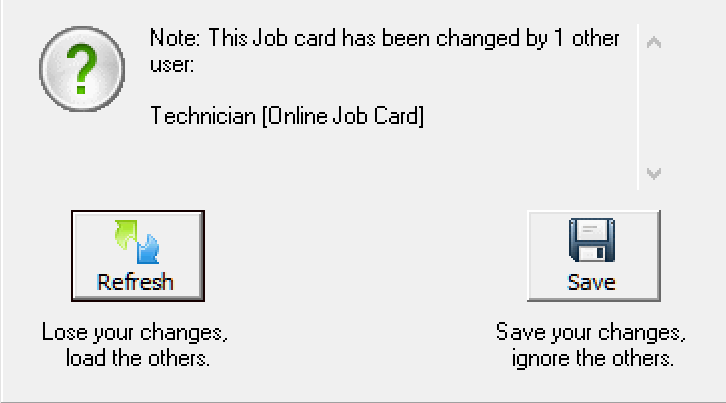
When a user attempts to save the same job card that has been open on another device with changes that have been save you will be requested to choose which data set you wish to record. Selecting refresh will overwrite any changes made on the terminal form with the current data from the other open job card.
Selecting save will retain the entries, however you will lose whatever changes have been made on the other open form.
Your on-line job card unlike the terminal does not have purchasing functions it does however have the ability to identify parts that are required (out of stock) and create purchase requests that are transferred to the node (admin) machine for processing.
The orders when actioned from the admin machine will change the status on the job card to ordered, once the items are received and the purchase order satisfied the on order status will no longer be visible for inventory items for buy-ins the status will change to completed.
The order request allows a technician to select specific parts to order from a specified supplier, the user has full access to the supplier listing and if required can send multiple orders for each individual supplier.
You can populate the job card with parts from either your parts listing or via the integrated purchasing links via Repco or Coventrys. To generate an order you must have parts that are not available, these are indicated by being flagged as inventory highlighted in red.

The parts that are indicated as being out of stock can be added to an order request, the order field is populated once the purchase order is created so the technician knows those parts are in the system awaiting arrival.

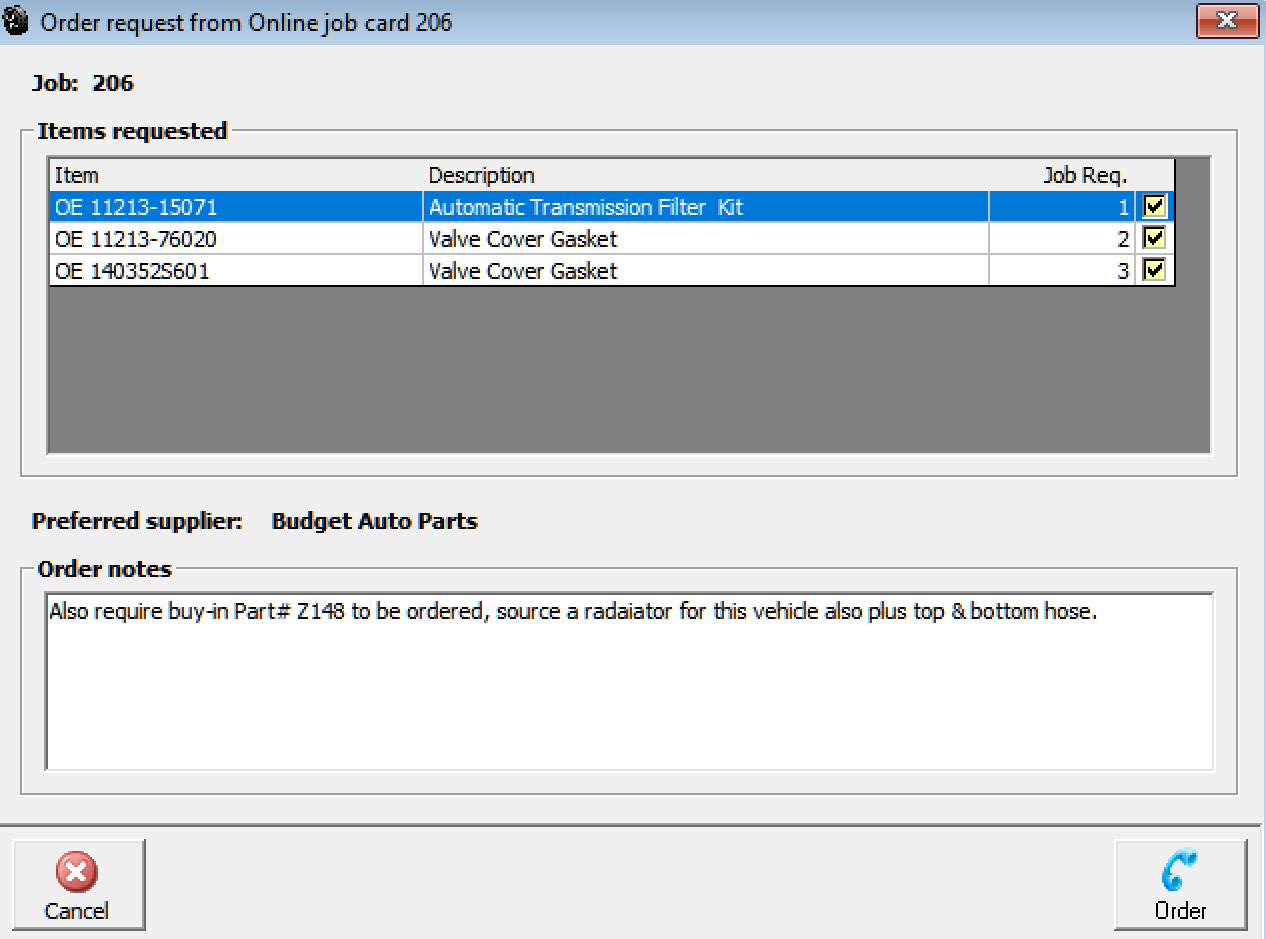
To begin the process select the order option from the bottom of the job card, the order request form is now in view, by default all parts are selected, if you do not wish a part to be on this request simply tap on the selection box, the tick is erased. Over to the right you have a quantity option if you wish to order more than the suggested requirement tap on the cell and edit the value.
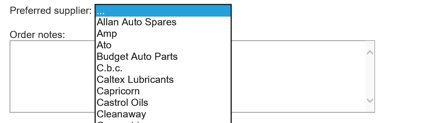
Supplier Selection: the request can be sent without selecting a preferred supplier, in which case the operator of the admin machine will have to decide from which supplier the parts need to be sourced. If the technician already knows which supplier to use it actually simplifies the process as the admin machine can import the parts straight onto a purchase order without accessing the supplier listing.
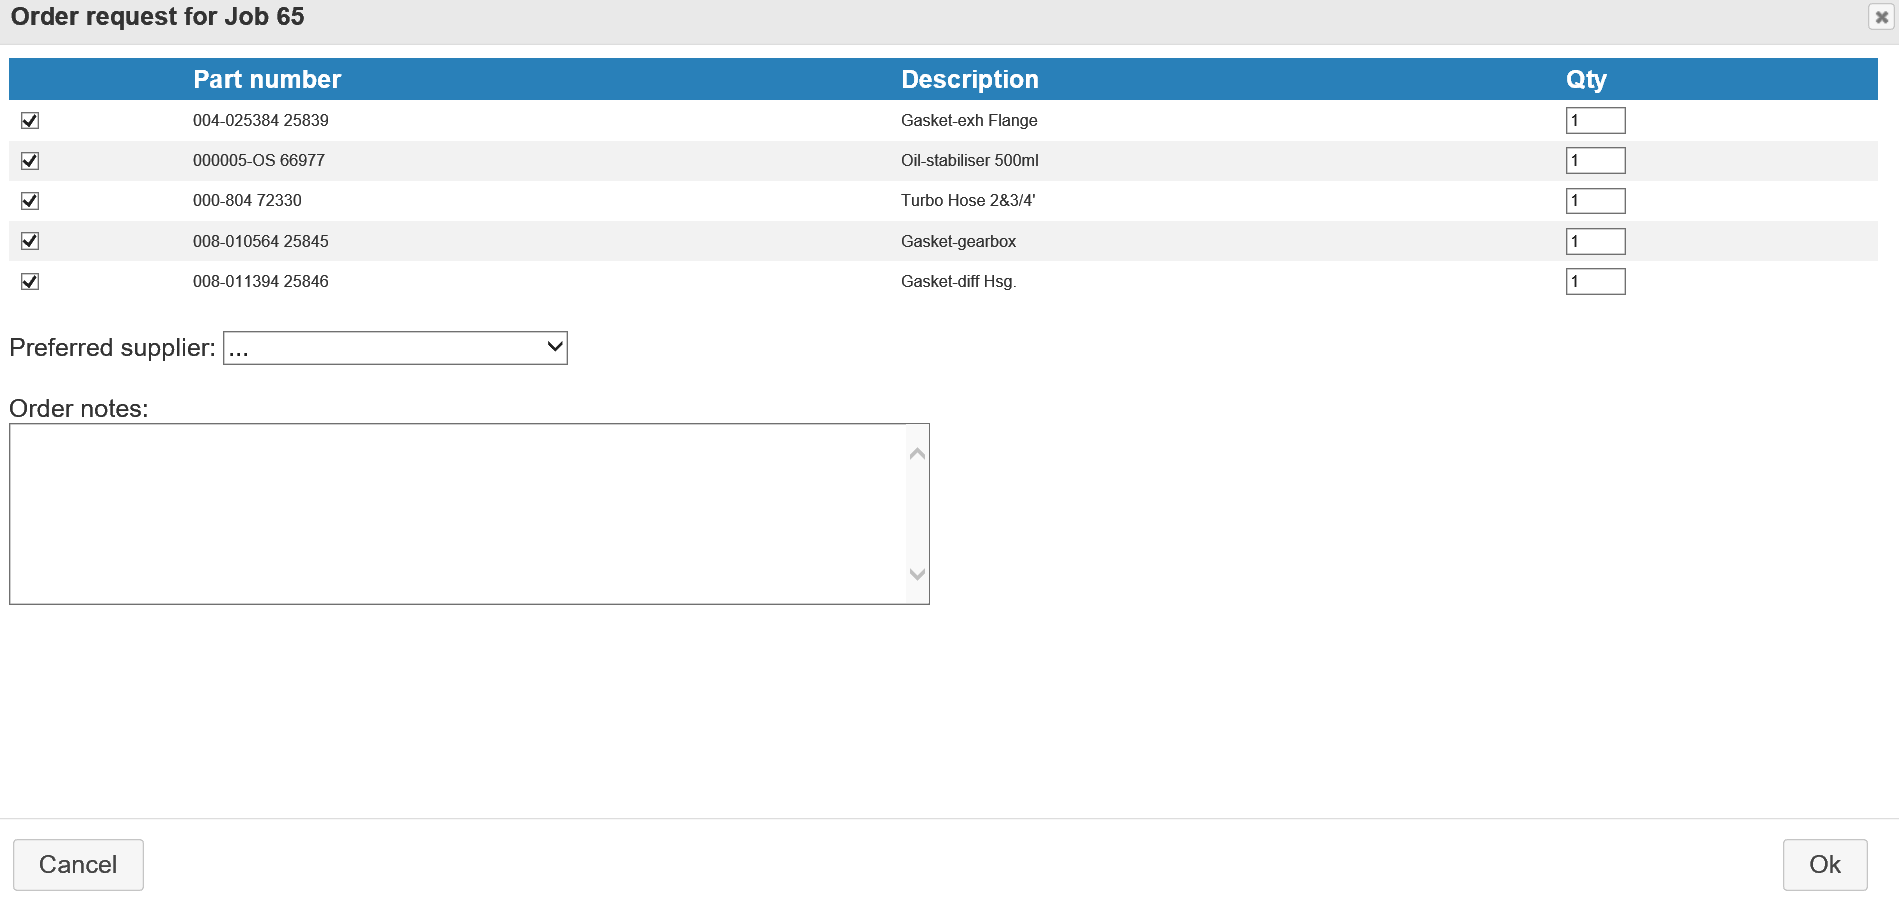
To select a supplier tap on the arrow to the right of the supplier field, your supplier list displays, scroll down or type the first letter of the supplier name, once the record is located tap to insert into the supplier field.
|
. |
Notes can also be added to the purchase request, this is a free typing field that is meant for extra instruction to the admin staff when ordering items
As previously mentioned it is not possible to place buy-ins listed in parts directly to the job card, they are visible for reference purposes only. If the technician requires a listed buy-in to be purchased he will need to make a note of the part number in the text area and send the request through to admin so the purchase can be processed in the normal way with the part being assigned to the job.
The technician will of course see the item on his job card with the order status indicating ordered, once the part is received and the purchase order converted to a bill the status will change to completed and be highlighted green, the technician then knows the item is available.

Order requests for items where the part number is unknown will require the technician to use the order request form as a note to the admin machine, a request should include a description of the part required and if known which supplier to source the item from. There is no need to enter the job number as the order request will display this information. The technician should then monitor the job card to ensure the part has indeed been ordered.

Receiving Requests: Only the node (admin) machine will receive the order requests, the orders will take approximately 15/30 seconds to transfer. The order request form includes the job number, item, description, job required quantity plus an order notes section.
Parts that are extracted from your listing or via a Repco / Coventrys download from Navigator or Pro-link order if the technician has chosen a preferred supplier the items can be inserted directly to a standard purchase by selecting the order option at the bottom of the form. If no supplier is selected by the technician the admin machine on processing will be presented with the supplier list and a selection is required before moving onto the purchase order.
In the case where no supplier selection has been made it is possible to de-select items from the list and apply only those items to the purchase order. Multiple purchase orders can be raised for parts required, the order request on processing the first PO will remain open until all parts are allocated.
The order request in the example below has been converted to a purchase order, the order can now be send directly to the supplier or processed via Navigator or Pro-Link.
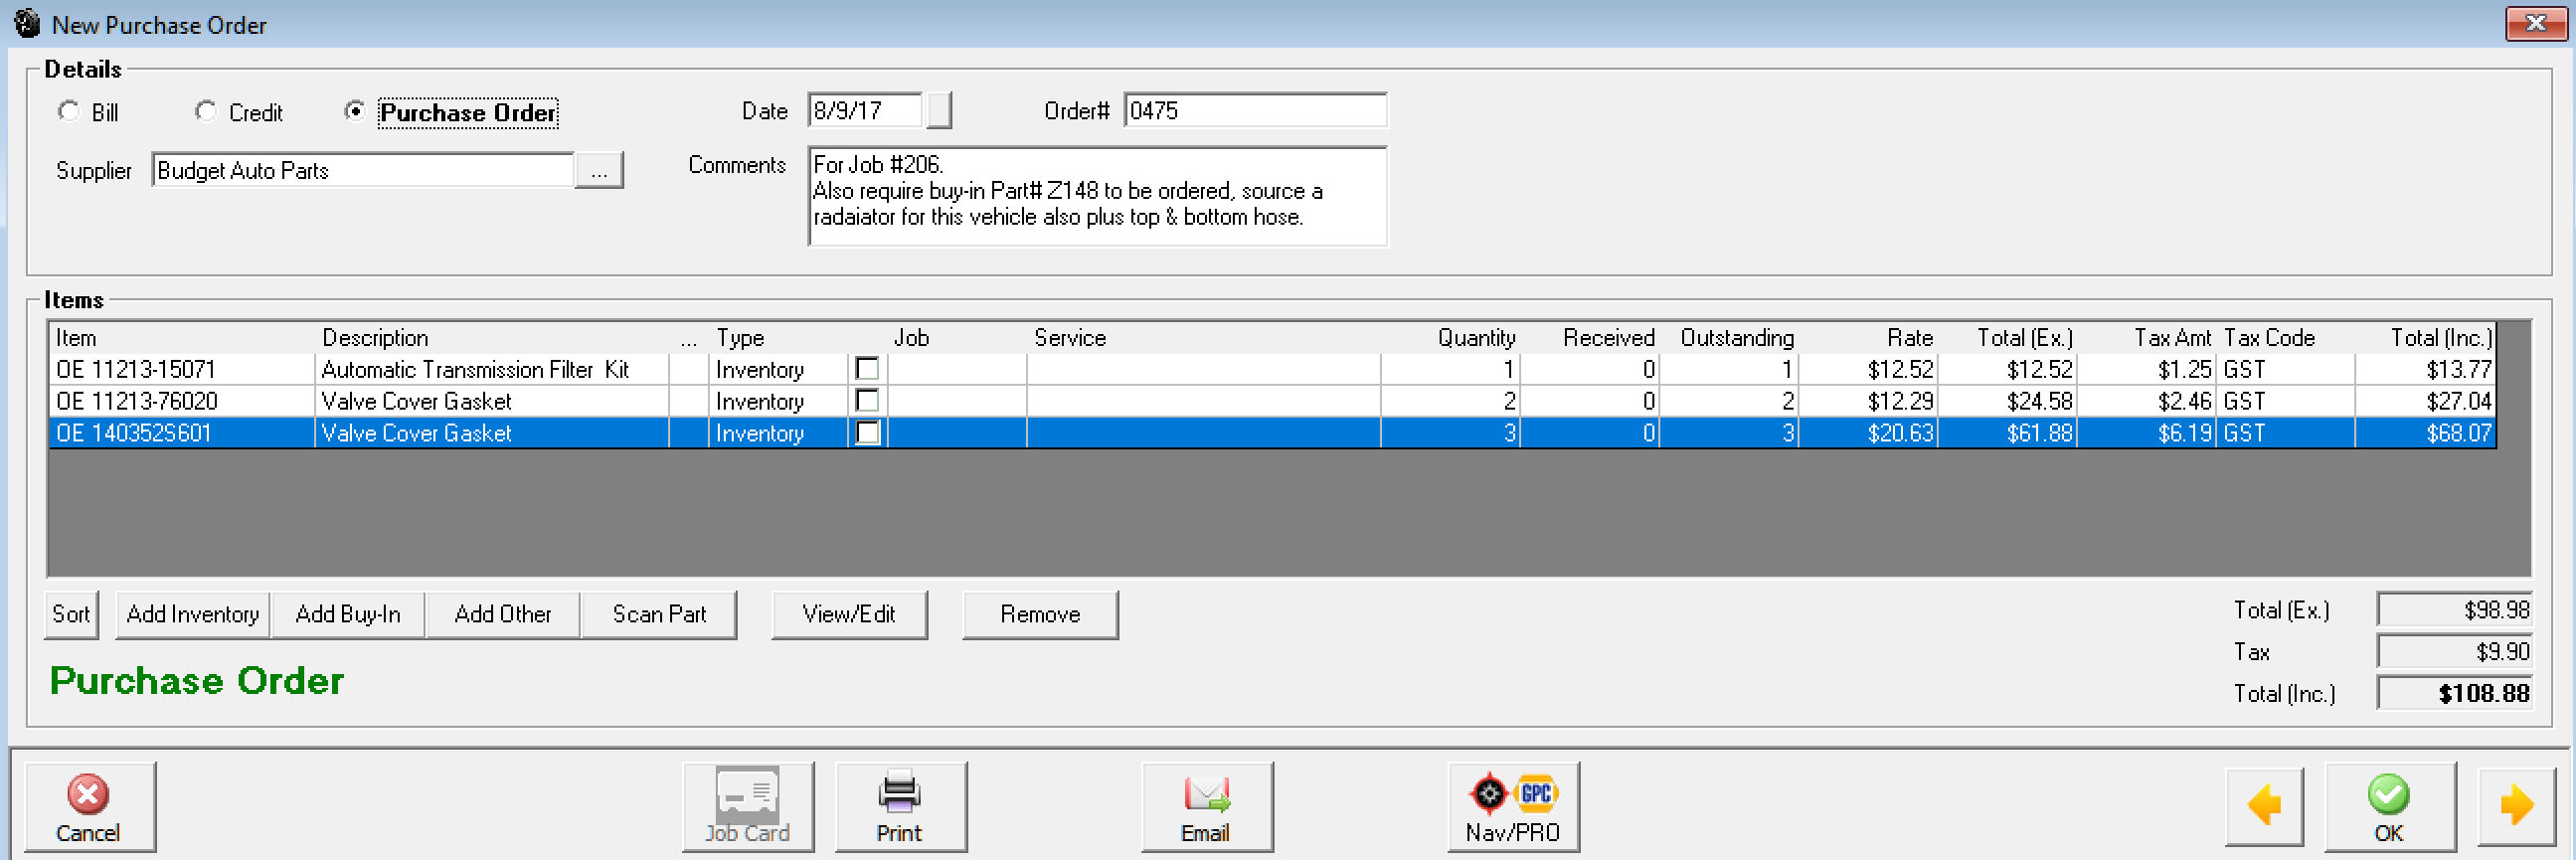
The technician once he refreshes the job card will see the parts are flagged as ordered, once the items arrive and the purchase order is converted to a bill the order status will no longer display on the job card.

Buy-ins need to be processed from the node (admin) machine with the purchase order being allocated to the specific job, the technician can then track progress of delivery. Once a buy-in is processed the status will change on the job card to complete with the background colour changing from amber to light green. The technician then knows the item is available for fitment.
Order Requests, Cancelling: Selecting the cancel option from the purchase request will display a confirmation message, selecting no will place the order back in the que for processing later, yes will delete the order entirely.

Overview: The Automation Premium online job integrates with Smart Inspector via the Repco and Coventrys ordering systems. Features include the ability to upload client and vehicle information directly to Smart Inspector, link a completed inspection to a job card and monitor job progress plus view completed checklists including any attached photos. Note: That if you wish to email the checklist link to a client this must be done from a terminal.
For sites using the on line job card estimates can be viewed the same as open jobs with exactly the same links available to the technician.
The following instructions use screen shots from Pro-Link, the procedures are exactly the same if you are a Repco customer and use the Navigator interface, the job card will present both options (if setup) you simply choose Navigator instead of Pro-Link.
Your online job card has direct links to Smart Inspector, if you have both options completed in site settings / online (admin machine) you will see links to both interfaces, if only one is selected you will have one choice. To upload client and vehicle information point and click on inspector a confirmation message displays, select yes to proceed.

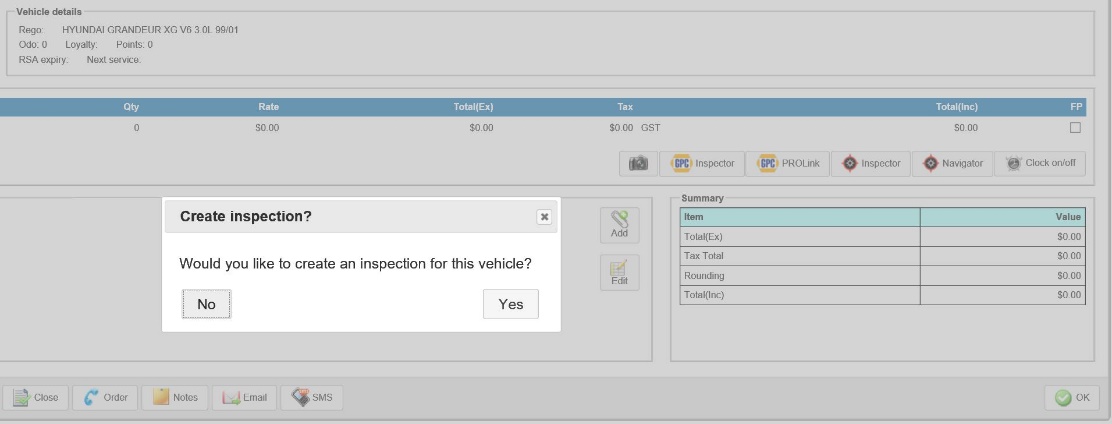
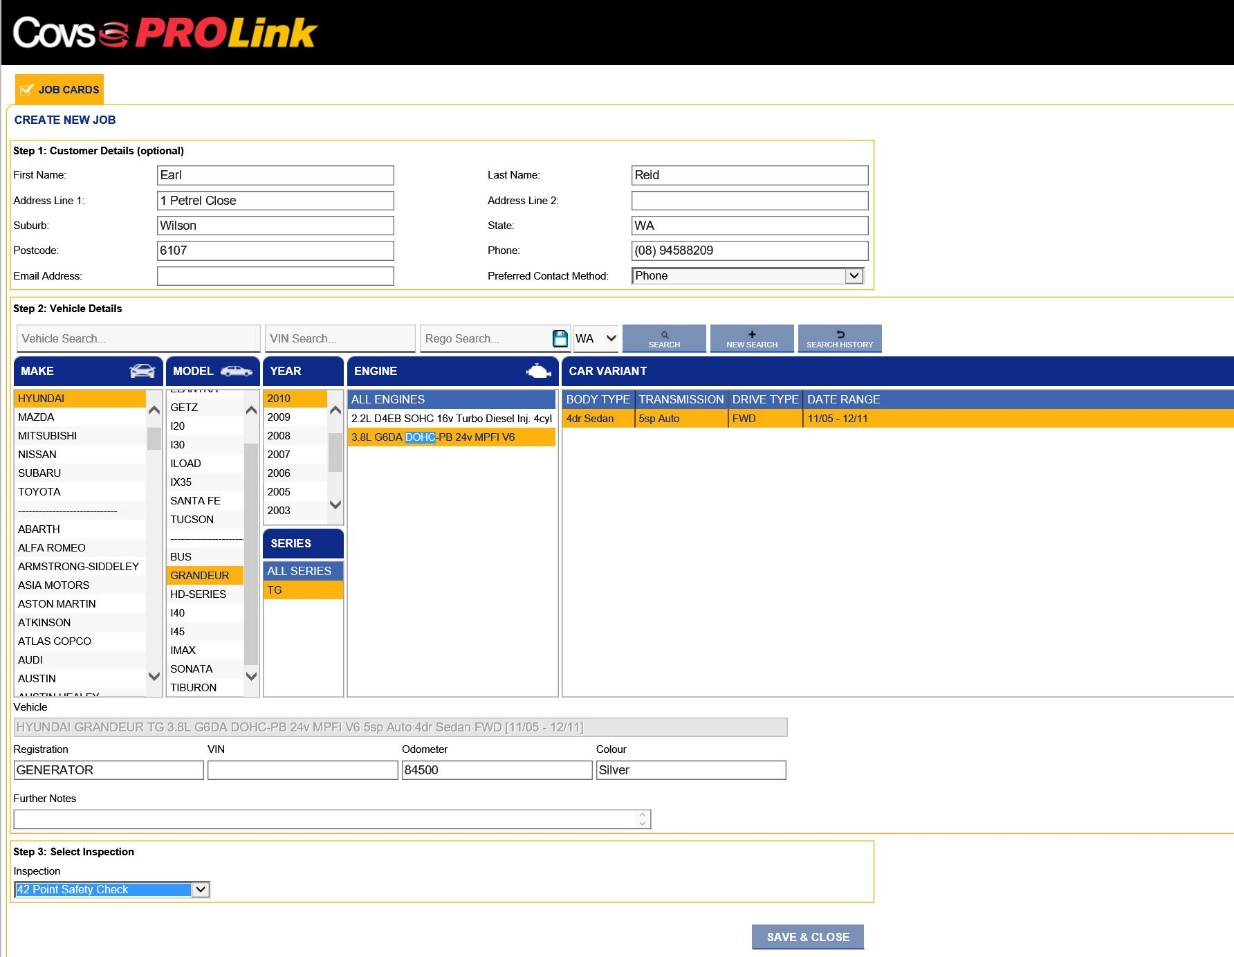
In Smart Inspector / Job Cards select the correct vehicle make, model, year, engine and variant, select the type of inspection you wish to perform, finalise with save & close. The inspection is now created listed in the incomplete section of Smart Inspector jobs, Pro-Link (or Navigator) will now close and return you to the Automation online job card.
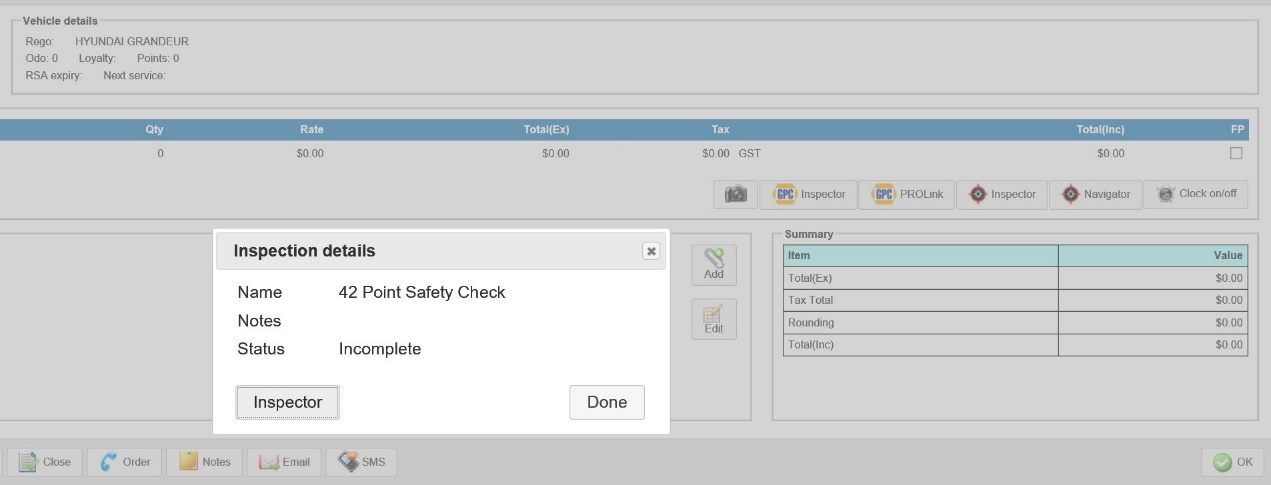
Clicking on the inspector option once an inspection is in progress will display the check title, notes and status, selecting inspector from this message will take you back to the job card information.

You now need to log into Smart Inspector select the incomplete list find the check and complete including the selection of any parts required.
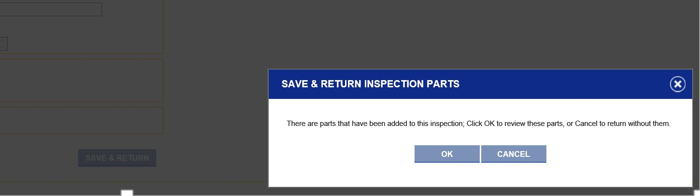
It is important that you return to Smart Inspector from Automation once the checks and parts selection are complete, this action will return the completed checklist to the job card plus allow you to move into Pro Link (or Navigator) to return the selected parts back to the job card / estimate. If parts are attached to a checklist you will see the message above select OK to return the parts.
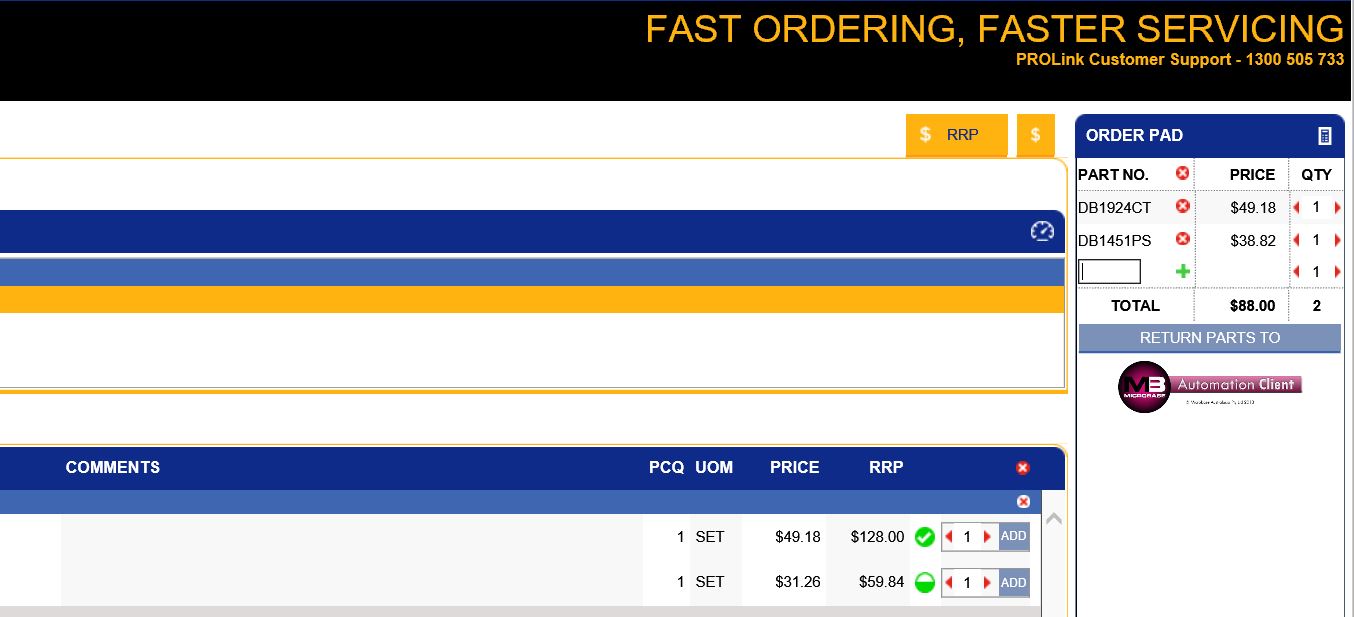
When you have completed your parts selection choose return parts to from the Pro Link / Navigator display. The parts will be paced on the job card / estimate and the status of the check will change to complete.
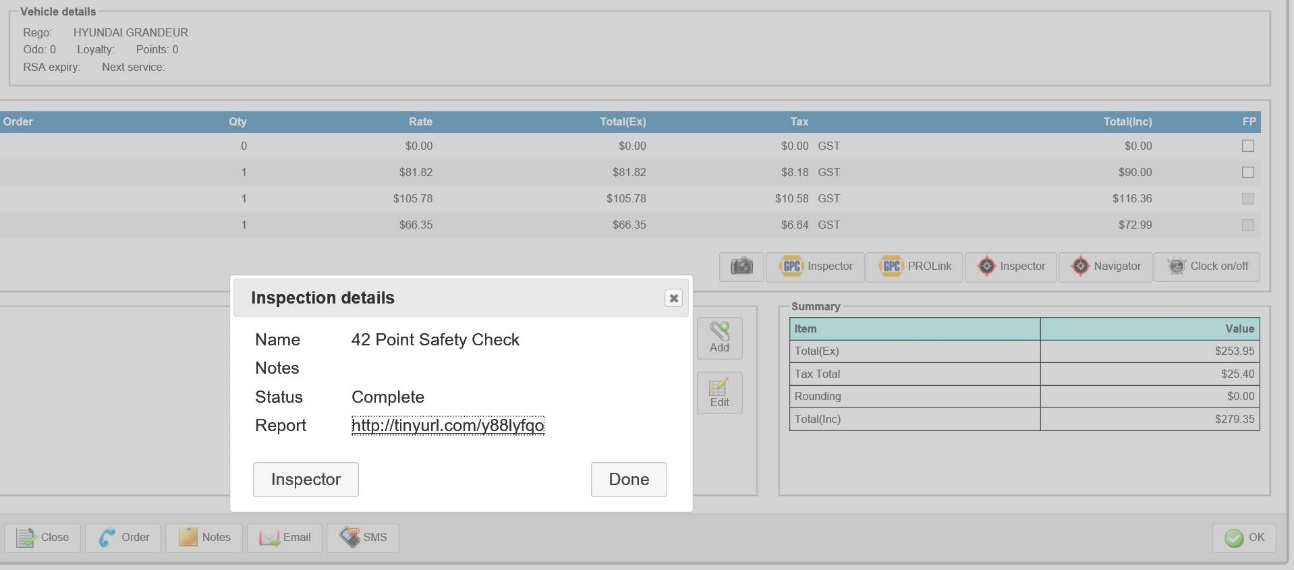
To view the checklist select the report link from the inspection details display, depending on how your system is configured you may be requested to view or save the file.